Table of Contents
There’s something almost rebellious about swapping your trusty tent for a tarp. Maybe it’s the ultralight freedom of shaving pounds off your pack, or perhaps it’s the primal satisfaction of crafting your shelter from a simple sheet of fabric. Whatever the draw, backpackers across the spectrum are ditching tent poles for trekking poles and embracing the versatile world of tarp camping.
But here’s the thing: making the leap from tent to tarp isn’t just about buying a piece of nylon and hoping for the best. It’s a fundamental shift in how you think about shelter, weather protection, and your relationship with the outdoors. The learning curve is real, but so are the rewards—once you understand what to look for and how to use it. This guide walks you through everything you need to know to choose your first tarp shelter without the confusion, frustration, or costly mistakes that plague so many beginners.
Top 10 Tarp Shelter For Beginners
Detailed Product Reviews
1. Pocket Field Guide: Survival Tarp Shelters
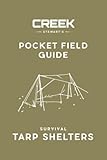
Overview: The Pocket Field Guide: Survival Tarp Shelters is a knowledge-based product rather than physical gear. This compact reference manual teaches essential knots, pitching configurations, and site selection for creating effective tarp shelters in wilderness situations. Designed for backpackers, preppers, and outdoor educators, it distills decades of bushcraft experience into a portable format.
What Makes It Stand Out: Unlike gear that can fail, knowledge weighs nothing and lasts forever. The guide presumably includes weather-specific configurations, tensioning techniques, and leave-no-trace principles often missing from online tutorials. Field-ready checklists and illustrated knot-tying sequences provide actionable intelligence when digital devices fail.
Value for Money: At typical guidebook prices ($10-15), this represents tremendous value compared to physical tarps costing $30-100. It transforms any cheap tarp into a sophisticated shelter system. For beginners, it prevents costly gear mistakes; for veterans, it serves as a quick refresher before expeditions.
Strengths and Weaknesses: Strengths include zero weight penalty, permanent utility, and comprehensive education. It works with any tarp you own and builds critical thinking skills. Weaknesses: requires practice to implement, can’t physically protect you in emergencies, and may duplicate free online resources. Physical books suffer water damage.
Bottom Line: An essential companion for anyone serious about tarp camping. Pair this knowledge with quality gear like the FREE SOLDIER or KALINCO tarps. For the cost of a fast-food meal, you gain skills that could save your life.
2. FREE SOLDIER Waterproof Portable Tarp Multifunctional Outdoor Camping Traveling Awning Backpacking Tarp Shelter Rain (Brown 10×10.5ft)
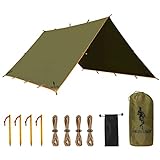
Overview: The FREE SOLDIER Waterproof Portable Tarp is a robust 10×10.5ft shelter designed for two-person camping. Constructed from 210T ripstop polyester with a 2500mm PU waterproof rating, it balances durability with practical coverage. Weighing 1.2kg, it includes four guy lines with tensioners and a stuff sack, offering nineteen guy points and five reinforced grommets for versatile configurations.
What Makes It Stand Out: The tarp’s heat-sealed seams and reinforced ridgeline demonstrate serious attention to weather protection. With nineteen attachment points, it configures into A-frame lean-tos, ground sheets, or hammock rain flies. The puncture-resistant fabric handles rough terrain, while the integrated tensioners simplify setup. This isn’t a flimsy emergency blanket—it’s a legitimate shelter system built for extended outdoor use.
Value for Money: At 1.2kg, it’s heavier than ultralight options but trades weight for reassuring durability. The complete accessory kit eliminates hidden costs. For campers prioritizing reliability over minimalist weight savings, this represents solid mid-range value. Comparable tarps often cost more while offering fewer attachment points.
Strengths and Weaknesses: Strengths include exceptional seam construction, multiple configuration options, and durable fabric. The nineteen guy points provide setup flexibility unmatched by basic tarps. Weaknesses: the 2500mm rating is adequate but not expedition-grade; 1.2kg may deter ounce-counters; brown color limits visibility for rescue situations.
Bottom Line: A dependable workhorse for car camping and backpacking where durability trumps ultralight concerns. The FREE SOLDIER tarp delivers professional-grade protection with setup versatility that experienced campers will appreciate.
3. FREE SOLDIER Camping Tarp Waterproof Portable Multifunctional Outdoor Camping Traveling Awning Backpacking Shelter Rain Tarp (Brown 13×13ft)

Overview: This 13×13ft FREE SOLDIER Camping Tarp expands coverage for two campers seeking maximum protection. Made from 150D ripstop polyester with a 3000mm PU rating, it promises enhanced waterproofing over its smaller sibling. Surprisingly, it maintains the same 1.2kg weight, suggesting either a specification error or significant material compromises.
What Makes It Stand Out: The expanded square footage creates a spacious living area for gear-intensive trips or taller users. Five additional feet of coverage per side transforms cramped quarters into comfortable shelter. The higher waterproof rating provides confidence in sustained downpours. Nineteen guy points across the larger surface enable complex pitching angles.
Value for Money: If the weight claim holds true, this offers exceptional space-to-weight value. However, 150D fabric is typically heavier than 210T, making the identical weight suspicious. For static basecamps where packed size matters less, the extra coverage justifies potential bulk. Verify specifications before purchasing.
Strengths and Weaknesses: Strengths include generous dimensions, superior waterproof rating, and versatile setup options. The larger footprint excels for group cooking areas or extended stays. Weaknesses: questionable weight specification, 150D may tear more easily than 210T, and the brown color absorbs heat. Packed size will be substantially larger despite weight claims.
Bottom Line: Ideal for campers needing maximum covered area who can tolerate bulkier packing. Approach with cautious optimism—confirm actual weight and dimensions. For genuine ultralight needs, consider smaller alternatives.
4. Azarxis Waterproof Camping Tent Tarp Hammock Rain Fly Footprint Ground Cloth Shelter Sunshade Beach Picnic Blanket Mat for Outdoor Camping Park Lawn (Army Green, 5 x 7 ft)

Overview: The Azarxis Waterproof Camping Tarp in 5×7ft army green is a compact, utilitarian groundsheet and minimalist shelter. Constructed from 420D Oxford cloth with professional waterproofing, it prioritizes durability over coverage. Weighing significantly less than larger tarps, it serves as a tent footprint, picnic blanket, or emergency bivy cover for solo adventurers.
What Makes It Stand Out: The 420D Oxford fabric offers surprising durability for such a small package. Multiple size and color options allow customization for specific needs. Metal grommet eyelets provide secure tie-down points, while the included storage pouch enhances portability. It excels as protective layer rather than primary shelter.
Value for Money: This represents budget-friendly insurance for your tent floor. Costing roughly half of full-size tarps, it extends tent lifespan and provides multi-use versatility. For ultralight hikers needing only a ground cloth, it’s economical and functional. Don’t expect four-season storm protection.
Strengths and Weaknesses: Strengths include exceptional portability, tough fabric, affordability, and simplicity. The 420D material resists abrasion better than thinner polyester. Weaknesses: 5×7ft is too small for effective overhead shelter, limited attachment points restrict configurations, and it’s inadequate for severe weather. Army green blends into forest floors—bad for emergencies.
Bottom Line: Purchase this as a dedicated tent footprint or minimalist sunshade, not as your primary shelter system. For car campers and festival-goers wanting basic ground protection, it delivers reliable performance at a bargain price.
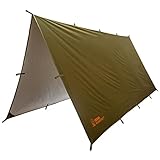
5. KALINCO Waterproof Camping Tarp Tent Hammock Rain Fly, 10X10FT/10X15FT, Mutifunctional Tent Footprint Lightweight Tarp for Camping, Hiking and Survival Shelter

Overview: The KALINCO Waterproof Camping Tarp delivers 10×10ft coverage at an ultralight 0.83kg (1.8lbs). Constructed from 210T polyester with a 3000mm PU coating and taped central seam, it includes six guy lines, six stakes, and a carrying bag. Nineteen reinforced attachment loops with double-stitched fix points enable versatile pitching without weight penalty.
What Makes It Stand Out: This tarp nails the crucial weight-to-coverage ratio that backpackers demand. The included stakes and guy lines eliminate aftermarket purchases. Double-reinforced stitching at all fix points prevents ripping—a common failure point in lightweight tarps. The 3000mm waterproof rating handles serious precipitation while maintaining packability.
Value for Money: Ultralight tarps often cost $100+ without accessories. While price isn’t specified, the complete kit and sub-kilo weight suggest excellent value. For thru-hikers and ounce-counters, every gram saved matters. The durability enhancements extend lifespan beyond typical lightweight options.
Strengths and Weaknesses: Strengths include exceptional weight savings, comprehensive included hardware, superior waterproof rating, and strategic reinforcements. The nineteen tie loops match premium brands. Weaknesses: lighter fabric sacrifices some puncture resistance versus heavier options; included stakes are likely basic aluminum; bright colors may not suit stealth camping.
Bottom Line: The KALINCO tarp is the top choice for backpackers prioritizing weight without sacrificing coverage or weather protection. It competes with premium ultralight brands at a fraction of the cost. Serious hikers should shortlist this immediately.
6. Waterproof Camping Tarp 10 x 10ft Survival Tent Backpacking Portable Tarp Multifunctional Anti-UV Shelter for Outdoor (Mud Green)

Overview: The AICALL Waterproof Camping Tarp delivers robust 10x10ft protection for serious outdoor enthusiasts. Constructed from 150D ripstop polyester with a 3000mm PU waterproof rating and UV50+ protection, this tarp balances durability with versatility. Weighing approximately 1.36kg and packing down small, it targets backpackers needing reliable shelter. The package includes eight aviation-grade aluminum stakes and eight 4-meter guy lines for immediate deployment.
What Makes It Stand Out: Nineteen reinforced hanging points with nylon webbing stress reinforcement distinguish this tarp from competitors. Double-needle stitching at fabric splices creates exceptional tear resistance, while dual-sided PU coating ensures comprehensive weather protection. The UV50+ rating provides genuine sun protection for desert or high-altitude environments where solar exposure is intense and potentially dangerous.
Value for Money: Positioned in the mid-range price bracket, this tarp offers professional-grade features without premium cost. The inclusion of aluminum stakes (not cheaper steel) and generous guy line length adds significant value. Compared to basic polyethylene tarps, the 150D ripstop construction and reinforced anchor points justify the investment for serious outdoor users prioritizing longevity over disposable gear.
Strengths and Weaknesses: Strengths: Superior waterproof rating, excellent UV protection, numerous anchor points for versatile configurations, durable double-needle construction, quality aluminum hardware. Weaknesses: Weight challenges ultralight purists, limited color choice, 19 attachment points may overwhelm beginners.
Bottom Line: The AICALL tarp is a dependable workhorse for campers facing variable conditions. Its reinforced construction and comprehensive accessory package make it ideal for extended trips where shelter failure isn’t an option. Highly recommended for serious outdoor enthusiasts.
7. Rhino Valley Waterproof Tent Tarp, 9.8 × 9.8 Ft Large Outdoor Shelter Cover with Light Strings, Lightweight Portable Tarp Shelter Rain Tarp Camping Canopy for Hiking Traveling Backpacking, Black

Overview: The Rhino Valley Waterproof Tent Tarp merges traditional shelter functionality with ambient lighting innovation. This 9.8x9.8ft polyester tarp features integrated light strings for atmospheric camping. Accommodating 2-3 people, it includes four ground stakes, six fixing ropes, and twenty clips for versatile setup. The foldable design prioritizes portability for hikers seeking both practicality and evening ambiance in their outdoor shelter.
What Makes It Stand Out: The integrated 10-meter light string is genuinely unique, transforming the tarp from mere protection to a cozy evening retreat. This feature eliminates separate lighting setups and creates diffused illumination perfect for social camping. The included 20 fixing clips offer unprecedented configuration flexibility, allowing creative shelter shapes beyond standard A-frame or lean-to designs.
Value for Money: While priced slightly above basic tarps, the added light string and generous accessory package deliver tangible value. The convenience of built-in lighting offsets the modest price premium, especially for car campers or festival-goers where atmosphere matters. However, ultralight backpackers may find the electrical component unnecessary weight for remote expeditions.
Strengths and Weaknesses: Strengths: Innovative integrated lighting, generous accessory count, easy tool-free assembly, versatile clip system, accommodates small groups. Weaknesses: Light strings require power source (not included), polyester denier unspecified, fewer anchor points than competitors.
Bottom Line: Perfect for recreational campers and festival enthusiasts who value evening ambiance, the Rhino Valley tarp excels in social settings. The lighting feature distinguishes it from purely functional alternatives, making it a worthwhile purchase for those who camp for relaxation rather than pure survival.
8. Azarxis Hammock Camping Tarp Rain Fly, Waterproof Tent Footprint Shelter Canopy Sunshade Cloth Picnic Mat for Outdoor Awning Hiking Beach Backpacking - Included Guy Lines & Stakes (Camouflage)

Overview: The Azarxis Hammock Camping Tarp offers compact, lightweight protection for solo adventurers. Measuring 7.55x4.59ft, this 210T polyester tarp features a 2000mm PU waterproof rating and UV protection. Packing down to just 6.69x4.33 inches, it prioritizes portability above all. The package includes two stakes and four guy lines, targeting minimalist backpackers needing essential coverage without bulk.
What Makes It Stand Out: The tarp’s remarkable pack-down size makes it among the most portable options available. Its rectangular shape serves dual purposes as a hammock rain fly or ground footprint. The camouflage pattern appeals to hunters and wildlife photographers requiring concealment. Despite its small size, the 210T fabric density provides surprising durability for the weight class and price point.
Value for Money: This budget-friendly option delivers essential protection at an entry-level price. While hardware is minimal (only two stakes), the quality 210T fabric exceeds expectations for this tier. Ideal for beginners testing tarp camping or experienced ultralight enthusiasts needing a backup shelter. The compromise between cost and performance is reasonable for fair-weather adventurers.
Strengths and Weaknesses: Strengths: Extremely compact and lightweight, versatile footprint/canopy use, affordable price, durable 210T fabric, camouflage option. Weaknesses: Small coverage area limits group use, only two stakes included, lower waterproof rating than premium options.
Bottom Line: The Azarxis tarp is a solid ultralight choice for fair-weather solo trips or as a supplemental ground sheet. While not suitable for severe conditions or large groups, its portability and price make it an excellent entry-level or backup option for weight-conscious hikers.
9. FREE SOLDIER Camping Tarp Waterproof Portable Multifunctional Outdoor Camping Traveling Awning Backpacking Shelter Rain Tarp (Dark Green 10×10.5ft)

Overview: The FREE SOLDIER Camping Tarp delivers military-inspired durability in a 10x10.5ft package. Constructed from 210T ripstop polyester with a 2500mm PU rating, this tarp emphasizes robust protection. Weighing 1.2kg, it balances portability with heavy-duty performance. The heat-sealed ridgeline seam and 19 guy points with five reinforced grommets provide exceptional setup versatility for two-person expeditions in demanding conditions.
What Makes It Stand Out: The heat sealing and melting process at seams creates a true waterproof barrier, addressing common failure points where stitching penetrates fabric. The reinforced ridgeline seam with anti-drop connector technology demonstrates engineering focused on storm-worthy performance. With 19 attachment points, this tarp offers more configuration options than most competitors, enabling complex shelter shapes for varied terrain.
Value for Money: Positioned as a heavy-duty option, the price reflects professional-grade construction. The reinforced seams and high attachment point count justify the cost for serious adventurers. While not the lightest option, the durability ensures multiple seasons of reliable use, offering better long-term value than cheaper alternatives requiring frequent replacement.
Strengths and Weaknesses: Strengths: Superior seam construction, high waterproof rating, numerous anchor points, ripstop fabric durability, military-grade design. Weaknesses: Weight deters ultralight hikers, limited color selection, requires skill to utilize all 19 points effectively.
Bottom Line: Built for challenging environments, the FREE SOLDIER tarp excels when reliability is non-negotiable. Its reinforced construction makes it ideal for extended backcountry trips or emergency preparedness. Recommended for experienced campers needing bombproof shelter performance.
10. Texas Bushcraft Emergency Camping Tarp, Waterproof 10x10 Emergency Shelter for Backpacking and Hiking, 70D Ripstop Nylon Survival Tarp with Reflective Aluminized Polymer and Loop Ties with Grommets
Overview: The Texas Bushcraft Emergency Camping Tarp redefines survival shelter with professional-grade materials. This 10x10ft tarp features 70D ripstop nylon with an industry-leading 15,000mm PU coating and reflective aluminized polymer. Weighing slightly more than ultralight options but delivering exceptional protection, it includes 14 perimeter loops and five ridgeline loops with brass grommets. Designed for emergencies, it doubles as a heat-reflective blanket.
What Makes It Stand Out: The 15,000mm waterproof rating is exceptional, far exceeding typical 2000-3000mm standards. The aluminized reflective coating serves dual purposes: reflecting body heat in emergencies and reducing UV absorption in summer. Fireproof properties add safety near campfires, while 70D ripstop nylon offers superior puncture resistance compared to polyester alternatives. This is a true multi-season survival tool.
Value for Money: Premium-priced but justified by extraordinary specifications. The reflective coating and extreme waterproofing rival professional mountaineering gear. For survivalists and serious bushcrafters, this represents excellent investment-grade equipment. Casual campers may find the price steep for occasional use, but the “buy once, cry once” philosophy applies for those prioritizing safety margins.
Strengths and Weaknesses: Strengths: Unmatched waterproof rating, heat-reflective technology, fire-resistant properties, superior nylon construction, extensive tie-down options. Weaknesses: Premium price, slightly heavier than minimalist options, reflective side limits stealth applications.
Bottom Line: The Texas Bushcraft tarp is a survival tool first, recreational shelter second. Its extraordinary protection level makes it essential for emergency kits and extreme expeditions. For those who prioritize safety margins and professional-grade durability, this is the gold standard. Highly recommended for serious survivalists and four-season adventurers.
Why Switch from Tents to Tarps?
The Ultralight Advantage
The most compelling reason backpackers switch to tarps is the dramatic weight savings. A quality solo tarp weighs anywhere from 6 to 16 ounces, while even lightweight tents rarely dip below 2 pounds. When you factor in that many tarp pitches use your trekking poles as support, you’re eliminating an entire category of gear weight. This isn’t just about bragging rights—every ounce saved translates to less joint stress, longer days on trail, and more enjoyable miles. The weight difference becomes even more pronounced for duo shelters, where a two-person tarp might weigh half as much as its tent equivalent.
Versatility in the Wild
Tents offer one configuration. Tarps offer infinite possibilities. That same piece of fabric can become an A-frame on a rainy night, a sunshade during a midday break, a windbreak while cooking dinner, or a minimalist lean-to when bugs aren’t an issue. This adaptability means your shelter system evolves with the conditions rather than fighting against them. In fair weather, you can pitch it high for ventilation and views. When storms roll in, you can drop it low and batten down the hatches. Try doing that with a tent’s fixed architecture.
Connection with Nature
Let’s be honest—part of the appeal is aesthetic. A tarp lets you experience your environment more intimately. You’ll fall asleep watching stars through the open ends, wake up to sunrise filtering through trees, and hear the natural sounds that tents muffle. This connection isn’t just romantic; it makes you a more attentive camper. You’ll notice shifting winds, changing clouds, and temperature drops because you’re not insulated from them. This awareness builds better backcountry skills and deeper appreciation for wild places.
Understanding Tarp Shelter Basics
What Exactly Is a Tarp Shelter?
At its core, a backpacking tarp is a waterproof or highly water-resistant sheet of fabric with reinforced tie-out points. Unlike tents, tarps don’t come with built-in floors, poles, or bug netting (though these can be added). They rely on creative pitching techniques, natural anchors like trees, and your existing gear (trekking poles, sticks) for structure. This simplicity is both the challenge and the beauty—your shelter becomes a reflection of your skill and the specific conditions you’re facing.
Key Terminology Every Beginner Should Know
Before diving deeper, you need to speak the language. Ridgeline refers to the central line running the length of many pitches, typically supported by poles or strung between trees. Guyline are the cords extending from tie-out points to stakes or anchors. Beak or storm doors are extra fabric panels that extend over the ends of some tarp designs for added weather protection. Catenary cut describes a curved edge that reduces flapping and improves tension. Understanding these terms helps you evaluate designs and follow setup instructions.
Key Factors to Consider When Choosing Your First Tarp
Seasonality and Expected Conditions
Your local climate and typical trip seasons should drive your decision. Three-season backpackers in the humid Appalachians need different features than desert hikers in the Southwest. Consider your worst-case weather scenario, not your ideal conditions. Will you face driving rain that requires steep pitches? Heavy morning dew that demands excellent ventilation? Unexpected snow loads? Beginners often benefit from slightly larger tarps with more coverage margin for error while they’re mastering pitch techniques.
Your Sleep System
Your tarp doesn’t exist in isolation—it needs to work with your sleeping bag, pad, and any additional protection like bivy sacks. A synthetic sleeping bag handles moisture better than down when used under a tarp, though modern hydrophobic down has narrowed that gap. Your sleeping pad’s R-value matters more without a tent’s dead air space for insulation. Some beginners pair their first tarp with a waterproof-breathable bivy for a safety net, while others go minimalist with just a groundsheet and bug net.
Trip Duration and Terrain
Weekend warriors can afford to wait out bad weather under a minimal tarp, but thru-hikers need reliable shelter night after night. Consider how often you’ll camp above treeline where trees are unavailable for anchors. Rocky terrain makes staking difficult—will you need to rely on rock anchors? Longer trips mean more varied conditions, suggesting a more versatile tarp design. Think about your typical campsite: forested with soft duff, alpine with sparse vegetation, or desert with hard-packed earth.
Tarp Materials Explained
Silnylon vs. Silpoly
These are the two most common coated fabrics for beginner tarps. Silnylon (silicone-impregnated nylon) is strong, packable, and relatively inexpensive. It stretches when wet, which means you’ll need to retension it during rain. Silpoly (silicone-impregnated polyester) has less stretch, maintains its pitch better in wet conditions, and absorbs less water (stays lighter when wet). It’s slightly heavier and less abrasion-resistant than silnylon. For beginners, silpoly’s stability often makes it the more forgiving choice.
Dyneema Composite Fabrics (DCF)
Formerly known as Cuben Fiber, DCF is the premium option—ultralight, completely waterproof, and doesn’t stretch. It’s also expensive, potentially 3-4x the cost of silnylon/silpoly. DCF is less abrasion-resistant and can be noisy in wind. While the weight savings are incredible, the high price tag and specific handling characteristics make it a questionable choice for your first tarp. Learn your preferences on a less expensive material before investing in DCF.
Coated Polyesters
Budget tarps often use polyurethane-coated polyester (PU polyester). These are heavier, less packable, and the coating can delaminate over time. However, they’re affordable and durable enough for learning the ropes. Some manufacturers use heavier-duty polyesters for tarps designed for car camping or basecamps. For backpacking, these are generally too heavy, but they can be a good practice tarp for backyard sessions before you invest in lighter materials.
Tarp Shapes and Their Best Uses
Flat Tarps
Flat tarps are rectangular or square pieces of fabric without any curves or catenary cuts. Their simplicity is their superpower—you can pitch them in dozens of configurations limited only by your creativity and anchor points. For beginners, this versatility provides a fantastic learning platform. You can start with simple A-frames and progress to more complex pitches as your skills grow. The downside? They can be trickier to get taut and may flap more in wind compared to shaped designs.
Shaped and Catenary Tarps
These tarps have curved edges and sometimes angled panels designed for specific pitches. A catenary-cut A-frame tarp, for instance, will pitch tighter and quieter than a flat tarp in the same configuration. Some shaped tarps include beaks or storm doors for end protection. While less versatile than flat tarps, they’re often easier for beginners to pitch well consistently. The trade-off is flexibility—you’re locked into a few optimal pitches rather than infinite possibilities.
Pyramid and Mid Designs
Pyramid tarps (often called “mids”) are shaped like teepees with a central pole support. They offer excellent weather protection and interior space for their weight. Many include bug netting and floors, blurring the line between tarp and tent. For beginners coming from tents, mids can be an easier transition since they pitch similarly and offer 360-degree protection. The downside is they’re less versatile for non-shelter uses like sunshades or group cooking areas.
Size Matters: Picking the Right Dimensions
Solo vs. Duo Considerations
A 7x9 foot tarp is the classic solo size—enough for coverage with room to maneuver. Some minimalists use 6x8 or even 5x8, but these require precise pitching and offer little margin for error. For two people, 8x10 or 9x9 square tarps provide adequate space. Remember that tarp dimensions are flat measurements; once pitched, your usable space shrinks. A 7x9 pitched as an A-frame might only offer 6 feet of width at the base. When in doubt, size up for your first tarp—you can always go smaller later as your skills improve.
Coverage vs. Weight Trade-offs
Every extra foot of fabric adds weight, but also versatility and comfort. A tarp that’s too small leaves you exposed to splashback and wind-driven rain. One that’s too large can be difficult to pitch in tight campsites and adds unnecessary ounces. Consider your height plus gear—your tarp needs to cover you from head to toe with room to sit up. Many beginners find that a 9-foot ridgeline length works well for solo use, providing enough headroom at the ends while keeping weight reasonable.
Weight and Packability Considerations
The True Weight of Your Shelter System
When calculating tarp weight, include everything: tarp, guylines, stakes, stuff sack, and any additional components like a groundsheet or bug net. A 12-ounce tarp can quickly become a 2-pound shelter system. Compare this total weight to your tent’s packaged weight. Often, the savings are still significant, but it’s important to be honest about the complete system. Some manufacturers list “trail weight” without stakes or guylines—always check what’s included.
Compression and Packing Strategies
Tarp materials pack differently. Silnylon and silpoly compress well and can be stuffed into small corners of your pack. DCF is less compressible and benefits from careful folding. Many tarp users skip the stuff sack and simply pack their tarp loose in their pack, using it to fill gaps around other gear. This prevents permanent creases and makes use of otherwise wasted space. Consider packing your groundsheet separately for quick access during sudden rain.
Setup Systems and Hardware
Lineloc Tensioners vs. Traditional Knots
Many modern tarps come with Lineloc or similar hardware that lets you adjust tension without knots. These are beginner-friendly and allow quick adjustments from inside your shelter during storms. However, they add minimal weight and can fail in extreme cold. Learning basic knots like the trucker’s hitch and taut-line hitch gives you more flexibility and reliability. Most experienced tarp users carry a mix—hardware for convenience, knot knowledge for backup.
Reinforcements and Tie-out Points
Examine how tie-out points are constructed. Bar-tacked reinforcements and double-layered patches distribute stress and prevent tears. Mid-panel tie-outs give you more pitching options but add weight. Corner tie-outs should have multiple attachment points (webbing loops or grommets) for versatility. Some premium tarps use “grosgrain” ribbon loops that are lighter than metal grommets and less likely to rip out. For beginners, more tie-out options mean more versatility as you experiment with different pitches.
Essential Pitch Configurations for Beginners
The A-Frame Pitch
This is your bread-and-butter setup—simple, weather-resistant, and intuitive. String a ridgeline between two trees or support it with trekking poles, then stake out the sides. The steepness of the walls determines ventilation vs. weather protection. In fair weather, pitch it high for headroom and airflow. When rain threatens, lower the ridgeline and stake sides close to the ground. Practice this pitch until you can set it up in under five minutes by headlamp.
The Lean-To Setup
Perfect for fair weather or when you want a view, the lean-to uses a ridgeline anchored high on trees or poles, with the tarp draped over and staked out on one side. It offers minimal weather protection but maximum ventilation and easy access. This is an excellent configuration for learning tarp dynamics—how wind flows around it, how precipitation angles matter, and how to position yourself relative to the opening. It’s also the go-to setup for quick lunch breaks and gear drying stations.
The C-Fly Configuration
This hybrid pitch gives you three-sided protection while leaving one side open. It’s essentially half an A-frame with one side staked low and the other left open or partially staked. This configuration shines in windy conditions where you can position the low side into the wind while maintaining ventilation through the open side. It’s more advanced than a basic A-frame but teaches crucial skills about wind direction assessment and asymmetric pitching that will serve you well in challenging conditions.
Weather Protection and Limitations
Handling Rain and Condensation
Tarps excel at ventilation, which reduces condensation compared to tents. However, they also expose you to splashing rain and wind-driven moisture. Pitching low with steep walls helps deflect rain, while a properly sized groundsheet protects from ground moisture. Learn to identify “splash zones”—areas where rain hits the ground and bounces back. Position your sleeping bag away from these zones. In prolonged rain, carry a small pack towel to wipe off any mist that penetrates your shelter.
Wind Management Strategies
Wind is a tarp’s biggest challenge and your most important consideration. Always assess wind direction before pitching, and position your tarp’s lowest side into the wind. Use natural windbreaks like trees, rocks, or terrain depressions. In exposed areas, pitch your tarp lower and more aerodynamic. Carry extra stakes and use rocks to anchor them in loose soil. Some tarp designs include “beaks” or can be pitched with “storm doors” to block wind from the ends. Practice your wind-worthy pitches before you need them.
Bug Protection Solutions
Inner Nets and Bivys
Most beginners pair their first tarp with a bug net solution. A simple rectangular bug net suspended from the ridgeline provides affordable protection. Waterproof-breathable bivy sacks offer bug protection plus an extra layer of weather defense, though they add weight and can be claustrophobic. Some companies make “tarp tents”—tarps with separate bug net interiors that combine the best of both worlds. For your first setup, a basic head net and groundsheet might suffice in bug-light areas.
Sewn-In Bug Skirts
Some shaped tarps feature bug netting sewn into the perimeter, creating a hybrid shelter. These offer excellent bug protection while maintaining tarp simplicity. The netting can be rolled up when not needed or deployed during buggy seasons. The compromise is weight and reduced versatility—you can’t use the tarp without the netting attached. For backpackers in heavily bug-infested areas like the Boundary Waters or Maine in summer, these designs can be worth the trade-off.
Groundsheet Options
Dedicated Groundsheets
Many tarp users carry a dedicated groundsheet cut to fit their sleep system. These are typically made from the same materials as tarps but lighter weight since they don’t need to be as durable. A groundsheet should extend 6-12 inches beyond your sleeping pad on all sides to catch splashback. Some shaped tarps come with matching bathtub floors that clip to the tarp edges, offering tent-like protection while maintaining tarp versatility.
Polycryo and DIY Solutions
For the weight-conscious, polycryo (window insulation film) makes an ultralight groundsheet at just 1-2 ounces. It’s surprisingly durable if you’re careful with site selection. Tyvek house wrap is another popular DIY option—cheap, waterproof, and breathable, though heavier. Some backpackers use emergency blankets or even thick trash bags in a pinch. Whatever you choose, make sure it’s slightly smaller than your tarp’s footprint to prevent water from pooling between the layers.
Guyline and Stake Strategies
Guyline Materials and Lengths
Reflective dyneema cord is the gold standard—strong, lightweight, and visible at night. Carry a variety of lengths: 6-foot lines for side tie-outs, 8-footers for corners, and longer 10-12 foot lines for ridgelines or challenging anchor points. Many beginners make the mistake of using cord that’s too short, limiting pitching options. Learn to coil and store guylines neatly to prevent tangles. Consider pre-attaching lines to your tarp with adjustable hitches for faster setup.
Stake Types for Different Soils
Your stakes are as important as your tarp. Carry a mix: shepherd’s hooks for soft forest duff, V-stakes for general use, and rock-solid nails for hard desert soil. In snow or sand, use deadman anchors (burying stakes horizontally). Always carry 2-3 extra stakes—losing one in the dark is inevitable. Some tarp pitches require up to 10 stakes, while minimal setups need as few as 4. Know your typical terrain and build your stake kit accordingly.
Common Beginner Mistakes to Avoid
Underestimating Weather
The number one mistake is bringing a tarp on a trip that’s beyond your skill level. That 5x8 minimalist tarp might work for a seasoned ultralighter, but it’s a recipe for misery during your first thunderstorm. Start with a larger, more forgiving tarp in mild conditions. Check weather forecasts obsessively, and have an exit plan. Your first few tarp trips should be in areas where you can bail to a car or shelter if things go sideways.
Poor Site Selection
Tarps amplify the importance of site selection. Look for slight elevation to avoid pooling water, but not so high you’re exposed to wind. Check for dead branches overhead (widowmakers). Avoid low areas that collect cold air. Position yourself relative to water sources, trails, and potential animal corridors. With a tarp, you’re more exposed to your environment, which means your site choice matters more, not less. Spend time scouting the perfect spot before you start pitching.
Overcomplicating Your Setup
Beginners often try fancy pitches they saw on YouTube, spending an hour fiddling while darkness falls. Master one or two reliable configurations before experimenting. The A-frame and lean-to will handle 90% of your needs. Bring a cheat sheet with knot diagrams or pitch instructions. Set up a “default” configuration quickly, then refine it if time and conditions allow. Remember: a simple, taut pitch beats a complicated, sloppy one every time.
Building Your Skills: Practice Tips
Backyard Practice Sessions
Your backyard is your best training ground. Practice pitching in different conditions: during rain to test waterproofing, in wind to learn aerodynamics, at dusk to simulate real-world timing. Try different configurations until you can set up your go-to pitch blindfolded. Practice adjusting tension from inside your sleeping bag. Set it up after a long day when you’re tired and hungry—that’s when you’ll need the muscle memory most. Film yourself to identify inefficiencies in your setup process.
Timing Your Transition
Don’t switch to a tarp the night before a major trip. Start with fair-weather overnighters close to home. Progress to weekend trips in familiar terrain. Only after a dozen successful tarp nights should you commit to a week-long expedition. Consider a hybrid approach: bring both tent and tarp on early trips, setting up the tarp as a backup or communal area. This builds confidence while maintaining safety. The transition isn’t binary—many backpackers use both systems depending on the trip.
Frequently Asked Questions
How do I stay dry under a tarp when it’s raining sideways?
Pitch low and steep, with the lowest side facing the prevailing wind. Use natural windbreaks, position yourself away from splash zones, and ensure your groundsheet has a slight edge to catch any water that does get blown in. A bivy sack adds insurance against wind-driven rain.
What’s the minimum size tarp I can get away with as a beginner?
Start with at least a 7x9 foot tarp for solo use. This gives you coverage margin while learning proper pitching techniques. Experienced users can go smaller, but beginners need the forgiveness of extra material. For two people, nothing smaller than 8x10 feet is practical while you’re still mastering setup.
Do I need a bivy sack with my tarp?
Not necessarily, but it’s good insurance for your first season. A bivy protects against splashback, wind-driven rain, and bugs. Many beginners start with a bivy, then phase it out as they gain confidence in site selection and pitching skills. In buggy conditions, a head net is often sufficient.
How many stakes should I carry?
Carry at least 8-10 stakes for a solo tarp, even if your primary pitch only uses 6. This gives you flexibility for different configurations and replacements if you lose some. For duo tarps or complex pitches, 10-12 stakes is reasonable. Always have 2-3 extras beyond what your primary pitch requires.
Can I use a tarp above treeline where there are no trees?
Absolutely—this is where trekking pole-supported pitches shine. The A-frame and pyramid configurations work perfectly in exposed terrain. Just ensure you have solid ground for staking and consider the wind exposure. Some of the most spectacular tarp campsites are in alpine zones with panoramic views tents would block.
How do I deal with bugs without a tent?
Options range from simple head nets to full rectangular bug nets suspended from your ridgeline. Some tarps have optional bug skirts or inner nets. In light bug pressure, treating your clothing and sleeping bag with permethrin and using a head net might suffice. For heavy bugs, a full enclosure is worth the weight.
Is a tarp actually warmer or colder than a tent?
Generally colder, since you lack the trapped dead air space a tent provides. However, this is often offset by better ventilation reducing condensation, which can make you feel colder. Use a higher R-value sleeping pad and consider wind-blocking pitches in cool weather. The temperature difference is usually 5-10°F, rarely a dealbreaker with proper sleep system adjustments.
What’s the learning curve like for tarp camping?
Most people need 5-10 practice sessions to feel competent and 20+ nights to feel truly confident. The key is progressive practice: start in fair weather, master one pitch, then expand your skills. The learning curve is steeper than tents but plateaus higher—you’ll eventually be able to create a perfect shelter in any conditions faster than most people can pitch a tent.
How do I prevent animals from bothering me without a tent?
Tarps don’t provide the psychological barrier tents do, but practically speaking, animals don’t care about your shelter type. Store food properly using bear hangs or canisters, and you won’t have issues. Some people feel more exposed and sleep poorly, which is a valid concern—this is part of the mental adjustment to tarp camping.
Can I use a tarp in winter or snow conditions?
Yes, but it’s advanced. Pyramid tarps handle snow loads best. You’ll need to pitch lower, use stronger stakes or deadman anchors, and understand snow dynamics. Condensation management becomes critical in cold conditions. Most beginners should stick to three-season use for their first year, expanding to winter only after gaining significant experience.
See Also
- Top 10 Best Ultralight Tarp Shelters for Solo Backpackers in 2026
- 10 Most Durable Backpacking Tarps for Tarp Shelters on the PCT in 2026
- 10 Ripstop Backpacking Tarps Turning Into Tarp Shelters on the AT in 2026
- The 10 Best Tarp Shelters for Family Backpacking with Kids in 2026
- 10 Premium Backpacking Tarps for Ultralight Tarp Shelters Worth Every Penny