Table of Contents
There’s something almost primal about pulling a perfectly golden loaf of artisan bread from a Dutch oven nestled in campfire coals. The crackling crust, the steam escaping as you lift the lid, the smell of yeast and woodsmoke mingling in the crisp morning air—it’s a ritual that transforms ordinary camping into a culinary adventure. But here’s the truth that seasoned outdoor bakers know: not all Dutch oven sets are created equal when it comes to baking bread in the wild.
The difference between a dense, undercooked disappointment and a bakery-worthy boule often comes down to understanding the nuanced features that make a Dutch oven truly camp-ready. As we look toward 2026, innovations in materials, design, and portability are reshaping what’s possible for campsite bread bakers. Whether you’re dreaming of sourdough under the stars or ciabatta by the creek, this guide will walk you through the essential considerations that separate the weekend warriors from the backcountry boulangerie masters.
Top 10 Dutch Oven Sets For Camping
Detailed Product Reviews
1. 8 Piece cast iron dutch oven camping set. 4.5 Qt cast iron pot with lid and Lifter Handle;2.1qt pot handle with lid;10In Pans ;Camping Tripod with;Grill Cookware Skillet Sets,Car carry-on storage box

Overview: This comprehensive 8-piece cast iron set delivers a complete outdoor cooking solution for serious campers. The centerpiece is a 4.5-quart Dutch oven with a dual-function lid that doubles as a skillet, accompanied by a 2.1-quart saucepot and 10-inch pans. The included camping tripod enables versatile fireside positioning, while the sturdy car carry-on storage box keeps everything organized between adventures. Pre-seasoned and ready for immediate use, this kit handles everything from stews to baked goods over open flames.
What Makes It Stand Out: The all-in-one system approach eliminates guesswork for camp cooking newcomers. The 3-in-1 design maximizes utility—each piece serves multiple purposes, reducing packed weight indirectly. The tripod’s long legs and handles allow both suspended and ground-level cooking, adapting to various fire setups. The dual-purpose lid-as-skillet is particularly clever, saving precious space while providing a secondary cooking surface. The dedicated storage box with car-carry capability demonstrates thoughtful consideration for transport and organization that many competitors overlook.
Value for Money: Priced in the mid-range for camping cookware sets, this collection offers substantial savings versus purchasing pieces individually. Comparable Dutch ovens alone cost $60-90, while quality tripods and multiple cast iron pieces would push a la carte totals well over $200. For families or groups who camp 4+ times annually, the investment quickly justifies itself. Casual campers may find it excessive, but frequent outdoor cooks get professional-grade versatility at a bundled discount.
Strengths and Weaknesses: Strengths include complete system integration, genuine cast iron durability, excellent heat retention, versatile cooking options, and smart storage solution. The pre-seasoned surface enables immediate cooking. Weaknesses involve significant weight (cast iron is inherently heavy), requiring diligent maintenance to prevent rust, potential tripod stability on uneven ground, and capacity limitations for groups larger than 6. The set may overwhelm minimalist backpackers or occasional campers.
Bottom Line: This is an excellent choice for dedicated camping enthusiasts who want a turnkey cooking solution. It eliminates the hassle of piecing together a camp kitchen while delivering authentic cast iron performance. Perfect for car camping families and outdoor cooking purists willing to maintain their gear.
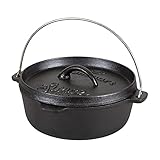
2. 4.5Qt camping dutch oven with lid,cast iron dutch oven,Lifter Handle,Camping Tripod,Cast Iron Camping Cookware, Camping Oven - Campfire Cooking Equipment,With Free Scrubber Brush Stainless Steel Material

Overview: This focused package centers on a single 4.5-quart cast iron Dutch oven equipped with essential campfire accessories. The pre-seasoned pot features a dual-function skillet lid, sturdy legs for fire placement, and a lifter handle for safe manipulation. The included camping tripod expands cooking options, while the complimentary stainless steel scrubber brush addresses post-meal cleanup. Designed as a streamlined solution, it prioritizes the core Dutch oven experience over expansive sets.
What Makes It Stand Out: The intentional simplicity makes this ideal for campers who want quality over quantity. The stainless steel scrubber inclusion shows practical understanding of cast iron maintenance challenges in the field. The 3-in-1 design—oven, skillet, and lid—maximizes functionality while minimizing packed items. The tripod’s compatibility with the Dutch oven’s integrated handle creates a secure hanging system that reduces spill risks compared to third-party accessories. This focused approach avoids the redundancy some larger sets suffer from.
Value for Money: As a single-pot system with key accessories, this offers exceptional value for solo campers or couples. The price point typically undercuts full sets by 40-60% while delivering the most-used camping cookware piece. The free scrubber brush, normally a $10-15 add-on, sweetens the deal. Compared to department store Dutch ovens lacking campfire-specific features, this specialized design justifies its modest premium. Budget-conscious buyers get professional campfire performance without paying for unused pieces.
Strengths and Weaknesses: Strengths include targeted functionality, lightweight (relative to full sets), pre-seasoned readiness, versatile lid-as-skillet, stable tripod design, and maintenance-friendly accessories. The 4.5-quart capacity suits small groups perfectly. Weaknesses involve limited cooking surface area for multiple dishes, no secondary pots for side dishes, and the need for separate purchase if you later want a complete set. The single-item focus lacks the versatility of larger collections for group cooking.
Bottom Line: Perfect for minimalist campers and couples seeking the essential Dutch oven experience without set bloat. It delivers core campfire cooking capability with thoughtful accessories at an accessible price. Ideal entry point for cast iron camp cooking before committing to larger collections.
3. EDGING CASTING 2-in-1 Pre-Seasoned Cast Iron Dutch Oven Pot with Skillet Lid Cooking Pan, Cast Iron Skillet Cookware Pan Set with Dual Handles, Indoor Outdoor for Bread/Frying/Baking/Camping/BBQ, 5 Qt

Overview: This 5-quart Dutch oven from EDGING CASTING emphasizes versatility through its 2-in-1 design, featuring a pot and integrated skillet lid with dual helper handles on both components. Pre-seasoned with vegetable oil and free from synthetic coatings, it transitions seamlessly between indoor kitchens and outdoor fires. The 5-quart capacity accommodates family meals while remaining manageable for transport. Designed for multiple cooking methods, it excels at bread baking, frying, and braising across various heat sources.
What Makes It Stand Out: The generous 5-quart capacity combined with thoughtful dual-handle design enhances safety and maneuverability when wearing oven mitts or using pot lifters. The skillet lid’s integrated handles provide secure grip compared to traditional loop handles, crucial when handling hot cast iron over unpredictable campfires. The company’s focus on natural pre-seasoning without chemical coatings appeals to health-conscious consumers. The versatility across indoor/outdoor contexts maximizes year-round utility, making it more than seasonal camping gear.
Value for Money: Positioned competitively against premium cast iron brands, this offers larger capacity than standard 4-quart models at similar price points. The 2-in-1 functionality effectively provides two quality pans for roughly the cost of one, delivering notable value. While lacking accessories like tripods or scrubbers, the core product’s quality and capacity justify the price for buyers who prioritize the cooking vessel itself over bundled extras. It represents smart spending for those who already own camp kitchen accessories.
Strengths and Weaknesses: Strengths include generous 5-quart capacity, superior handle design for safe transport, chemical-free pre-seasoning, excellent heat retention and distribution, true multi-method versatility, and year-round indoor/outdoor utility. The skillet lid’s flat cooking surface performs admirably. Weaknesses include no included accessories (tripod, lifter, storage), heavier weight than smaller models, and the need for separate purchase of campfire-specific tools. The minimalist packaging may disappoint those wanting a complete kit.
Bottom Line: An excellent choice for cooks seeking a high-quality, versatile Dutch oven that serves home and camp equally well. The superior handle design and larger capacity make it ideal for families. Perfect for those who value core quality over bundled accessories.
4. Bruntmor Camping Cooking Set Of 7. Pre Seasoned Cast Iron Pots And Pans Dutch Oven With Lids For Outdoor Comefire. Grill Cookware Skillet Sets With Storage Box

Overview: Bruntmor’s 7-piece set provides a balanced middle ground between minimalism and comprehensive kits. The collection includes a Dutch oven, griddle, saucepot, skillet, matching lids, a lifter, and a storage box. Pre-seasoned and built for open-flame durability, each piece features even heat distribution properties essential for outdoor cooking. The set aims to equip campers with varied cookware options without the complexity of larger collections, covering everything from pancakes to stews around the campfire.
What Makes It Stand Out: The deliberate curation focuses on practical variety rather than quantity. Including both a griddle and skillet addresses different cooking needs—flat surfaces for pancakes/bacon and contoured pans for sautéing. The saucepot adds legitimate versatility for sides and sauces often missing from basic sets. Bruntmor’s emphasis on warp resistance under high heat demonstrates understanding of campfire challenges. The storage box’s design specifically accommodates the varied shapes, solving a common frustration with odd-shaped camp cookware storage.
Value for Money: This set hits the sweet spot for price-conscious buyers wanting legitimate variety. Typically priced 20-30% below 8-piece competitors while retaining essential pieces, it eliminates redundant items. The inclusion of four distinct cooking surfaces (Dutch oven, griddle, skillet, saucepot) provides real cooking flexibility that justifies the cost over single-pot systems. For families of 4-5 who want diverse meal options without premium pricing, this represents strong value. The quality-to-price ratio favors practical functionality over brand prestige.
Strengths and Weaknesses: Strengths include thoughtful piece selection, true cooking versatility, pre-seasoned readiness, excellent heat distribution, durable construction, smart storage solution, and balanced capacity for small to medium groups. The varied cookware enables complete meal preparation. Weaknesses include fewer pieces than some competitors, no tripod for suspended cooking, moderate weight across multiple items, and potential quality variance between pieces. The set lacks a dedicated cleaning tool.
Bottom Line: Ideal for families seeking genuine cooking variety without overspending on redundant pieces. The practical selection covers most camp cooking scenarios effectively. A smart, value-driven choice for regular campers wanting more than a single pot offers.
5. 8 Piece Pre-Seasoned Dutch Oven Cooking Set Cast Iron Camping Kitchen Cookware Bakeware Skillets & Square Grill Pan w/Vintage Carrying Wood Box for Ourdoor Home BBQ Baking

Overview: This premium 8-piece set emphasizes completeness and presentation, featuring a 4.5-quart Dutch oven, 2.1-quart saucepot, large rectangular griddle with heat grooves, frying pan, stand, lifter, and a vintage-style wooden storage box. The electrophoretic chip-resistant coating promises enhanced durability while maintaining non-toxic properties. Designed for 5-7 people, the set includes specialized features like a high-brims lid for coal placement and a multi-function stand that doubles as a lid holder and extra cooking surface.
What Makes It Stand Out: The vintage wooden carrying box elevates storage from functional to stylish, making this gift-worthy for outdoor enthusiasts. The rectangular griddle with heat grooves demonstrates engineering attention often missing in camp cookware, creating better searing and grease management. The innovative stand serves triple duty: pot support, lid holder, and secondary cooking surface—a genuinely useful multi-tool. The high-brims lid design optimizes top-coal placement for true oven performance. These thoughtful details show deep understanding of campfire cooking challenges.
Value for Money: While priced at the premium end, the set justifies cost through specialized features and presentation quality. The wooden box alone adds $30-50 value compared to basic plastic cases. Unique elements like the grooved griddle and triple-function stand aren’t available in budget sets. For those who camp frequently or gift-givers seeking impressive bundles, the price reflects genuine innovation and completeness. Casual campers may find better value in simpler sets, but enthusiasts appreciate the premium details.
Strengths and Weaknesses: Strengths include exceptional completeness, innovative griddle design, multi-function stand, premium wooden storage, high-quality pre-seasoning, large capacity for groups, specialized lid design, and gift-worthy presentation. The chip-resistant coating adds durability. Weaknesses include premium pricing, substantial total weight, complex maintenance for multiple pieces, and potential over-equipment for solo campers. The wooden box, while attractive, requires care to prevent moisture damage.
Bottom Line: Outstanding for serious outdoor cooks and group camping scenarios where versatility and capacity matter. The premium features and presentation justify the investment for enthusiasts. Perfect gift for avid campers or those wanting the most complete campfire kitchen solution available.
6. CampMaid Outdoor Cooking Set - Dutch Oven Tools Set - Charcoal Holder & Cast Iron Grill Accessories - Camping Grill Set - Outdoor Cooking Essentials - Camp Kitchen Equipment - (7 Piece Set)

Overview: The CampMaid 7-Piece Outdoor Cooking Set is a comprehensive Dutch oven accessory kit designed to elevate campfire cooking. This award-winning system transforms a standard Dutch oven into a versatile outdoor kitchen, enabling grilling, steaming, barbecuing, and even pizza making. The set includes a lid lifter, flip grill, charcoal/wood holder, kickstand, heat-safe leather gloves, collapsible chimney, and a custom carry bag. Note that the Dutch oven itself is sold separately, making this an upgrade kit for existing cast iron owners.
What Makes It Stand Out: CampMaid’s innovative lid lifter keeps your cast iron lid off dirty ground—a simple but game-changing feature. The flip grill converts your Dutch oven lid into a griddle, while the charcoal holder maximizes heat efficiency. The collapsible chimney ensures quick, even charcoal ignition without lighter fluid. These tools work synergistically to create a professional-level outdoor cooking experience that goes far beyond basic campfire fare.
Value for Money: Priced in the mid-to-high range for accessory kits, this set delivers strong value if you already own a Dutch oven. Purchasing these specialized tools individually would cost significantly more. Compared to basic tongs-and-lifter sets, CampMaid’s engineering and versatility justify the premium for serious outdoor enthusiasts.
Strengths and Weaknesses: Strengths include exceptional versatility, robust construction, and thoughtful design that solves real outdoor cooking problems. The heat-safe gloves provide excellent protection, and the carry bag keeps everything organized. Weaknesses include the separate Dutch oven purchase requirement and a learning curve for mastering all functions. The price may deter casual campers, and the kit is somewhat heavy for backpacking.
Bottom Line: This is an excellent investment for dedicated camp cooks who already own a Dutch oven. If you frequently cook outdoors and value convenience and versatility, the CampMaid set transforms campfire cooking from basic to exceptional.
7. Stansport 2 QT Pre-Seasoned Cast Iron Dutch Oven Flat Bottom (16019-20)
Overview: The Stansport 2-Quart Pre-Seasoned Cast Iron Dutch Oven is a compact, entry-level option for campers and home cooks alike. With over 75 years of brand heritage, this flat-bottomed pot comes ready to use with its pre-seasoned surface. The tight-fitting lid and sturdy handle make it suitable for braising, roasting, baking, and stovetop use. Its smaller capacity is ideal for solo campers or couples looking to prepare simple meals without the bulk of larger cast iron cookware.
What Makes It Stand Out: The flat bottom design distinguishes this from traditional camp Dutch ovens, allowing it to sit securely on conventional stovetops and home ovens—not just campfires. Coming pre-seasoned eliminates the initial preparation work that intimidates many first-time cast iron users. Stansport’s seven-decade reputation for affordable, reliable camping gear provides confidence in this no-frills workhorse.
Value for Money: This Dutch oven sits at the budget-friendly end of the market, typically priced well under $50. It offers exceptional value for beginners testing cast iron cooking or those needing a small, portable option. While premium brands like Lodge command higher prices, Stansport delivers functional performance at a fraction of the cost.
Strengths and Weaknesses: Strengths include affordability, pre-seasoned convenience, flat-bottom versatility, and lightweight portability for cast iron. The trusted brand name and simple maintenance requirements are additional pluses. Weaknesses include the small 2-quart capacity, which limits meal sizes, and the flat bottom’s inability to hold hot coals on top for traditional campfire baking. The quality of casting may be rougher than premium competitors.
Bottom Line: Perfect for beginners, couples, or those wanting a stovetop-friendly Dutch oven without a major investment. While not ideal for large groups or traditional coal-top campfire cooking, it reliably handles basic camp meals and everyday kitchen tasks at an unbeatable price.
8. IPROUDER 5-in-1 Dutch Oven Camping Accessories Kit - Campfire Cooking Equipment with Heat-Resistant Gloves, 16" Scissors Tongs, Lid Lifter, Lid Stand & Trivet | BBQ Tools, Outdoor Camping Cookware

Overview: The IPROUDER 5-in-1 Dutch Oven Camping Accessories Kit provides essential tools for safe and convenient campfire cooking at a budget price point. This kit includes a 16.5-inch lid lifter, 10.6-inch lid stand/trivet, 13-inch heat-resistant gloves, 16-inch scissor tongs, and a trivet function. Designed for compatibility with various Dutch oven sizes, it offers fundamental accessories without the premium cost of higher-end sets. The kit targets occasional campers seeking basic functionality without complexity.
What Makes It Stand Out: The kit’s standout feature is its exceptional value, bundling necessary safety tools at an accessible price. The 4-in-1 lid stand offers versatility, functioning as a trivet, secondary lifter, or griddle base. The heat-resistant gloves feature a 13-inch length with silicone coating for superior grip and protection—longer than many competitors in this price range. The scissor tongs provide sturdy handling of hot cookware.
Value for Money: This is one of the most affordable Dutch oven accessory kits available, often priced under $40. It delivers remarkable value for campers who need basic tools without premium features. While it lacks specialized items like charcoal holders or grill attachments, it covers essential safety and handling needs at a fraction of CampMaid’s cost.
Strengths and Weaknesses: Strengths include unbeatable affordability, adequate glove length, versatile lid stand, and lightweight portability. The tools are functional for occasional use. Weaknesses include lower overall quality compared to premium brands, lack of advanced features like charcoal management systems, and basic construction that may not withstand heavy, frequent use. The gloves offer less heat protection than leather alternatives.
Bottom Line: An ideal starter kit for casual campers or those on a tight budget. If you camp infrequently and need basic safety tools for Dutch oven cooking, this kit provides excellent bang for your buck. Serious outdoor chefs will want to invest in more robust options.
9. Maxdot Camping Tripod Dutch Oven for Camp Fire Cooking Equipment, 4 Quart Cast Iron Dutch Oven with Lid, Adjustable Height Tripod Campfire Lantern Hanger, Grill Grate, Cap Remover for over Fire Pit
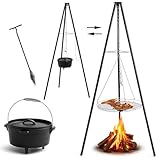
Overview: The Maxdot Camping Tripod Dutch Oven Set is a complete over-fire cooking system featuring a 4-quart cast iron Dutch oven, 59-inch adjustable tripod, 18.9-inch chrome grill grate, 200cm chain, and 16.5-inch lid lifter. This all-in-one kit enables traditional suspended campfire cooking with precise height adjustment for temperature control. The set disassembles for transport, making it suitable for car camping and basecamps where authentic campfire cuisine is desired.
What Makes It Stand Out: The adjustable chain system allows precise control over cooking temperature—something fixed systems cannot match. The tripod’s stable triangular structure adapts to uneven terrain, while the included grill grate adds grilling capability beyond Dutch oven cooking. The Dutch oven features integrated legs and a rimmed lid for traditional coal-top baking, offering multiple cooking methods in one cohesive system.
Value for Money: As a complete cooking system, this kit offers strong value compared to purchasing components separately. The inclusion of both Dutch oven and tripod setup under one price point represents savings. While not cheap, it’s competitively priced against similar systems and eliminates guesswork about compatibility.
Strengths and Weaknesses: Strengths include true versatility (grilling, baking, stewing), adjustable height control, stable tripod design, and comprehensive inclusion of all necessary components. The system captures traditional campfire cooking authenticity. Weaknesses include the 4-quart capacity limiting group sizes, chrome-plated grill grate potentially wearing over time, and longer setup compared to direct campfire placement. The weight and packed size restrict portability.
Bottom Line: Excellent choice for campfire purists who want authentic suspended cooking with modern convenience. If you enjoy the ritual of cooking over open flames and need adjustable temperature control, this system delivers a complete solution. Less ideal for backpackers or those wanting quick setup.
10. CampMaid Outdoor Cooking Set - Dutch Oven and Tools Set - Charcoal Holder & Cast Iron Grill Accessories - Camping Grill Set - Outdoor Cooking Essentials - Camp Kitchen Equipment - (8 Piece Set)

Overview: The CampMaid 8-Piece Outdoor Cooking Set builds on their award-winning design by including a 12-inch pre-seasoned Dutch oven with the full accessory kit. This premium package contains the Dutch Oven Lid Lifter, Flip Grill, Charcoal/Wood Holder, Kick Stand, Heat Safe Leather Gloves, Collapsible Chimney, custom Carry Bag, and the 12" Dutch oven itself. It represents a complete, integrated outdoor kitchen solution for serious camp chefs seeking maximum versatility without purchasing components separately.
What Makes It Stand Out: This is the only set that combines CampMaid’s innovative accessories with a matching Dutch oven, ensuring perfect compatibility. The lid lifter’s ground-free design, flip grill conversion, and efficient charcoal holder create a professional cooking experience. The collapsible chimney enables fast, chemical-free charcoal ignition. The 12-inch oven offers ample capacity for group cooking while remaining manageable for transport.
Value for Money: While priced at a premium, this complete set offers better value than buying the 7-piece kit and separate Dutch oven. For serious enthusiasts, the engineering quality and versatility justify the investment over budget alternatives. It eliminates compatibility concerns and provides everything needed for advanced outdoor cooking.
Strengths and Weaknesses: Strengths include complete integration, award-winning design, versatile cooking options (grill, steam, pizza), quality leather gloves, and organized storage. The 12-inch size serves groups effectively. Weaknesses include a high price point that may overwhelm casual campers, significant weight for transport, and a learning curve to master all features. The premium cost could be excessive for occasional users.
Bottom Line: The ultimate choice for dedicated outdoor cooking enthusiasts who want the best integrated system. If you camp frequently, cook for groups, and value innovative design, this premium set is worth every penny. Casual campers should consider more basic options.
Why Dutch Ovens Are the Ultimate Campsite Bread Baking Tool
Dutch ovens have been the workhorse of outdoor cooking for centuries, but their magic for bread baking lies in a perfect storm of thermal properties. Unlike modern kitchen ovens that rely on consistent electricity and precise digital controls, a quality Dutch oven creates its own micro-oven environment. The heavy cast iron walls radiate heat evenly from all directions, while the tight-fitting lid traps steam—a crucial element for developing that coveted artisan crust.
What makes them particularly suited for campsite use is their independence from power sources. Whether you’re perched on a mountain ridge or settled in a developed campground, a Dutch oven only needs coals or embers to transform simple dough into something extraordinary. The thermal mass retains heat long after the flames have died down, giving you a stable baking environment even when Mother Nature is anything but stable.
Understanding Dutch Oven Materials for Outdoor Baking
The Science of Cast Iron Heat Retention
Cast iron’s density isn’t just about durability—it’s about thermal physics. The material’s high specific heat capacity means it absorbs and holds enormous amounts of energy, releasing it slowly and evenly. For bread bakers, this translates to consistent oven spring (that dramatic rise in the oven) and even browning. The material’s ability to maintain temperatures between 450-500°F for extended periods mimics professional bread ovens that cost thousands of dollars.
When evaluating materials, pay attention to wall thickness. Premium campsite Dutch ovens typically feature walls between 3/16" and 1/4" thick. Thinner walls heat faster but lose temperature quickly when you remove coals for temperature adjustments. Thicker walls provide more thermal stability but add weight—a trade-off we’ll explore later.
Modern Material Innovations
While traditional cast iron remains the gold standard, 2026 is seeing exciting developments in composite materials. Some manufacturers are experimenting with cast iron cores wrapped in protective alloys that resist rust without seasoning. Others are exploring ceramic-coated exteriors that reflect heat more efficiently, requiring fewer coals to maintain temperature. These innovations aim to solve the traditional pain points of cast iron—namely weight and maintenance—while preserving the thermal characteristics that make it ideal for bread.
Cast Iron vs. Enameled: Which Is Best for Campsite Bread?
The debate between bare cast iron and enameled Dutch ovens intensifies when you move outdoors. Bare cast iron excels in high-heat applications and develops a natural non-stick patina over time. For bread baking, this means you can preheat the pot to screaming temperatures without worrying about damaging a coating—essential for achieving that initial blast of heat that creates oven spring.
Enameled Dutch ovens, while beautiful in kitchen settings, present challenges in the field. The porcelain coating can crack under thermal shock when placed directly on hot coals, and the lighter interior makes it harder to judge crust development. However, they require no seasoning and resist acidic ingredients, which matters if you’re also using your Dutch oven for tomato-based camp stews.
For dedicated bread bakers, the verdict is clear: bare cast iron offers the durability and heat tolerance needed for consistent outdoor baking. The seasoning process becomes part of your camping ritual, creating a surface that improves with each loaf.
Size Matters: Selecting the Right Capacity for Your Baking Needs
The Solo Baker’s Companion: 4-Quart Options
A 4-quart Dutch oven produces a 1-pound loaf—perfect for solo backpackers or couples who want fresh bread without leftovers. Its compact size means faster heating times and requires fewer coals, making it ideal for short trips or minimalist setups. The smaller circumference also means your dough rises higher, creating impressive height relative to the loaf’s diameter.
Family Feeding: 6-8 Quart Workhorses
For group camping or weekend family trips, the 6-8 quart range hits the sweet spot. These ovens accommodate 1.5 to 2-pound boules or multiple smaller loaves, giving you enough bread to feed four to six people. The larger thermal mass provides more temperature stability, which actually makes baking more forgiving—a boon when you’re still mastering coal management.
The Baker’s Dozen: 10+ Quart Beasts
Serious baking enthusiasts who want to experiment with multiple loaves or large batch cooking should consider 10+ quart ovens. These are essentially portable brick ovens, capable of holding several loaves simultaneously or baking pizza. The trade-off is significant weight and coal consumption, making them best suited for car camping or basecamp scenarios where portability isn’t paramount.
The Importance of Lid Design for Even Heat Distribution
Flat Lids vs. Domed Lids: A Thermal Perspective
The lid isn’t just a cover—it’s a critical heat management tool. Flat lids with a lip around the edge serve dual purposes: they hold hot coals for top heat and can be flipped over to use as a griddle. For bread baking, this lip is invaluable. It keeps coals from sliding off while you’re rotating the oven, ensuring consistent top browning.
Domed lids, while excellent for roasts that need headspace, create uneven heat distribution for bread. The apex of the dome stays cooler, potentially leaving the center of your loaf underbaked. Some hybrid designs feature a slightly domed interior with a flat exterior, attempting to balance steam circulation with coal stability.
Lid Tightness and Steam Retention
The seal between pot and lid determines how much steam escapes during baking. Too loose, and you lose the moist environment needed for crust development. Too tight, and pressure builds up, potentially forcing dough out or creating safety concerns. Look for lids that sit flush with just enough gap to allow minimal steam venting—about the thickness of a piece of paper is ideal.
Some advanced designs incorporate tiny vent holes that can be opened or closed, giving you control over steam release. This feature is particularly useful for the final stage of baking when you want to drive off moisture to crisp the crust.
Handle Systems: Safety and Portability Considerations
Bail Handles vs. Side Handles
The bail handle—that wire loop that arches over the top—transforms a Dutch oven from a static pot into a portable baking system. It allows you to hang the oven over a fire or lift it safely with a hook when it’s buried in coals. For campsite bread bakers, a sturdy bail handle is non-negotiable. It should be thick enough to support the oven’s weight when full of dough and should pivot smoothly without binding.
Side handles (or “ears”) are useful for rotating the oven on a flat surface or for lifting with pot lifters. The best designs incorporate both systems, giving you flexibility for different cooking scenarios. Pay attention to handle placement—those positioned too low can become buried in coals, making them impossible to grab without disturbing your heat source.
Heat-Resistant Coatings and Grips
Modern Dutch ovens sometimes feature wooden or silicone grips on handles. While comfortable, these have no place in serious campfire cooking. They’ll burn, melt, or become damaged. Pure cast iron handles that can withstand direct flame are essential. Consider bringing leather welding gloves or specialized Dutch oven gloves instead—accessories we’ll discuss later.
Seasoning and Maintenance in the Field
The Mobile Seasoning Kit
Maintaining your Dutch oven’s seasoning at camp requires a minimalist approach. Pack a small container of flaxseed oil or grapeseed oil—both have high smoke points and polymerize well. After cleaning, heat the oven slightly, apply a micro-thin layer of oil with a dedicated cloth, and heat it over coals until it smokes lightly. This quick field-seasoning prevents rust and builds your patina even while adventuring.
Avoid soap in the field unless absolutely necessary. Instead, use hot water and a dedicated brush or scraper. For stubborn dough residue, coarse salt acts as an abrasive that won’t damage seasoning. The key is cleaning while the oven is still warm—cold, dried dough becomes cement.
Dealing with Moisture and Humidity
Camping often means morning dew, unexpected rain, and high humidity—all enemies of cast iron. Always store your Dutch oven in a breathable cotton bag (never plastic) that allows moisture to escape. Some bakers place a paper towel inside to absorb condensation. If rust appears, don’t panic—a quick scrub with steel wool at home, followed by re-seasoning, restores the surface. In the field, minor rust can be managed with vigorous scrubbing and immediate re-oiling.
Heat Source Compatibility: Campfires, Coals, and Stoves
The Charcoal Chimney Method
Serious campsite bread bakers swear by the charcoal chimney starter. It lights coals evenly without lighter fluid (which imparts flavors), and gives you a precise count for temperature control. The standard formula is: oven size diameter + 3 coals on top, oven size diameter - 3 coals underneath. For a 12" oven baking bread at 450°F, that’s 15 coals on the lid and 9 underneath.
This method provides predictable, consistent heat—crucial for bread, which is less forgiving than stews. You can even pre-light replacement coals in a second chimney, swapping them out mid-bake if you’re doing a long fermentation loaf.
Wood Fire Nuances
Cooking directly on wood coals connects you to centuries of tradition, but requires skill. Hardwoods like oak, maple, and hickory produce long-lasting, consistent coals. Softwoods like pine create hot, fast-burning coals but impart resinous flavors and spike temperatures unpredictably.
When baking on wood coals, create a flat bed of embers about 1.5 times the diameter of your oven. Place the oven directly on the coals, then scoop additional embers onto the lid. You’ll need to rotate the oven 90 degrees every 10-15 minutes to counteract hot spots—a technique that becomes second nature with practice.
Propane and Liquid Fuel Stove Adaptations
Not all camps allow open fires, but that doesn’t mean you can’t bake bread. Specialized Dutch oven stoves—or even a two-burner camp stove with a heat diffuser—can power your baking. The key is creating a heat chamber. Place the Dutch oven on one burner and use a metal windscreen or foil to trap heat around the oven. You’ll need to monitor temperatures closely, as stoves lack the thermal mass of coals.
Essential Accessories Every Campsite Bread Baker Needs
The Lid Lifter: Your Most Important Tool
A 16-20 inch lid lifter (essentially a metal rod with a hook) keeps your hands safely away from hot coals when checking your loaf. Look for one with a wooden or insulated handle and a sturdy hook that won’t bend under a loaded lid’s weight. Some models include a small shovel on the opposite end for coal management—dual-purpose tools are gold when packing space is limited.
Coal Management Tools
Long-handled tongs (18+ inches) let you reposition coals without reaching into the fire. A small metal dustpan or shovel helps scoop coals onto the lid. For precision work, a pair of leather welding gloves gives you dexterity to move individual coals by hand—essential for fine-tuning temperatures.
Thermometers: Instant-Read and Probe
Bread baking demands temperature accuracy. An infrared thermometer lets you check the oven’s surface temperature without opening it. Even more valuable is a probe thermometer with a heat-resistant cable—you can insert it into the oven through a tiny vent hole and monitor internal temperature without lifting the lid and releasing precious steam.
Dough Management in the Wild
Bring a lightweight bamboo cutting board as a work surface and a silicone dough scraper for handling sticky dough. A compact proofing basket (banneton) that nests inside your Dutch oven for transport saves space. For scoring your loaves, a simple razor blade on a coffee stirrer handle works as well as an expensive lame.
Weight and Portability: Balancing Durability with Packability
The Ounce Counting Reality Check
A 6-quart cast iron Dutch oven weighs 15-18 pounds empty. Add coals, lid, and accessories, and you’re looking at 25+ pounds. For backpackers, this is a non-starter. But for canoe camping, car camping, or horse packing, the weight becomes manageable when distributed properly.
Consider the weight-to-usefulness ratio. That 18-pound oven also serves as your cooking pot, frying pan (using the inverted lid), and baking vessel—potentially replacing three other pieces of gear. For minimalist car campers, a single Dutch oven might be the only cookware you need.
Packable Design Features
Some modern Dutch ovens feature legs that unscrew or fold flat, reducing packed volume. Others have lids that double as skillets, eliminating the need for a separate frying pan. When evaluating portability, think about how the oven nests with your other gear. A 6-quart oven that fits inside your 8-quart model gives you a versatile, space-efficient system for group trips.
Alternative Materials for Weight Savings
If weight is your primary concern, explore anodized aluminum Dutch ovens. They weigh 60-70% less than cast iron and heat more quickly. The trade-off? Inferior heat retention and a less ideal thermal mass for bread. You’ll need to manage heat more actively and may struggle with oven spring. However, for backpackers determined to bake in the backcountry, they represent a viable compromise.
Temperature Control Techniques for Perfect Campfire Loaves
The 450°F Sweet Spot
Most artisan breads thrive at 450-475°F. Achieving this in a Dutch oven requires understanding the relationship between coal quantity, ambient temperature, and wind. In calm conditions at 70°F, the diameter-plus-three formula works perfectly. But in wind, you’ll need 2-3 additional coals on top to compensate for heat loss. Cold weather (below 40°F) demands 4-5 extra coals on both top and bottom.
The Rotation Ritual
Even the best Dutch ovens develop hot spots, especially on uneven coal beds. Rotate the oven 90 degrees every 10-12 minutes, and rotate the lid independently in the opposite direction. This creates a convection-like effect, ensuring even browning. Mark the 12 o’clock position on both pot and lid with a small file scratch so you can track rotations accurately.
Managing the Steam Phase
For the first 20-25 minutes of baking, you want maximum steam. Keep the lid tight and resist the urge to peek. After this initial spring phase, you can crack the lid slightly or remove 3-4 coals from the top to drive off moisture and crisp the crust. Some bakers place a small twig or piece of foil under the lid edge to create a controlled vent for the final 10 minutes.
Understanding Thermal Mass and Heat Retention
The Heat Battery Effect
Think of your Dutch oven as a battery that stores thermal energy. The greater the mass, the more energy it holds. This is why preheating is crucial—placing dough in a cold Dutch oven produces dense, gummy bread. Preheat for at least 20 minutes with coals on both top and bottom before loading your loaf.
The thermal mass also buffers temperature fluctuations. When you open the lid to add dough, you might lose 50-75°F of air temperature, but the oven walls and lid remain hot, quickly reheating the interior. This forgiveness is invaluable in unpredictable outdoor conditions.
Recovery Time Between Bakes
Planning multiple loaves? Your Dutch oven’s recovery time matters. After removing a finished loaf, add 4-5 fresh coals and let the oven reheat for 10 minutes before loading the next batch. The retained heat in the iron means you’re not starting from zero, but you still need to rebuild that optimal baking environment. Experienced camp bakers often run two Dutch ovens simultaneously, staggering loading times for continuous production.
Budget Considerations: Investment vs. Performance
The Entry-Level Threshold
Quality campsite Dutch ovens start around $60-80 for a basic 6-quart model. These will have the essential features—bail handle, flat lid with lip, and solid construction—but may have rougher casting and require more initial seasoning. They’re perfectly functional and can last decades with care.
The mid-range ($100-150) offers smoother casting, more consistent wall thickness, and often includes useful accessories like a lid lifter or carrying case. This is the sweet spot for most serious enthusiasts—you’re paying for quality without premium brand markup.
Premium Features Worth the Splurge
High-end Dutch ovens ($200+) justify their cost through innovations like precision-machined lids for better seals, optimized handle geometry, and included temperature management systems. Some feature internal thermometer ports or built-in trivets that elevate the oven slightly for better bottom heat control. For those who bake bread weekly at camp, these features save time and improve consistency.
Consider the cost-per-use over a lifetime. A $150 Dutch oven used 50 times per year for 20 years costs 15 cents per use. Skimping on quality to save $50 often means replacing a cheap oven in 3-5 years when it cracks or warps from thermal stress.
Environmental Factors: Weather and Altitude Adjustments
Baking in the Rain and Wind
Wet weather doesn’t mean skipping fresh bread, but it requires adaptation. Create a windscreen using rocks, logs, or a folding aluminum panel. This protects your coals and concentrates heat. In heavy rain, a tarp shelter becomes essential—but position it high enough that radiant heat doesn’t melt the material.
Humidity actually helps bread baking. That damp mountain air means your dough loses less moisture during proofing, and the ambient moisture contributes to crust development. You might need 2-3 fewer coals in high-humidity environments since moisture transfers heat more efficiently.
High Altitude Baking Science
Above 5,000 feet, everything changes. Water boils at lower temperatures, fermentation speeds up, and dough rises more easily but collapses more readily. Reduce yeast by 25% and increase salt slightly to strengthen gluten structure. Your Dutch oven needs 5-10% more coals to compensate for thinner air’s reduced oxygen supply to the fire.
At extreme altitudes (8,000+ feet), consider baking in two stages: a lower temperature (425°F) for the first 15 minutes to set structure, then increasing to 475°F for oven spring and browning. This prevents the rapid rise from bursting the loaf’s structure before it sets.
Frequently Asked Questions
How do I prevent the bottom of my bread from burning when using a Dutch oven at camp?
The key is creating an air gap between the oven bottom and the coals. Use a metal trivet, three small stones arranged in a triangle, or even a layer of sand or ash to elevate the oven slightly. This diffuses direct heat and allows air circulation. Also, follow the coal formula carefully—fewer coals underneath than on top. Rotate your oven every 10 minutes to distribute any hot spots, and consider using a heat diffuser if you’re baking on a concentrated bed of coals.
Can I use my kitchen Dutch oven for campfire bread baking?
Kitchen Dutch ovens, especially enameled ones, aren’t designed for direct flame and can crack or discolor. They also typically lack the bail handle needed for safe coal management. If you must use a kitchen pot, place it on a camp stove with a heat diffuser rather than directly on coals. However, investing in a proper camp Dutch oven with legs and a flat, lipped lid will transform your outdoor baking experience and keep your indoor cookware pristine.
What’s the best way to transport a heavy Dutch oven to my campsite?
Use a dedicated padded carrying bag that protects both the oven and your other gear from soot and grease. Many bakers nest their Dutch oven inside a plastic storage bin with their other cooking equipment. For backpackers or canoeists, consider a lightweight canvas Duluth pack that distributes weight evenly. Always store the lid separately or secured with a strap to prevent it from banging against the pot and chipping seasoning. Some campers wrap their oven in an old towel before bagging it for extra protection.
How do I know when my campfire Dutch oven has reached the right temperature for bread?
Invest in an infrared thermometer to check the lid temperature—it should read 450-475°F. Without tools, use the “hand test”: hold your hand 6 inches above the lid. If you can keep it there for 3-4 seconds, you’re around 350°F. If you can only hold it for 1-2 seconds, you’re approaching 450°F. The most reliable method is the flour test: sprinkle a pinch of flour on the preheated oven bottom. If it browns in 60 seconds, you’re ready to bake. If it burns in 30 seconds, it’s too hot.
How long should I preheat my Dutch oven before baking bread at camp?
Preheating takes longer over a campfire than in your kitchen. Allow 20-25 minutes with coals on both top and bottom. This ensures the entire thermal mass—not just the surface—reaches target temperature. Place your empty Dutch oven on the coals with the lid on and fully coaled. After 20 minutes, carefully remove the lid, check temperature, add your dough, replace the lid with fresh coals, and start your baking timer. Skipping proper preheating is the number one cause of dense, gummy bread.
What’s the ideal dough hydration level for campsite Dutch oven bread?
Aim for 65-70% hydration for your first few attempts—this is forgiving and less likely to stick. As you gain experience, increase to 75-80% hydration for those holey, artisan-style crumb structures. The Dutch oven’s sealed environment is more forgiving than a home oven, so you can push hydration higher without worrying about dough spreading. Bring a spray bottle of water to mist the dough before closing the lid for extra steam, especially in dry climates.
Can I bake sourdough bread in a Dutch oven while camping?
Absolutely, and it’s a game-changer. Feed your starter before leaving home and keep it in a sealed jar in your cooler. In cool weather, the starter will be sluggish, so give it extra time or keep it in a sleeping bag at night. The Dutch oven’s consistent heat is actually ideal for sourdough’s longer bake times. Plan for a 45-50 minute bake at 450°F, and consider doing the final proof in the Dutch oven itself while it preheats—just oil it well and flour the dough heavily.
How do I clean my Dutch oven in the field without damaging the seasoning?
Scrape out crumbs while the oven is still warm using a dough scraper or dedicated brush. Add hot water and scrub with a natural-bristle brush—never use metal scouring pads. For stubborn bits, boil a cup of water in the oven to loosen residue. Dry immediately over low heat, then apply a thin coat of oil while still warm. Avoid soap unless absolutely necessary; if you must use it, re-season the oven that evening. Pack a dedicated cleaning brush that never touches soap to prevent contamination.
What’s the best bread recipe for beginners using a campfire Dutch oven?
Start with a no-knead dough: 3 cups flour, 1.5 cups water, 1/4 tsp yeast, 1.5 tsp salt. Mix at home, let it ferment for 12-18 hours in a sealed container, then shape at camp. This forgiving dough thrives on Dutch oven steam and doesn’t require precise timing. It’s also less messy to handle in the outdoors. As you master temperature control, progress to kneaded doughs and sourdough. The no-knead method’s wet dough and long fermentation develop excellent flavor with minimal technique.
How do I adjust baking time and temperature for different altitudes and weather conditions?
At altitudes above 5,000 feet, increase oven temperature by 25°F and reduce baking time by 5-10 minutes to prevent over-proofing in the oven. In temperatures below 40°F, add 4-5 extra coals to both top and bottom to compensate for heat loss to the environment. On windy days, build a windscreen and add 2-3 extra coals on top. In high humidity, reduce top coals by 2-3 since moisture transfers heat more efficiently. Always use a probe thermometer in the loaf’s center—bread is done at 200-205°F regardless of external conditions.
See Also
- 10 Game-Changing Dutch Oven Sets for Campfire Baking in 2026
- 10 Game-Changing Dutch Oven Sets for Campfire Stews in 2026
- 10 Premium Dutch Oven Sets for Baking Cinnamon Rolls at Camp in 2026
- 10 Must-Have Camping Cooking Stations with Windscreens for Chefs
- 10 Must-Have Manual Pump Camping Showers for Off-Grid Families in 2026