Table of Contents
Shoulder pain has become the silent trip-ruiner for outdoor enthusiasts, turning dream adventures into miserable slogs. If you’ve ever winced under the weight of a traditional backpack, felt that burning sensation creep across your traps after mile five, or popped ibuprofen just to make it through a weekend trip, you’re not alone. The good news? The backpacking world is experiencing a quiet revolution that’s rewriting the rules of comfort. Frameless backpacks, once relegated to ultralight purists, have evolved into sophisticated load-carrying systems that can genuinely stop shoulder pain in its tracks. As we look toward 2026, these minimalist marvels are no longer compromises—they’re strategic choices backed by biomechanical science and innovative design.
The key isn’t just going lighter; it’s going smarter. Modern frameless packs leverage advanced materials, ergonomic harness systems, and a deeper understanding of how our bodies naturally carry weight. They’re designed to work with your physiology, not against it. But here’s the catch: choosing the wrong frameless pack—or using it incorrectly—can make shoulder problems worse. This guide cuts through the marketing hype to give you the expert knowledge you need to select, fit, and use a frameless backpack that will actually eliminate your shoulder pain for good.
Top 10 Frameless Backpacks
Detailed Product Reviews
1. Teton 65L Explorer Internal Frame Backpack for Hiking, Camping, Backpacking, Rain Cover Included, Black

Overview: The Teton 65L Explorer delivers serious backpacking capability without the premium price tag. This internal frame pack balances capacity, comfort, and durability for multi-day adventures, making it an ideal choice for both novice and experienced hikers looking to maximize value.
What Makes It Stand Out: Teton’s “feature-rich at this price point” promise holds true with multi-position torso adjustment, durable open-cell foam lumbar support, and integrated rain cover—all typically found on pricier models. The availability in 65L, 75L, and 85L sizes ensures you can match capacity to trip length, while the dedicated hydration pocket and sleeping bag compartment demonstrate thoughtful design. The “TETON TOUGH” ethos suggests confidence in durability.
Value for Money: Exceptional. Competing brands charge 2-3x more for similar features. You’re getting a complete backpacking system with compression straps, multiple compartments, and adjustable suspension that rivals packs in the $200+ range, making it perfect for budget-conscious adventurers or those testing the waters.
Strengths and Weaknesses: Strengths include impressive capacity, comprehensive adjustability, included rain cover, and robust construction. The multi-directional compression straps secure loads effectively. Weaknesses: at 5.5 pounds empty, it’s heavier than ultralight alternatives, and the materials—while durable—won’t match premium Cordura nylon. Some users report zipper quality inconsistencies.
Bottom Line: For hikers seeking maximum features per dollar, the Explorer 65L is unbeatable. It’s not the lightest or most refined pack, but it reliably handles serious backpacking trips without draining your wallet. Perfect for beginners and value-minded veterans alike.
2. VentaPak Lightweight Ventilation Backpack Spacer - Frame for Hiking, Commuting & Biking Backpacks - Large Mesh Ventilation, Rucksack Frames for Improved Airflow Reduced Sweat

Overview: The VentaPak solves a universal problem: the sweaty back syndrome that plagues backpack wearers. This ingenious aluminum frame spacer creates a ventilation channel between you and any pack, transforming your existing backpack into a breathable, posture-supporting system for hiking, commuting, or cycling.
What Makes It Stand Out: Media recognition from ABC, CBS, and NY Times Wirecutter validates its innovation. The reinforced aluminum structure with breathable mesh isn’t just a simple pad—it actively improves weight distribution by shifting load horizontally, reducing spinal compression. The posture-correcting design prevents shoulder rounding, while two size options ensure proper fit. A rare two-year warranty for an accessory demonstrates confidence.
Value for Money: At roughly half the cost of a premium ventilated backpack, it extends the life and comfort of your current investment. For commuters and daily users, the sweat reduction alone justifies the price. However, ultralight hikers may balk at adding 14+ ounces to their baseweight.
Strengths and Weaknesses: Strengths: universal compatibility, proven ventilation, posture benefits, durable construction, and excellent warranty. It genuinely reduces back sweat and discomfort. Weaknesses: adds bulk and weight, may not fit all backpack shapes, and the aesthetic isn’t sleek. Some users find installation fiddly.
Bottom Line: If you love your current pack but hate the back sweat, VentaPak is a game-changer. It’s a smart investment for commuters, students, and weekend hikers prioritizing comfort over ultralight minimalism. The posture benefits are a bonus.
3. TIMBER RIDGE Aluminum External Frame Hiking Backpacks with Adjustable Height, Lightweight & Foldable for Camping, Hiking, Travel, Outdoor
Overview: Timber Ridge resurrects the classic external frame design with modern materials and thoughtful engineering. This pack caters to traditionalists and gear-heavy hikers who value organization and load-carrying capacity over sleek minimalism, offering a robust platform for extended wilderness trips.
What Makes It Stand Out: The premium aluminum frame provides exceptional support for heavy, awkward loads that would overwhelm internal frame packs. Its foldable design is unique—collapsing for storage when not in use. The extensive customization options let you attach sleeping bags, tents, and accessories externally, while the mesh back panel and thick padding address traditional external frame comfort complaints.
Value for Money: Competitively priced within the external frame category, it offers durability and versatility that justifies the cost for the right user. However, internal frame packs at similar prices offer better stability and modern features, limiting its overall value proposition for general hikers.
Strengths and Weaknesses: Strengths: superior load-carrying capacity, excellent ventilation, customizable attachment system, and sturdy construction. The adjustable height fits various torso lengths. Weaknesses: external frames feel dated—higher center of gravity reduces stability on technical terrain, and the design is inherently heavier and bulkier than contemporary alternatives. Limited interior organization.
Bottom Line: Best suited for hunters, scouts, or hikers carrying irregular, heavy loads. For most backpackers, modern internal frame packs provide better performance. Timber Ridge excels as a niche solution, not a mainstream recommendation.
4. Teton 55L Scout Internal Frame Backpack for Hiking, Camping, Backpacking, Travel, Rain Cover Included, Olive

Overview: The Scout 55L distills Teton’s proven formula into a more versatile, manageable size. Positioned as the sweet spot for weekend warriors and light packers, this internal frame pack offers the same feature set as its larger siblings while avoiding the bulk that often overwhelms shorter trips.
What Makes It Stand Out: It inherits the Explorer’s best attributes: multi-position torso adjustment, open-cell foam lumbar pad, integrated rain cover, and TETON’s durability promise. The 55L capacity hits the perfect balance—spacious enough for 3-4 day trips yet compact enough for travel and day hikes. The olive colorway provides tactical aesthetic appeal without the military price premium.
Value for Money: Identical value proposition to the 65L model—maximum features per dollar. For most hikers, 55L is more practical than larger capacities, making this the smarter buy. You’re getting premium features like a sleeping bag compartment and hydration pocket at a budget price point that undercuts competitors by hundreds.
Strengths and Weaknesses: Strengths: ideal capacity for typical trips, full adjustability, included rain cover, durable construction, and excellent organization. The weight is more reasonable for shorter adventures. Weaknesses: shares the same potential zipper and material quality limitations of the larger model. Heavier than true ultralight options. The 45L and 65L siblings may fit specific needs better.
Bottom Line: The Scout 55L is Teton’s most balanced offering. Unless you’re planning weeklong expeditions, this capacity covers 90% of hiking scenarios while delivering unbeatable value. It’s the definitive entry-to-mid level pack for discerning budget shoppers.
5. Mardingtop 60L Military Internal Frame Backpack for Hiking,Camping,Hunting,Rucksack Backpack with Rain Cover
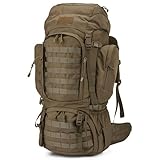
Overview: Mardingtop bridges tactical durability with backpacking functionality in this 600D polyester, MOLLE-equipped 60L pack. Designed for outdoorsmen who appreciate military-inspired organization and bombproof construction, it handles hiking, camping, and hunting with equal competence while meeting airline carry-on standards.
What Makes It Stand Out: The YKK hardware and 600D polyester signal serious durability rarely seen at this price point. The MOLLE webbing offers unlimited customization for attaching pouches and gear. A unique divider separates sleeping and main compartments, while the hydration sleeve doubles as a laptop pocket—perfect for adventure travelers. The military aesthetic is authentic, not cosmetic.
Value for Money: Outstanding for tactical gear enthusiasts. YKK components alone justify the cost, as they’re standard on premium packs costing twice as much. The versatility for both wilderness and urban use increases its value proposition, though civilian hikers may prefer lighter options.
Strengths and Weaknesses: Strengths: exceptional durability, modular MOLLE system, versatile compartments, airline compliance, and quality hardware. The 60L capacity is flexible for various trip lengths. Weaknesses: military styling isn’t universally appealing, and the robust materials add weight compared to ultralight packs. The frame suspension is less refined than dedicated hiking brands. Limited color options.
Bottom Line: Ideal for hunters, preppers, and tactical gear fans who hike. If you want a pack that transitions from trail to travel to emergency preparedness, this is your choice. Traditional backpackers may prefer lighter, more streamlined options, but Mardingtop delivers unmatched durability and versatility for the price.
6. Teton 65L Explorer Internal Frame Backpack for Hiking, Camping, Backpacking, Rain Cover Included, Graphite

Overview:
The Teton 65L Explorer is a feature-packed internal frame backpack designed for multi-day adventures. With its generous 65-liter capacity, this pack targets serious hikers and backpackers who need reliable gear without breaking the bank. The graphite colorway offers a sleek, understated aesthetic that works well on any trail.
What Makes It Stand Out:
This backpack shines through its customizable fit system. The multi-position torso adjustment accommodates medium to tall adventurers, while the open-cell foam lumbar pad with molded channels delivers exceptional comfort and ventilation. The dedicated sleeping bag compartment, multi-directional compression straps, and integrated hydration pocket demonstrate thoughtful design. The included rain cover adds significant value, protecting your gear in unpredictable weather.
Value for Money:
At its price point, the Explorer 65L competes with packs costing twice as much. You’re getting premium features like torso adjustability, a dedicated sleeping bag compartment, and comprehensive compression systems typically found in higher-end brands. The Teton Sports Promise of responsive customer support further sweetens the deal.
Strengths and Weaknesses:
Strengths include excellent adjustability, robust construction, comfortable load distribution, and generous capacity. The included rain cover is a major plus. Weaknesses are its weight compared to ultralight alternatives and potential overkill for casual day hikers. Some users may find the frame slightly bulky for airline travel.
Bottom Line:
The Teton 65L Explorer is an outstanding choice for backpackers seeking a durable, comfortable, and feature-rich pack for extended trips. It delivers exceptional value and performance that rivals premium competitors.
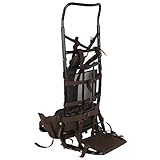
7. TR Aluminum External Frame Backpack with Adjustable Height for Extra Large Load Hunting Hiking Design, Camouflage

Overview:
The TR Aluminum External Frame Backpack is a specialized workhorse built for hunters and adventurers who regularly haul heavy, awkward loads. This pack distinguishes itself with a robust aluminum frame that adjusts from 34 to 40 inches, making it ideal for carrying large game or extensive gear on extended expeditions.
What Makes It Stand Out:
The external aluminum frame is the star feature, providing unparalleled load support and weight distribution for exceptionally heavy cargo. The Realtree Edge camouflage pattern offers superior concealment, while the three adjustable extended straps specifically accommodate large game. Dual zipper pockets on the waist belt provide quick access to essentials without breaking stride.
Value for Money:
This pack represents solid value for serious hunters and those needing maximum load capacity. While more expensive than basic internal frame packs, its specialized features—game carrying capability, adjustable frame height, and heavy-duty construction—justify the investment for its target audience. The one-year support period adds confidence.
Strengths and Weaknesses:
Strengths include incredible load capacity, customizable frame height, durable 600D fabric, and hunter-specific features like camouflage and quick-access pockets. The breathable mesh back panel and enhanced foam shoulder straps improve comfort under heavy loads. Weaknesses include bulkiness compared to internal frame designs, weight penalty, and limited versatility for non-hunting applications. External frames can snag on brush more easily.
Bottom Line:
For hunters and those regularly carrying extreme loads, the TR Aluminum External Frame Backpack is an excellent specialized tool. Its robust construction and thoughtful hunting features make it worth the investment for serious outdoorsmen.
8. Teton 55L Scout Internal Frame Backpack for Hiking, Camping, Backpacking, Travel, Rain Cover Included, Black

Overview:
The Teton 55L Scout offers a versatile middle ground in the Teton backpack lineup, delivering the same robust feature set as its larger siblings in a more manageable 55-liter package. This internal frame pack suits weekend warriors and travelers who need substantial capacity without the bulk of expedition-sized gear.
What Makes It Stand Out:
Like the 65L Explorer, the Scout excels with its multi-position torso adjustment system that fits medium to tall adventurers comfortably. The durable open-cell foam lumbar pad with molded channels ensures excellent airflow and comfort during long days on the trail. The large sleeping bag compartment and multi-directional compression straps provide organizational flexibility, while the included rain cover adds weather protection.
Value for Money:
The Scout maintains Teton’s reputation for delivering premium features at budget-friendly prices. You get professional-grade adjustability, comfort features, and organizational options typically reserved for higher-priced brands. The 55L capacity hits the sweet spot for most 2-5 day trips, making it more versatile than larger alternatives.
Strengths and Weaknesses:
Strengths include versatile sizing, excellent adjustability, comfortable suspension system, and comprehensive feature set. The included rain cover and hydration compatibility are notable advantages. Weaknesses include weight that’s slightly higher than ultralight competitors and capacity that may be insufficient for extended expeditions exceeding a week. Some users might prefer more exterior pockets.
Bottom Line:
The Teton 55L Scout is an exceptional all-around backpack for hikers and campers seeking a balance of capacity, comfort, and value. It’s ideal for weekend to week-long adventures.
9. Backpack Ventilation Frame Breathable Backpack Ventilation Spacer | Sweat-Free Back Support | Lightweight Mesh Design for Hiking, Travel Commuting

Overview:
This Backpack Ventilation Frame isn’t a backpack itself, but an innovative accessory designed to eliminate the sweaty back syndrome that plagues hikers and commuters. Weighing just 200 grams, this spacer creates a 2cm air gap between your back and pack, promising significant temperature reduction and moisture wicking.
What Makes It Stand Out:
The 3D spacer mesh panel is engineered to reduce back temperatures by 3-5°C through constant airflow. Its universal design fits 90% of backpacks from 5-30L, attaching in under 10 seconds with a simple clip-and-loop system. The aerospace-grade polyester and TPU frame support loads up to 30kg while redistributing 40% of shoulder pressure to the hips, reducing fatigue.
Value for Money:
At a fraction of the cost of a new ventilated backpack, this spacer transforms your existing pack into a cooler, more comfortable carrier. The 5-year warranty and extreme durability testing suggest long-term value that outlasts many backpacks themselves. For hot climate hikers or daily commuters, it’s a cost-effective upgrade.
Strengths and Weaknesses:
Strengths include universal compatibility, featherlight weight, proven cooling performance, and impressive load-bearing capacity. The 5-year warranty demonstrates manufacturer confidence. Weaknesses include adding minimal bulk to your pack, potential fit issues with non-standard backpack designs, and an additional expense on top of your existing gear. Some users may find it shifts slightly during active movement.
Bottom Line:
This ventilation spacer is a brilliant solution for anyone battling back sweat and discomfort. It’s an affordable, effective upgrade that breathes new life into your current backpack.
10. Maelstrom Hiking Backpack,Camping Backpack,40L Waterproof Hiking Daypack with Rain Cover,Lightweight Travel Backpack,Green

Overview:
The Maelstrom 40L Hiking Backpack positions itself as a lightweight, waterproof solution for day hikers, travelers, and commuters who prioritize weather protection and portability. Constructed from rip-stop 210D nylon with a bonus rain cover, this pack ensures your gear stays dry in wet conditions.
What Makes It Stand Out:
The waterproof construction sets this pack apart, complemented by a unique wet pocket inside the main compartment for separating damp gear. Safety features like reflective signs and an integrated whistle on the chest buckle show thoughtful design. The headphone hole and hydration system compatibility add modern convenience, while elastic side fasteners accommodate trekking poles.
Value for Money:
This pack offers excellent value for a waterproof, feature-rich daypack. The inclusion of a rain cover with reflective logo, multiple compartments, and specialized pockets like the wet compartment provide premium features at a mid-range price. Its airline-friendly size adds versatility for travel.
Strengths and Weaknesses:
Strengths include waterproof material, lightweight design, comprehensive organizational pockets, safety features, and versatility for hiking and travel. The wet pocket is particularly innovative. Weaknesses include the 40L capacity limiting its use for multi-day trips, and the 210D fabric, while waterproof, may not match the durability of heavier denier packs for rugged use. The green color may not appeal to all users.
Bottom Line:
The Maelstrom 40L is an outstanding lightweight daypack that excels in wet conditions and travel scenarios. It’s perfect for day hikes, commuting, and short trips where weather protection is paramount.
Understanding Shoulder Pain and Backpacks
The Anatomy of Shoulder Strain
Your shoulders aren’t built to be load-bearing pillars. The complex network of rotator cuff muscles, deltoids, and trapezius fibers functions best as dynamic stabilizers, not static weight hangers. When you strap 30-40 pounds to your back with a traditional framed pack, you’re essentially asking these muscles to contract isometrically for hours, restricting blood flow and creating microscopic tissue damage. The acromioclavicular (AC) joint, where your collarbone meets your shoulder blade, takes the brunt of this abuse, compressing under downward pressure and potentially leading to impingement syndrome.
The pain you feel isn’t just muscle fatigue—it’s your body’s alarm system warning of joint compression, nerve irritation, and compromised circulation. Over time, this repetitive stress can create chronic issues that persist long after you’ve unshouldered your pack. Understanding this mechanical mismatch is the first step toward choosing a solution that works with your body’s design, not against it.
Why Traditional Backpacks Cause Problems
Internal frame packs revolutionized backpacking in the 1990s, but they came with a hidden cost. Their rigid structures and hip-belt-focused weight transfer created a “set it and forget it” mentality that encouraged overloading. The problem? Even with excellent hip belts, 20-30% of pack weight typically remains on your shoulders. When you’re carrying 50 pounds, that’s 10-15 pounds of constant pressure on those delicate shoulder structures we just discussed.
Moreover, the stiff frames and structured padding create pressure points rather than distributing load evenly. The shoulder straps, often an inch or more thick, dig into the supraspinatus tendon and can compress the brachial plexus—the nerve bundle controlling your arms. The result? Numb fingers, burning shoulders, and that dreaded “dead arm” feeling halfway through your trek. Traditional packs also force a rigid posture, preventing your natural spinal curves from absorbing shock and forcing your shoulder girdle into unnatural positions.
What Are Frameless Backpacks?
The Minimalist Revolution
Frameless backpacks strip away rigid structures to create a system that molds to your back and moves with your body. Think of them as a sophisticated sack with purpose-built suspension rather than a box you wear. These packs typically weigh between 8-24 ounces—less than a pound—compared to 3-5 pounds for traditional framed packs. This weight savings alone reduces your total load, but the real magic lies in how they distribute what remains.
The philosophy is radical: instead of building a pack that can carry heavy loads, build a system that encourages you to carry less while making that weight feel nearly weightless. Modern frameless packs achieve this through body-hugging designs, strategic padding placement, and harness systems that transfer load to your hips without the bulk of a full frame. They’re not just stripped-down versions of framed packs; they’re entirely different animals designed from the ground up for efficiency.
How Frameless Designs Differ
The fundamental difference lies in load management. Without a rigid frame, these packs rely on your sleeping pad (folded inside) or carefully packed gear to create structure—a technique called “virtual frame” packing. The harness system attaches directly to the pack body, allowing it to conform to your spine’s natural S-curve rather than forcing your spine to conform to the pack.
Shoulder straps on quality frameless packs are typically narrower, more flexible, and positioned to ride higher on your shoulders, engaging the stronger upper trapezius and levator scapulae muscles while avoiding the vulnerable AC joint. The pack body sits higher and closer to your center of gravity, reducing the lever-arm effect that pulls you backward and forces your shoulders to compensate. This intimate fit means the pack becomes an extension of your torso rather than a separate entity fighting against your every move.
The Science Behind Pain-Free Carrying
Weight Distribution Mechanics
Frameless packs excel at creating a “load hugging” effect that traditional packs can’t match. By sitting flush against your back, they eliminate the gap between pack and body that creates leverage and shifting weight. The center of mass stays within your base of support—basically, the pack’s weight stays over your feet where it belongs. This reduces the forward lean compensation that strains your shoulders and lower back.
The key is dynamic distribution. As you move, a well-fitted frameless pack shifts subtly with you, keeping weight distributed across a larger surface area of your upper back rather than concentrating it on two narrow strap pressure points. Your entire torso shares the load, with the pack body itself acting as a broad weight distributor. This is why proper packing technique is crucial—creating a stable, even mass that presses uniformly against your back.
Load Transfer Without Frames
Here’s where modern frameless packs get clever: they use your hip belt not as the primary load-bearing tool, but as a stabilization and secondary support system. The belt—often removable or minimal—catches about 30-40% of the weight, just enough to keep the pack from bouncing. The remaining 60-70% rides on your back, but because the total weight is typically under 25 pounds, this feels like a gentle hug rather than a crushing burden.
The straps themselves are engineered with angled attachment points that create a slight “V” shape, pulling the pack upward and inward simultaneously. This vector of force lifts the weight off your shoulders while pulling it close to your spine. Some 2026 designs incorporate subtle elastomers in the strap attachment points that allow millimeters of stretch, absorbing shock and preventing the jarring impacts that cause micro-trauma to shoulder tissues.
Biomechanics of Natural Movement
Your spine is designed to flex, rotate, and absorb shock. Traditional frames lock it into a single position, forcing your shoulders to compensate for every twist and turn. Frameless packs restore your natural kinematic chain. When you duck under a branch, your pack flexes with you. When you navigate uneven terrain, the pack shifts subtly, allowing your core muscles to engage naturally.
This freedom of movement activates your body’s built-in stabilization system: the multifidus muscles along your spine, your transverse abdominis, and the rotator cuff muscles in their proper stabilizing role. Instead of fighting your pack, you’re moving with it. This reduces the static muscle contraction that causes pain and allows for better circulation, delivering oxygen to tissues and removing metabolic waste products that contribute to soreness.
Essential Features for 2026
Advanced Harness Systems
The shoulder straps on next-generation frameless packs are marvels of ergonomic engineering. Look for S-curved straps that follow the natural contour of your collarbone and chest, avoiding the brachial plexus entirely. Width matters—straps should be 2-3 inches wide at the attachment point, tapering to 1.5 inches where they pass over your shoulder apex. This distributes pressure while allowing free arm movement.
Padding has evolved beyond simple foam. 2026 harnesses use segmented, laser-cut foam with ventilation channels, or even 3D-spacer mesh that creates air circulation without sacrificing support. The attachment points should offer multiple inches of vertical adjustability—not just for torso length, but to fine-tune the pack’s ride height based on your load and activity. Some systems now incorporate subtle load-lifters that work without a frame, using angled webbing to create upward pull.
Material Innovations
The fabric revolution is making frameless packs more durable at lighter weights than ever before. Ultra-high-molecular-weight polyethylene (UHMWPE) blends like Dyneema Composite Fabrics are becoming standard in high-end packs, offering exceptional tear strength at under 2 ounces per square yard. For 2026, look for recycled UHMWPE options that maintain performance while reducing environmental impact.
Robic nylon, with its high tenacity and abrasion resistance, dominates the mid-range market. The key spec is the “denier” rating—100-210D for ultralight packs, 400-500D for durability-focused models. More important than denier is the fabric’s “grab strength” and “tear propagation resistance,” specs manufacturers are now publishing. Waterproof coatings have also evolved; look for non-PFC DWR treatments that maintain breathability while shedding rain.
Capacity Considerations
Frameless packs typically range from 30-55 liters, with the sweet spot for most hikers being 35-45 liters. The capacity you need depends entirely on your gear volume, not arbitrary trip length. A skilled ultralight hiker can do a week-long trip from a 35-liter pack, while a traditional gear setup might not fit in a 50-liter frameless pack.
For 2026, modular capacity is trending. Look for packs with roll-top closures that can expand 5-10 liters, removable hip belt pockets that add versatility, and external attachment systems that carry gear without stuffing it inside. The key is choosing a pack that matches your compressed gear volume, not your gear’s fluffed-up storage size. Measure your sleeping bag, quilt, and clothing in compression sacks to get realistic numbers.
Ventilation Technology
The “sweaty back” problem plagued early frameless packs, but 2026 designs have cracked the code. Tensioned mesh back panels create a 1-2 inch air gap without compromising the close-to-body fit essential for weight distribution. These panels use lightweight monofilament mesh stretched over minimal aluminum stays (which don’t disqualify them as “frameless” since they’re only for ventilation, not load support).
Alternatively, some designs use vertically oriented foam channels with perforated foam, creating airflow paths that wick moisture laterally. The latest innovation is “active ventilation” fabrics that use body heat to create micro-convection currents, though these remain premium features. For most users, a simple, well-designed mesh panel or channel system provides adequate ventilation while maintaining the pack’s weight advantages.
Mastering Fit and Sizing
Torso Length Measurement
Getting torso length right is non-negotiable with frameless packs. Unlike framed packs with adjustable suspension, frameless packs typically come in fixed torso sizes. Measure from your C7 vertebrae (the prominent bump at the base of your neck) to the iliac crest (the top of your hip bones) along your spine’s natural curve. This measurement determines your pack size—small (16-18"), medium (18-20"), large (20-22").
But here’s the pro tip: frameless packs fit differently. You want the pack to ride higher than a framed pack, with the bottom hitting about 2-3 inches above your hip belt line. This position keeps weight over your center of gravity and prevents the pack from pulling backward. When trying on packs, load them with 15-20 pounds and have someone check that the shoulder straps attach at a point level with your T1 vertebrae—just below where your neck meets your shoulders.
Hip Belt Integration
The hip belt on a frameless pack serves a different purpose than on a framed pack. It’s not meant to bear 70-80% of the load; instead, it stabilizes and catches 30-40% of the weight. For 2026, look for removable belts that weigh 3-4 ounces, with 1-2 inches of padded width. The belt should sit on your iliac crest, not your waist, and tighten with a forward pull mechanism that creates a snug fit without restricting breathing.
Some frameless packs now offer “half belts” or “luminary belts” that are essentially wide webbing with minimal padding. These work surprisingly well for loads under 20 pounds, providing just enough stability without the bulk. For loads over 25 pounds, a padded belt becomes more important. The key is adjustability—look for belts with at least 6 inches of length adjustment and the ability to move the attachment points up or down an inch.
Sternum Strap Positioning
The sternum strap is your shoulder pain prevention secret weapon. It should ride 1-2 inches below your collarbones, pulling the shoulder straps inward to prevent them from sliding off and spreading pressure across your chest. In 2026 designs, look for straps with elasticized sections that allow breathing expansion without loosening.
The attachment points should slide vertically on a rail system, letting you position the strap perfectly for your anatomy. Width matters—straps should be 0.5-1 inch wide with a breakaway feature for safety. Some advanced packs now integrate a whistle into the buckle and use magnetic closures for one-handed adjustment. The sternum strap’s job is to create a triangle of support between your two shoulders and chest, stabilizing the pack’s top and preventing the seesaw motion that causes strap digging.
Weight Optimization Strategies
The Ultralight Philosophy
Going frameless forces a mindset shift: every ounce matters because your body becomes the frame. The ultralight philosophy isn’t about deprivation; it’s about intentionality. Start with the “Big Three”—shelter, sleep system, and pack. These should total under 6 pounds for frameless comfort. Your goal is a total pack weight (including food and water) under 20 pounds, with 15 pounds being the pain-free sweet spot.
This isn’t about being a minimalist zealot. It’s about recognizing that every pound you remove from your pack is a pound your shoulders don’t have to support. The math is simple: reducing your base weight from 15 to 10 pounds has a multiplier effect on comfort because it changes how the pack rides and how much your stabilizing muscles must work. Frameless packs reward discipline exponentially.
Base Weight Fundamentals
Your base weight—everything except consumables (food, water, fuel)—is the critical number. For pain-free frameless backpacking, aim for a base weight under 10 pounds. This isn’t as extreme as it sounds. Modern down quilts weigh 16-20 ounces, ultralight tents are under 2 pounds, and titanium cookware is measured in grams.
The key is weighing everything with a kitchen scale and creating a spreadsheet. You’ll be shocked to discover that your “essential” headlamp weighs 8 ounces when a 1-ounce version exists. That 3-pound sleeping bag? A 20-degree down quilt weighs 22 ounces. These swaps aren’t sacrifices; they’re upgrades to better-performing gear that happens to be lighter. Your shoulders will thank you with every step.
Smart Packing Techniques
Packing a frameless pack is an art form that directly impacts shoulder comfort. Start by creating a virtual frame: line the back panel with your sleeping pad (folded or rolled) to provide structure. Pack dense, heavy items—food bag, water, cook kit—directly against this pad, centered between your shoulder blades. This positions the heaviest mass at your center of gravity.
Fill the remaining space with softer items like clothing and your sleep system, creating a uniform, stable load that doesn’t shift. The pack should feel like a solid cylinder when finished, not a lumpy sack. Use compression straps strategically to pull weight inward and upward, creating a cohesive unit that moves as one with your body. A well-packed frameless pack feels like it’s floating, with weight pressing evenly across your entire back rather than hanging from your shoulders.
Activity-Specific Selection
Thru-Hiking Applications
For long-distance trails, durability and comfort over months become paramount. Look for packs with reinforced bottom panels (300D+ fabric), replaceable shoulder straps, and robust hip belts that can handle 25-pound resupply loads. Capacity should be 40-55 liters to accommodate varying resupply strategies and gear changes.
The pack must also be repairable in the field. External daisy chains and webbing allow you to jury-rig repairs with cordage. Avoid packs with bonded seams or welded construction that can’t be sewn. For thru-hiking, a slightly heavier (20-24 oz) pack with 500D fabric often outperforms a sub-16 oz ultralight model that fails after 500 miles. Your shoulders need consistency over 2,000+ miles.
Day Hiking and Trail Running
For fast-and-light day missions, weight is everything. Packs in the 20-30 liter range weighing 8-12 ounces are ideal. Look for vest-style shoulder straps borrowed from running packs—these distribute weight across your entire upper torso and prevent bouncing. Hip belts can often be omitted entirely for sub-10-pound loads.
Features should be minimal: a hydration sleeve, a couple of stretch pockets, and maybe a zippered hip belt if you use one. The pack should compress completely when empty, rolling up inside your larger pack for multi-day trips. For trail running, look for bounce-reduction systems like elasticized sternum straps and side compression that pulls the load tight against your back.
Travel and Urban Use
Frameless packs are crossing over into travel because they avoid the rigid structure that makes traditional packs awkward in cities. For travel, prioritize security features: lockable zippers (if the pack has them), discreet pockets for passports, and a lay-flat design for packing cubes. Capacity around 35-40 liters works for carry-on compliance.
Look for packs that don’t scream “hiker” in urban environments—clean lines, neutral colors, and minimal external straps that catch on things. A removable hip belt is crucial here; you can take it off for airport security and urban walking where it looks dorky. The ability to stow straps completely (like a duffel conversion) is a bonus for bus and train travel.
Technical Gear Considerations
Photographers, climbers, and anglers need specialized access and attachment. For technical use, look for packs with side zippers to access gear without unpacking, robust external attachment systems (ice axe loops, daisy chains, compression straps), and reinforced haul loops. Capacity needs vary widely—a photographer might need 45 liters for a weekend, while a climber might do a week in 35 liters.
The key is modularity. Packs with removable brain/lids, detachable hip belt pockets, and configurable compression systems let you adapt the pack to your gear rather than forcing your gear to fit the pack. For heavy camera gear, consider packs with optional frame stays that can be added for 5-10 pound loads, giving you flexibility without committing to a fully framed pack.
Durability and Weather Protection
Fabric Technologies
The material arms race in 2026 has produced fabrics that are lighter and stronger than ever. Dyneema Composite Fabrics (DCF) remain the gold standard for ultralight durability, with tear strengths exceeding 200 pounds yet weighing less than 2 oz/sq yd. The new “Hybrid DCF” laminates add a woven polyester face for better abrasion resistance at trailheads and rock faces.
For most users, high-tenacity nylon (Robic, Cordura) offers the best price-performance ratio. Look for “double-ripstop” weaves that prevent tears from spreading. The coating matters too—silicone impregnation (silnylon) provides excellent waterproofing and tear strength, while PU coatings are more repairable with tape. For extreme durability, X-Pac laminates offer multi-layer protection but at a weight penalty.
Construction Quality
Even the best fabric fails with poor construction. Inspect seam types: flat-felled seams are strongest, followed by bound seams. Stitch count should be 8-10 stitches per inch—more is actually weaker because it perforates the fabric. Bar tacking (dense zigzag stitching) at stress points is non-negotiable; these are your failure points.
For 2026, look for “bias tape” reinforcement along all edges and seam allowances, which prevents fraying and adds years to pack life. Bonded seams are appearing on some ultralight packs, but these are difficult to repair in the field. The best compromise is hybrid construction: bonded main seams with bar-tacked reinforcements you can re-stitch if needed.
Water Management
True waterproof backpacks are myths—all will eventually leak through zippers, seams, or roll-tops. The smart approach is water resistance with proper internal protection. Look for packs with DWR-treated fabrics, taped seams, and roll-top closures that create a waterproof seal. Then, line your pack with a trash compactor bag (2 oz) or use waterproof stuff sacks for critical items.
Some 2026 packs feature “aquaguard” zippers that are water-resistant but add weight and stiffness. For frameless packs, these often aren’t worth the penalty. Instead, prioritize a pack with a drain hole in the bottom pocket—if water gets in, it can get out. Pack covers are largely ineffective in wind and brush; invest in a good liner system instead. Your shoulders will appreciate the simplicity and saved weight.
Transitioning Successfully
Physical Preparation
Switching to frameless isn’t just gear swapping—it’s physical training. Your core and upper back muscles must adapt to providing structure. Start 6-8 weeks before your first frameless trip with targeted exercises: planks (front and side), dead bugs, bird dogs, and resistance band rows. These build the stabilizing muscles that become your pack’s frame.
Begin with day hikes carrying 10 pounds in your frameless pack, focusing on posture and pack fit. Gradually increase weight and distance. Your body will protest initially—that’s normal neuromuscular adaptation. Pay attention to new aches in your lower back and abs; these are good signs that you’re engaging the right muscles. Shoulder pain should decrease immediately; if it doesn’t, your fit is wrong.
Load Reduction Timeline
Don’t go from a 35-pound framed load to a 15-pound frameless load overnight. Reduce systematically over several trips. Start by weighing every item and identifying the “dead weight”—redundant clothing, excess food, heavy gear you rarely use. Aim to cut 2-3 pounds per trip until you hit your target base weight.
This timeline also lets you test gear changes. That new ultralight shelter might save a pound but perform poorly in wind. Better to discover this on a short trip than a week-long expedition. Your shoulders need time to adapt to the new carrying mechanics too. The gradual reduction lets you build confidence in your lighter system while your body builds strength.
Muscle Development Timeline
Expect a 4-6 week adaptation period for your stabilizing muscles to fully adjust. The first two weeks, you’ll notice increased core and upper back fatigue—that’s your multifidus and erector spinae muscles waking up. By week four, you’ll feel more stable and notice less shoulder pressure. By week six, the frameless pack will feel natural.
During this period, listen to your body. Sharp pain is a warning sign; dull fatigue is adaptation. Do maintenance work: foam rolling your back and shoulders, stretching your hip flexors (which tighten from hip belt use), and strengthening your rotator cuff with band work. The goal is a resilient, balanced musculature that makes framed packs feel clumsy and overbuilt by comparison.
Common Pitfalls to Avoid
Overloading Your Pack
The cardinal sin of frameless backpacking is thinking “I have space, so I’ll fill it.” Frameless packs have absolute weight limits—typically 25-30 pounds maximum. Exceed this and the pack collapses, creating pressure points and defeating the weight distribution benefits. The pack will sag, pulling on your shoulders and causing exactly the pain you’re trying to avoid.
Set a hard limit: total pack weight shouldn’t exceed 20% of your body weight for comfortable frameless use. For a 150-pound hiker, that’s 30 pounds maximum, including water and food. Weigh your pack fully loaded before every trip. If you’re over, don’t “make it work”—remove items. Your shoulders don’t care that you “might need” that extra fleece.
Ignoring Fit Adjustments
Frameless packs require micro-adjustments throughout the day. As you consume food and water, the load’s center of gravity shifts. Stop every couple of hours to tighten compression straps, adjust shoulder strap tension, and reposition the hip belt. A pack that fit perfectly at the trailhead can start sagging and pulling by lunchtime.
Learn to read the signs: shoulder pain means the pack is riding too low or the load has shifted backward. Lower back pain suggests the pack is too high or the hip belt is too tight. The sternum strap may need loosening as your breathing rate increases on climbs. These adjustments take 30 seconds but prevent hours of discomfort.
Choosing Wrong Capacity
Too large a pack encourages overpacking; too small forces you to strap gear externally, creating weight distribution nightmares. The right capacity is determined by your gear’s compressed volume, not trip length. Measure your sleep system, clothing, and essentials in a box to calculate liters needed. Add 5 liters for food and you’re set.
Many hikers buy 50+ liter frameless packs thinking they’ll grow into them. This defeats the purpose. A 35-liter pack that forces you to carry only essentials will be more comfortable than a 50-liter pack filled with “just in case” items. Be honest about your gear volume. If you can’t fit everything in a 45-liter frameless pack, you need to reduce gear volume, not increase pack size.
Maintenance and Longevity
Cleaning Protocols
Dirt and body oils degrade fabrics and attract moisture, increasing pack weight and reducing performance. Clean your frameless pack every 3-5 trips or after any muddy adventure. Use a front-loading washing machine on gentle cycle with a mild, fragrance-free detergent. Never use fabric softeners—they destroy DWR coatings.
Better yet, hand wash in a bathtub with lukewarm water and Nikwax Tech Wash. Gently scrub straps and high-contact areas with a soft brush. Rinse thoroughly and hang dry—never machine dry, as heat damages coatings and foam. For stubborn stains, a paste of baking soda and water works wonders without harsh chemicals. A clean pack is a lighter, longer-lasting pack.
Storage Best Practices
Never store a frameless pack compressed or stuffed in a stuff sack. This crushes the foam in shoulder straps and hip belts, creating permanent deformations. Store it loosely packed with a towel inside to maintain shape, hanging in a closet or stored flat in a breathable cotton bag. Keep it away from direct sunlight, which degrades nylon and DWR coatings.
Before long-term storage, ensure the pack is completely dry. Pack mice love salty shoulder straps, so add a cedar block or store in a sealed container if you’re putting it away for winter. Remove any detachable straps or belts and store them separately to prevent creasing. Proper storage maintains the pack’s structural integrity for years.
Field Repairability
Frameless packs will eventually get holes, blow out seams, or break buckles. Choose packs with repair-friendly features: standard 1-inch or 3/4-inch webbing that you can replace with generic buckles, exposed seams you can re-stitch with a needle and dental floss, and fabric patches you can tape or sew. Carry a small repair kit: Tenacious Tape, a sewing needle, dental floss, and a spare buckle.
Some manufacturers now include “repair panels”—swatches of matching fabric and buckles with each pack. This is a sign they expect their gear to last. Avoid packs with proprietary buckles or welded construction that can’t be field-repaired. Your shoulders depend on pack integrity; being able to fix a strap failure with a Leatherman and some cordage is peace of mind.
Budget and Value
Investment Strategy
Quality frameless packs range from $150 to $400+. The sweet spot for most hikers is $200-250, where you get excellent materials and construction without boutique pricing. Budget under $150 and you’ll get heavy fabrics, poor stitching, and harness systems that cause more pain than they solve. Over $350 and you’re paying for marginal weight savings or brand prestige.
Consider cost-per-use. A $250 pack used 50 days per year for five years costs $1 per use. A $100 pack that fails after two years and causes shoulder pain costs far more in discomfort and replacement. Invest in the best pack your budget allows, focusing on fit and harness quality over weight savings. A 20-ounce pack that fits perfectly is better than a 12-ounce pack that hurts.
Price-Performance Balance
The law of diminishing returns hits hard in frameless packs. The jump from $150 to $250 gets you significantly better materials, adjustable harness systems, and thoughtful features. The jump from $250 to $400 might save 4-6 ounces and add minor conveniences. For most users, that $250 pack represents the optimal balance.
Look for packs with lifetime warranties from companies known for honoring them. This is your insurance policy. A $300 pack with a lifetime warranty is cheaper long-term than a $150 pack you replace every two seasons. Also consider resale value: quality packs from respected makers retain 60-70% of their value on the used market if you decide to switch sizes or styles.
Long-Term Value
A well-maintained frameless pack lasts 5-10 years and thousands of miles. Calculate value based on durability features: reinforced bottom panels, bar-tacked stress points, and replaceable straps add years to pack life. Packs with timeless designs (simple roll-tops, minimal zippers) age better than feature-heavy models that look dated.
Consider modularity a value-add. A pack that works for day hikes, overnights, and travel replaces three specialized bags. Your shoulders benefit from using one well-fitted pack across all activities rather than switching between different fits. The environmental value is significant too—buying one pack for a decade is far greener than replacing cheaper packs frequently.
Sustainability Factors
Eco-Friendly Materials
The outdoor industry is finally addressing its environmental impact. In 2026, look for frameless packs made from recycled high-tenacity nylon, bio-based Dyneema alternatives, and fabrics certified by Bluesign or OEKO-TEX. These materials perform identically to virgin fabrics but reduce petroleum consumption and toxic emissions.
Some manufacturers now offer “cradle-to-grave” programs, recycling your worn-out pack into new products. This closed-loop system is the future. Also consider natural fiber blends—hemp and recycled cotton are appearing in urban-focused frameless packs, offering durability with lower environmental impact. Your shoulders don’t care if straps are recycled; the planet does.
Repair-First Philosophy
The most sustainable pack is the one you don’t replace. Support companies that offer free repair clinics, sell replacement parts, and provide detailed repair guides. This repair-first approach extends pack life indefinitely. Some brands now include a “repairability score” in their specs, rating how easy it is to fix common failures.
Avoid packs with bonded or welded construction that can’t be repaired. Look for simple designs with accessible seams. A pack you can fix with a $5 buckle and 15 minutes of sewing is infinitely more sustainable than one requiring professional service. This philosophy also saves money and ensures your perfect-fitting pack isn’t rendered useless by a broken strap.
2026 Trends and Innovations
Smart Integration
Frameless packs are getting smarter without adding weight. Integrated load sensors in shoulder straps can now connect to your phone via Bluetooth, alerting you when weight distribution shifts or total load exceeds your preset limit. These systems weigh under an ounce and run on coin-cell batteries lasting a season. While gimmicky for purists, they’re excellent training tools for new frameless users.
Some packs now feature NFC tags that store your pack’s specs, repair history, and recommended load limits. Tap your phone to the strap to access this data. More practically, reflective elements are being engineered into fabrics at the fiber level rather than added as coatings, providing permanent visibility without weight or stiffness.
Customization Options
The one-size-fits-all approach is dying. Leading manufacturers now offer custom torso lengths, strap widths, and hip belt sizes at little or no upcharge. Some let you choose fabric weights by panel—lighter materials on the sides, heavier on the bottom. This “configurator” approach ensures perfect fit without the trial-and-error of off-the-shelf packs.
Modular components are expanding: swap a running vest-style harness for a padded hiking harness depending on the trip. Add or remove hip belts, pockets, and compression systems. This adaptability means one pack truly does everything, reducing consumption and ensuring you always have the perfect setup for your shoulders.
Community-Driven Design
The best frameless pack features are coming from user communities—thru-hikers, ultralight forums, and gear tinkerers. Companies are increasingly open-sourcing their designs and incorporating crowd-sourced improvements. This has led to innovations like the “stretch mesh front pocket with bottom drain” and “removable sit pad sleeve” that solve real problems.
Look for brands with active user communities and responsive design teams. These packs evolve based on thousands of miles of user feedback, not just lab testing. The result is gear that works in the real world, addressing shoulder pain through collective experience rather than individual guesswork.
Your Decision Framework
Personal Assessment Checklist
Before buying, honestly answer these questions: What’s my typical total pack weight? (If over 25 lbs, reconsider frameless). What’s my compressed gear volume? (Measure it). What’s my torso length? (Measure accurately). What activities will I use this pack for? (Be specific). What’s my budget? (Plan for the $200-250 sweet spot).
Try on packs with your actual gear, not sandbags. Load the pack and walk around for at least 30 minutes in the store. Does weight feel like it’s pulling backward? Do straps dig? Can you access water and snacks easily? The pack should disappear on your back. If you’re constantly aware of it, the fit is wrong.
Trial and Return Policies
Never buy a frameless pack you can’t return after a test hike. Even perfect fitting room packs can fail on the trail. Look for retailers with 30-day return policies that allow outdoor use. Some manufacturers offer “demo programs” where you pay a small fee to test a pack for a week, then apply that fee to your purchase.
When testing, do a realistic hike: 5+ miles with your typical load. Pay attention to shoulder pain onset. If you feel pain in the first hour, something is wrong with fit or weight. If you feel pain after three hours, you may be overloading. Take notes on what hurts and where, then adjust or exchange. The right frameless pack should allow 8+ hour days without shoulder discomfort.
Frequently Asked Questions
How do I know if a frameless backpack will actually stop my shoulder pain?
Frameless packs eliminate the rigid pressure points of traditional packs, but success depends on keeping total weight under 20-25 pounds and achieving proper fit. If your shoulder pain stems from heavy loads (over 30 pounds) or poor posture, frameless designs can help dramatically. However, if you have underlying injuries like rotator cuff tears or AC joint arthritis, consult a physical therapist first. The key is testing: try a properly fitted frameless pack with your actual gear weight for at least a two-hour walk. If pain decreases or shifts to muscle fatigue rather than joint pain, you’re on the right track.
What’s the maximum weight I can comfortably carry in a frameless pack?
Most frameless packs perform best with total loads of 15-20 pounds, with an absolute ceiling of 25-30 pounds depending on the specific model and your body mechanics. The “comfort limit” is highly personal—some experienced ultralight hikers manage 25-pound loads comfortably, while others feel pain above 18 pounds. The pack’s design matters too: models with minimal frame sheets or reinforced back panels can handle slightly more weight than true zero-frame sacks. Always check manufacturer specifications, but treat them as optimistic maximums, not recommendations. Your shoulders will tell you the real limit.
Will switching to frameless require me to buy all new ultralight gear?
Not necessarily, but you’ll need to reduce weight and volume significantly. Most people can achieve frameless-compatible loads by upgrading just 2-3 key items: switching from a sleeping bag to a quilt (saves 1-2 lbs), choosing a lighter shelter (saves 1-2 lbs), and reducing clothing redundancy (saves 8-12 oz). Many hikers already own frameless-suitable gear without realizing it. The bigger challenge is volume—frameless packs have less structure, so you can’t just strap bulky items externally. Focus on compressible gear and smart packing. You might be surprised how much you can fit when you pack strategically.
How do I measure torso length correctly for a frameless pack?
Use a flexible measuring tape and have a friend help. Tilt your head forward to find the C7 vertebra—the prominent bump at the base of your neck where it meets your shoulders. Place your hands on your hips with thumbs pointing backward; the top of your hip bones (iliac crest) is where your thumbs rest. Measure along the natural curve of your spine between these points. Frameless packs fit differently than framed packs—you want the pack to ride higher, with the bottom 2-3 inches above your hip belt line. If you’re between sizes, size down for frameless packs; a slightly small pack rides better than one that sags.
Can I use a frameless pack for winter camping or heavy gear loads?
Generally, no. Winter gear—thick sleeping bags, bulky insulation, snow tools—exceeds the weight and volume limits of frameless packs. The typical winter load of 35-45 pounds requires a framed pack for proper weight distribution. However, some hybrid “minimal frame” packs exist: they have removable foam or carbon fiber stays that add 2-4 ounces but increase load capacity to 30-35 pounds. These can work for lightweight winter trips or when carrying group gear. For true winter mountaineering with ropes and technical gear, stick with a proper framed pack. Frameless is a three-season solution for minimalist strategies.
What’s the difference between a frameless pack and a “frame sheet” pack?
True frameless packs have zero rigid structure, relying entirely on your packed gear for shape. Packs with frame sheets use a thin, flexible piece of plastic or foam that provides minimal rigidity without the weight of a full frame. These sheets typically weigh 2-4 ounces and can increase load capacity by 5-10 pounds. Some 2026 “frameless” packs include removable frame sheets, giving you versatility. For pure shoulder pain relief, true frameless is often better because it forces you to carry less weight. Frame sheet packs blur the line and can tempt you to overload, negating the benefits.
How long does it take to adjust to carrying a frameless pack?
Plan for a 4-6 week adaptation period involving both physical conditioning and technique refinement. Your first few hikes will feel different—more weight on your back, less on your hips, and increased core engagement. This is normal. Start with day hikes carrying 10-12 pounds, focusing on posture and pack fit. Gradually increase weight and distance over 3-4 weeks. By week six, your stabilizing muscles (multifidus, transverse abdominis) will be stronger and the pack will feel natural. Don’t attempt a week-long trip in week one. Your body needs time to develop the muscle memory and strength that make frameless packs feel effortless.
Are expensive frameless packs worth the price difference over budget options?
In the $200-250 range, yes. You’ll get significantly better harness systems, more durable fabrics, and thoughtful features that affect comfort. Budget packs under $150 often use thick, stiff foam that creates pressure points and heavy fabrics that negate weight savings. However, the jump from $250 to $400+ offers diminishing returns—mostly marginal weight savings and brand prestige. Focus on fit and harness quality first. A $220 pack that fits perfectly is infinitely better than a $350 pack that doesn’t. The best value is often found with smaller, direct-to-consumer brands that prioritize function over marketing.
Can I add a hip belt to a frameless pack that doesn’t come with one?
Most frameless packs have attachment points for optional hip belts, but adding one aftermarket rarely works well. The pack’s geometry—torso length, strap angle, load distribution—is designed for beltless or specific belt use. Generic belts attach at the wrong height or angle, creating more problems than they solve. If you think you’ll need a hip belt, buy a pack designed with one integrated. Some packs offer removable belts that you can take off for light loads and attach for heavier trips. This modularity is better than trying to retrofit. Your shoulders need the pack’s weight distribution system to work as a cohesive unit.
What should I do if I experience shoulder pain even with a frameless pack?
First, verify your total weight is under 20-25 pounds and your pack is properly fitted. Check that the pack rides high on your back, sternum strap is positioned correctly, and load is centered. If pain persists, examine your shoulder strap width and padding—narrow straps can dig into the brachial plexus. Try loosening the hip belt slightly to let your back share more load. If pain is sharp or localized to the AC joint, you may be overloading or have an underlying injury. Take a break, reduce weight further, and consider seeing a physical therapist. Sometimes the solution is a pack with minimal frame stays (2-4 oz) to add structure without significant weight penalty.
See Also
- How to Stop Shoulder Pain with the 10 Best Frameless Backpacks in 2026
- Stop Back Pain with the 10 Best Frameless Backpacks for Lightweight Trekkers
- Stop Shoulder Strain with the 10 Best Women-Specific Camping Backpacks in 2026
- Stop Back Pain with the 10 Best External Frame Backpacks for Seniors in 2026
- Stop Shoulder Pain with the 10 Best Daypacks for Petite Women in 2026