Table of Contents
When the mercury plunges and your breath crystallizes in the air, your camping stove transforms from a convenience into a lifeline. While summer backpackers might get away with lightweight canister stoves, winter campers face a brutal reality: most pressurized fuel systems fail miserably in sub-zero temperatures. Liquid fuel camping stoves aren’t just another gear choice for cold-weather adventures—they’re the difference between a hot meal that fuels your summit push and a cold, morale-crushing dinner of frozen energy bars.
The chemistry is simple but unforgiving. Standard isobutane canisters lose pressure as temperatures drop, sputtering out when you need them most. Liquid fuel systems, by contrast, give you complete control over pressure and performance, delivering consistent heat output even when the thermometer reads -20°F. But not all liquid fuel stoves are created equal, and choosing the right one requires understanding a complex interplay of design features, fuel types, and real-world performance metrics that manufacturers rarely advertise.
Top 10 Liquid Fuel Camping Stoves
Detailed Product Reviews
1. ArtHoval Portable Camping Stove Kit, 500ml Fuel Bottle Foldable Multi-Fuel for Diesel Kerosene Gas with Pump Aluminum Alloy Stainless Steel
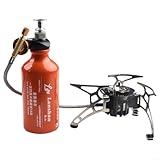
Overview: The ArtHoval Portable Camping Stove Kit is a robust multi-fuel cooking solution designed for serious outdoor enthusiasts. Constructed from aluminum alloy and stainless steel, this stove promises durability in harsh conditions. The complete kit includes a 500ml fuel bottle, pump, multiple nozzles for different fuel types, and a storage sack, making it a turnkey solution for backcountry cooking.
What Makes It Stand Out: This stove’s true versatility shines through its broad fuel compatibility—handling diesel, kerosene, gas, alcohol, and other liquid fuels. The foldable brackets feature anti-skid serrated arms and padded legs, creating a stable cooking platform on uneven terrain. The integrated pump system and sealed fuel bottle with gasket prevent leaks, addressing a common frustration with liquid fuel stoves.
Value for Money: As a complete package, this kit eliminates the need for separate fuel bottle purchases or accessory hunting. Comparable multi-fuel stoves from premium brands often cost significantly more while offering similar performance. The included components and durable construction suggest excellent long-term value for frequent campers and international travelers who need fuel flexibility.
Strengths and Weaknesses: Pros: Exceptional fuel versatility; sturdy, stable design; complete kit with all accessories; leak-proof fuel bottle; compact when folded. Cons: Slightly heavier than canister stoves; requires priming and practice to master; maintenance needed for optimal performance; fuel bottle capacity may be limiting for extended solo trips.
Bottom Line: Ideal for adventurers who prioritize fuel availability over ultralight weight. The ArtHoval kit delivers reliable performance across diverse conditions and fuel sources, making it a smart investment for international trekkers and cold-weather campers.
2. Tidevib Outdoor Camping Multi-Fuel Oil Stove with 500ml Aluminum Alloy Fuel Bottle and Pump, Foldable Brackets and Serrated Arms for Diesel and Liquid Gas

Overview: The Tidevib Multi-Fuel Oil Stove targets backpackers and campers seeking reliable performance in rugged environments. Built from aluminum alloy and stainless steel, this stove emphasizes durability and efficient heating. The package includes a 500ml fuel bottle, pump, specialized nozzles, and a storage sack, providing everything needed for liquid fuel cooking.
What Makes It Stand Out: This stove excels in heat efficiency, designed to minimize fuel consumption while delivering rapid boil times. The foldable brackets with anti-skid serrated arms offer superior pot stability compared to many competitors. Its leak-proof fuel system, featuring a threaded lid with seal gasket, provides peace of mind when packing fuel in your backpack.
Value for Money: The Tidevib offers strong value by bundling essential accessories that competitors often sell separately. While liquid fuel stoves require higher initial investment than canister models, the ability to use inexpensive, widely-available diesel and liquid gas pays dividends on long trips. The robust construction suggests years of reliable service, amortizing the cost effectively.
Strengths and Weaknesses: Pros: Efficient fuel consumption; stable folding support arms; comprehensive accessory package; leak-proof design; works with multiple fuel types. Cons: Steeper learning curve for liquid fuel operation; requires regular cleaning and maintenance; slightly bulkier than minimalist alternatives; pump mechanism may be failure point over time.
Bottom Line: Perfect for extended backcountry trips where resupply options are limited. The Tidevib’s efficiency and stability make it a dependable choice for serious backpackers willing to master liquid fuel stove operation.
3. Outdoor Mini One-Piece Liquid Fuel Camping Gasoline Stove Burner Lightweight Portable Gasoline Stove
Overview: This compact, integrated gasoline stove offers a streamlined approach to liquid fuel cooking. The one-piece design eliminates separate burner and fuel line components, reducing potential failure points. Engineered for strong fire power, it handles camping, hiking, mountaineering, and fishing applications where simplicity and reliability matter most.
What Makes It Stand Out: The patented explosion-proof fuel filler port sets this stove apart, automatically relieving pressure if internal pressure becomes excessive—a critical safety innovation rarely seen in this price category. The collapsible mount prevents sliding while saving pack space. Its gasoline-specific optimization delivers robust performance in cold weather where canister stoves struggle.
Value for Money: As a focused gasoline solution without bundled accessories, this stove represents excellent value for users who already own fuel bottles or prefer minimalist setups. The integrated design reduces complexity and potential maintenance costs. For budget-conscious adventurers needing reliable cold-weather performance, it punches above its weight class.
Strengths and Weaknesses: Pros: Innovative safety features; simple one-piece design; excellent cold-weather performance; compact and lightweight; stable collapsible mount. Cons: Limited fuel versatility (gasoline only); no included fuel bottle or pump; requires careful fuel handling; may be less efficient than multi-fuel alternatives; limited simmer control.
Bottom Line: An excellent choice for cold-weather campers and mountaineers who prioritize safety and simplicity. The explosion-proof design provides confidence, though fuel versatility is sacrificed for this specialized performance.
4. KoiLykke Multi-Fuel Folding Camping Stove, with 500ml Aluminum Bottle Stainless Steel Burner Compact Lightweight for Backpacking Hiking Outdoor

Overview: The KoiLykke Multi-Fuel Stove balances portability with performance for weight-conscious backpackers. Weighing just 290g and measuring 185 x 88mm, this compact burner handles diesel, alcohol, and liquid gas. The stainless steel burner and aluminum alloy construction deliver durability without excessive weight, while the 500ml fuel bottle provides ample capacity for multi-day trips.
What Makes It Stand Out: Precise specifications demonstrate KoiLykke’s attention to detail—290g is genuinely ultralight for a multi-fuel stove. The secure, leak-proof fuel bottle with threaded lid and seal gasket ensures safe transport. The included pump and interchangeable nozzles allow quick fuel type transitions, adapting seamlessly from international travel to local backpacking.
Value for Money: This stove competes directly with premium ultralight liquid fuel stoves at a fraction of the cost. The weight-to-performance ratio is exceptional, rivaling systems twice the price. While the fuel bottle adds packed volume, the 500ml capacity reduces refueling frequency compared to smaller bottles, saving money and hassle on extended trips.
Strengths and Weaknesses: Pros: Ultralight at 290g; compact dimensions; secure leak-proof fuel system; versatile fuel compatibility; complete accessory set. Cons: Smaller pot support may limit cookware size; requires practice for optimal flame control; maintenance-intensive like all liquid fuel stoves; fuel bottle capacity adds weight for solo overnighters.
Bottom Line: Outstanding for ultralight backpackers who refuse to compromise on fuel versatility. The KoiLykke delivers premium specs at a mid-range price, making it a top choice for ounce-counters traveling internationally.
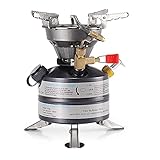
5. ACAGALA Portable Outdoor Camping Mini Gasoline Stove Liquid Fuel Alcohol Diesel Oil Stove

Overview: The ACAGALA Mini Gasoline Stove emphasizes speed and weather resistance in a compact package. This liquid fuel burner features integrated wind baffles and foldable serrated support arms, creating a stable cooking platform even in harsh conditions. Designed for rapid heating, it boils 1 liter of water in just 2 minutes while consuming 120ml of fuel per hour.
What Makes It Stand Out: Wind baffles are the standout feature, maintaining consistent flame performance in gusty conditions that would cripple unprotected stoves. The impressive boil time rivals premium integrated canister systems while using widely-available gasoline. The included funnel simplifies the fueling process, reducing spills and waste—a small but meaningful convenience.
Value for Money: This stove offers compelling performance metrics at a budget-friendly price point. The wind resistance eliminates the need for a separate windscreen, saving money and pack weight. For campers frequently cooking in exposed locations, the time and fuel savings quickly offset the initial investment. The gasoline focus keeps operating costs low.
Strengths and Weaknesses: Pros: Excellent wind resistance; rapid boil times; efficient fuel consumption; stable serrated arms; convenient fueling funnel; highly compact. Cons: Gasoline-only operation limits versatility; no fuel bottle included; potentially overpowered for simmering; gasoline odor during transport; requires careful priming.
Bottom Line: Ideal for campers and climbers facing consistently windy conditions. The ACAGALA’s wind baffles and rapid heating deliver reliable performance where other stoves falter, though it’s best suited for users comfortable with gasoline operation.
6. MSR WhisperLite International Compact Multi-fuel Camping and Backpacking Stove

Overview: The MSR WhisperLite International is the globetrotter’s choice for backcountry cooking, engineered to burn virtually any liquid fuel you encounter abroad. This iconic stove has served expedition teams for decades, offering unparalleled versatility for remote adventures where fuel availability is uncertain.
What Makes It Stand Out: Its three interchangeable fuel injectors let you seamlessly switch between white gas, kerosene, and even unleaded gasoline—a game-changer for international travel. The proprietary Shaker Jet technology self-cleans with a simple shake, eliminating field stripping. Stainless steel legs stamp-craft stability without excess weight, while its packable design nests inside MSR cookware. The included windscreen, heat reflector, and comprehensive maintenance kit show MSR’s attention to expedition-ready details.
Value for Money: Positioned at the premium end ($120-140), this stove justifies its cost through decades-proven reliability and fuel flexibility that cheaper alternatives can’t match. You’re investing in a field-serviceable tool that eliminates the need for multiple stoves. The included accessories (except fuel bottle) represent significant added value compared to bare-bones competitors.
Strengths and Weaknesses: Strengths include exceptional fuel versatility, bombproof construction, self-cleaning capability, stable platform, and brand reputation. Weaknesses involve a steeper learning curve for fuel switching, higher price point, requiring separate fuel bottle purchase, and being heavier than minimalist canister options. Performance degrades slightly with dirtier fuels.
Bottom Line: For serious backpackers and expedition leaders prioritizing fuel adaptability and field reliability, the WhisperLite International remains the gold standard despite its premium price.
7. MSR WhisperLite Compact Camping and Backpacking Stove

Overview: The MSR WhisperLite is the streamlined sibling of the International model, representing 25 years of proven backcountry reliability. This stove has earned its place as a benchmark for liquid-fuel performance, favored by purists who value simplicity and time-tested engineering over fuel-switching complexity.
What Makes It Stand Out: Its legendary durability stems from an elegantly simple design with fewer moving parts to fail. Weighing just 11.5 ounces, it strikes an impressive balance between robustness and packability. The Shaker Jet technology allows tool-free cleaning in the field—just shake the stove to clear carbon buildup. The flexible fuel line and compact folding design enable it to nest efficiently inside MSR cookware systems, saving precious pack space.
Value for Money: At $80-100, it occupies a sweet spot between budget stoves and premium multi-fuel models. For backpackers who primarily use white gas, it delivers 90% of the International’s performance at 70% of the cost. The included maintenance kit and windscreen add value, while its rebuildable design ensures a decade-plus lifespan, amortizing the initial investment.
Strengths and Weaknesses: Strengths include bulletproof reliability, straightforward operation, lightweight construction, and exceptional field maintainability. Weaknesses are limited to white gas only (no kerosene/gasoline versatility), requiring separate fuel bottle purchase, and a higher price than no-name alternatives. The manual pump operation has a slight learning curve.
Bottom Line: Ideal for dedicated backpackers who prioritize reliability and simplicity over multi-fuel flexibility, making it a smart long-term investment for domestic wilderness travel.
8. Outdoor Camping Multi Fuel Oil Stove with 500ml Aluminum Alloy Fuel Bottle for Diesel, Gaso-line or Alcohol, Foldable Anti Skid Brackets, Compact Design with Storage Sack for Hiking and Backpacking

Overview: This generic multi-fuel stove targets budget-conscious adventurers seeking premium features without the premium price tag. Designed for diesel, gasoline, and alcohol, it includes a 500ml aluminum fuel bottle—a rare inclusion that immediately adds value for those starting their backcountry cooking setup.
What Makes It Stand Out: The anti-skid serrated arms and padded legs provide surprising stability for a budget option, while the 85x88mm packed size rivals more expensive competitors. Weighing just 290g, it’s competitive with ultralight offerings. The inclusion of both diesel and gasoline nozzles demonstrates thoughtful design for international travelers facing fuel scarcity.
Value for Money: Typically priced under $60, this stove delivers remarkable bang-for-buck. The bundled fuel bottle ($15-20 value) and dual-nozzle system essentially provide a complete cooking system for the price of a bare-bones premium stove. While it won’t match MSR’s refinement, it offers 80% of the functionality at 40% of the cost—perfect for occasional backpackers or as a backup.
Strengths and Weaknesses: Strengths include exceptional affordability, included fuel bottle, versatile fuel compatibility, compact packed size, and stable cooking platform. Weaknesses involve unknown brand reputation, potentially inferior long-term durability, limited warranty support, and less refined flame control. The pump mechanism may require more frequent maintenance, and parts availability could be problematic.
Bottom Line: A solid entry-level multi-fuel stove for casual adventurers or budget-minded travelers, though serious expedition leaders should invest in proven brands for mission-critical reliability.
9. Portable Outdoor Camping Mini Gasoline Stove Liquid Fuel Dil Oil Stove
Overview: This mini gasoline stove strips backcountry cooking to its essentials, prioritizing speed and packability over versatility. Designed for harsh weather with integrated wind baffles, it targets ultralight backpackers and emergency-preparedness enthusiasts who need a no-frills, rapid-boiling solution.
What Makes It Stand Out: The claim of boiling one liter in two minutes places it among the fastest in its class, while foldable serrated arms create a surprisingly stable platform for such a compact unit. The integrated wind baffles demonstrate thoughtful engineering for exposed conditions. Weighing minimal ounces and packing down to pocket size, it epitomizes ultralight philosophy.
Value for Money: Priced around $30-40, this stove delivers functional performance at a fraction of premium brand costs. The included funnel is a practical touch that prevents messy fuel spills. However, the absence of a fuel bottle means additional expense. It’s best viewed as a specialized tool for fast-and-light missions rather than a daily workhorse—acceptable durability for the price, but don’t expect decades of service.
Strengths and Weaknesses: Strengths include rapid boiling capability, excellent wind resistance, ultralight weight, compact dimensions, and straightforward operation. Weaknesses are limited fuel compatibility (gasoline/diesel only), unknown manufacturer reliability, minimal included accessories, and lack of field-serviceable parts. The 120ml/hour consumption rate is moderately efficient but not class-leading.
Bottom Line: Perfect as a backup stove or for ultralight enthusiasts on a tight budget, though serious backpackers should consider it a secondary option rather than primary cook system.
10. Taruor Portable Outdoor Camping Mini Gasoline Stove, Liquid Fuel Alcohol Diesel Oil Stove

Overview: The Taruor mini gasoline stove delivers near-identical performance to generic competitors, offering a branded alternative in the budget ultralight category. Engineered for harsh conditions with integrated wind baffles, it serves hikers needing a simple, fast-boiling solution without investing in premium liquid-fuel systems.
What Makes It Stand Out: Like its generic counterparts, it boasts an impressive two-minute boil time for one liter and features foldable serrated arms that provide reliable pot stability. The integrated wind baffles are essential for exposed campsites, while the compact design disappears into any pack pocket. The Taruor branding may suggest slightly better quality control than unbranded alternatives.
Value for Money: At $30-40, it represents solid entry-level value, particularly with the included refueling funnel. However, the lack of a fuel bottle requires additional investment. While cheaper than established brands, you’re trading long-term durability and customer support for upfront savings. It’s a calculated risk for occasional users versus daily backpackers.
Strengths and Weaknesses: Strengths include rapid boiling, effective wind protection, ultralight portability, and stable pot support. Weaknesses encompass limited fuel options, uncertain long-term reliability, absence of a comprehensive maintenance kit, and potential parts availability issues. The 120ml/hour burn rate is acceptable but not exceptional.
Bottom Line: A decent budget pick for ultralight enthusiasts or as a backup stove, though critical expeditions demand the reliability of premium brands. Consider it a disposable tool for specific missions rather than a lifetime investment.
Why Liquid Fuel Stoves Reign Supreme in Winter
The Cold-Weather Chemistry Advantage
The fundamental superiority of liquid fuel stoves in winter stems from their manual pressure system. Unlike canister stoves that rely on vapor pressure from the fuel itself, liquid fuel stoves use a separate pump to generate pressure, forcing fuel through the system regardless of ambient temperature. This means your stove performs identically whether you’re camping in mild autumn weather or battling Arctic conditions.
White gas, the most common liquid camping fuel, remains fluid and flammable down to -40°F, while isobutane mixtures effectively quit at around 15°F. More importantly, you can physically warm a liquid fuel bottle in your sleeping bag or jacket before use, something you simply can’t do safely with a sealed canister. The ability to prime the stove with a small amount of fuel poured directly into the priming cup gives you ignition control that cold, uncooperative canisters can’t match.
Decoding Stove Types and Designs
Multi-Fuel Versus Dedicated Systems
Multi-fuel stoves offer undeniable flexibility, burning everything from white gas to kerosene, diesel, and even unleaded gasoline in emergencies. This adaptability proves invaluable on extended expeditions or international trips where white gas might be unavailable. However, this versatility comes at a cost—more complex jet systems, additional maintenance requirements, and typically higher price points.
Dedicated white gas stoves, conversely, optimize every component for a single fuel type. They’re generally more efficient, easier to maintain, and more reliable for the specific conditions most winter campers face. The jets are precision-engineered for white gas’s viscosity and burn characteristics, resulting in cleaner combustion and fewer clogs. For most North American winter campers who can reliably source white gas, a dedicated system often outperforms its multi-fuel cousins.
Integrated vs. Remote Canister Configurations
While the term “liquid fuel” typically conjures images of remote tank systems, some integrated designs exist where the bottle mounts directly beneath the burner. Remote configurations—where the fuel bottle connects via a flexible fuel line—offer superior stability on snow platforms and allow you to use a windscreen without dangerous heat buildup around the fuel source. They also enable you to invert the bottle for better fuel feeding as it empties.
Integrated systems save weight and reduce connection points but sacrifice versatility and safety in deep winter. The proximity of fuel bottle to flame makes windscreen use problematic, and they’re inherently less stable on the uneven surfaces common in snow camping. For serious winter use, remote designs dominate for good reason.
Essential Features for Sub-Zero Performance
Fuel Bottle Pressure and Pump Design
The pump mechanism determines how easily you can maintain consistent pressure throughout your cooking session. Look for pumps with leather or synthetic leather gaskets that remain pliable in extreme cold. Plastic-only pumps become brittle and can crack at temperatures where you need them most. The best designs feature replaceable pump seals and pressure relief valves that prevent dangerous over-pressurization.
Bottle capacity matters more than you might think. A 20-ounce bottle balances cooking time with pack weight for solo or duo trips, while 30-ounce bottles better serve groups or extended basecamp stays. Some systems offer multiple bottle sizes that work with the same pump, providing flexibility without requiring separate stove purchases.
Generator Tube Engineering
The generator tube—where liquid fuel vaporizes before reaching the burner—represents the heart of cold-weather performance. Wider-diameter tubes handle cold, viscous fuel more reliably but may sacrifice some fuel efficiency. The material composition matters enormously; steel tubes withstand abuse but take longer to heat initially, while aluminum tubes heat faster but can be more prone to damage.
The most advanced designs incorporate passive heat exchangers that capture flame heat to maintain optimal generator temperature, preventing the “flame-out” that can occur when melting snow for water. This feature proves particularly valuable during long simmer sessions or high-altitude use where ambient cold constantly fights against system heat.
Precision Simmer Control
Winter cooking demands more than just brute-force boiling. Melting snow efficiently requires precise heat control—too little heat and you wait forever; too much and you scorch your pot, creating a disgusting taste and difficult cleanup. The best stoves offer fine-tuned valve control that maintains consistent low output without sputtering.
Look for stoves with separate fuel control valves at both the bottle and burner. This dual-valve design lets you dial in pressure at the source while making fine adjustments at the stove, giving you true simmer capability even when the bottle is fully pressurized. Some premium models incorporate pressure regulators that automatically adjust fuel flow as bottle pressure changes, maintaining consistent output throughout the fuel supply.
Wind Protection Systems
Windscreens aren’t optional accessories in winter—they’re essential safety equipment. A good windscreen does double duty: protecting the flame from gusts while reflecting heat back toward your pot. The most effective designs are tall enough to surround both burner and pot, with ventilation holes positioned to create a convection current that actually improves combustion efficiency.
Remote tank designs allow you to completely encircle the burner with a windscreen, something impossible with integrated systems where the fuel bottle sits beneath the stove. Some manufacturers offer heat exchanger pots specifically designed to work with their windscreens, creating an integrated system that maximizes fuel efficiency in windy conditions by up to 40%.
Fuel Selection Strategies for Winter
White Gas: The Gold Standard
White gas, also sold as Coleman fuel or naphtha, burns cleanest and hottest of all liquid fuels suitable for camping. Its purity means minimal maintenance, as it leaves virtually no residue in fuel lines or jets. For winter camping, its low freezing point and high vapor pressure when heated make it ideal for reliable ignition and consistent output.
Store white gas in metal bottles rather than plastic; metal conducts heat better when you need to warm the bottle, and it won’t crack if dropped on ice. Always filter fuel when transferring from large containers to your stove bottle—ice crystals and debris that seem harmless in summer can clog jets when they freeze in place during sub-zero operation.
Alternative Fuels: Kerosene and Diesel
Kerosene offers advantages for extended expeditions: it’s widely available globally, has higher energy density than white gas (more BTUs per ounce), and is significantly cheaper. The trade-offs are substantial, though. Kerosene requires extensive priming with alcohol or priming paste, burns dirtier requiring frequent jet cleaning, and produces more soot that blackens pots and clogs systems.
Diesel performs similarly to kerosene but with even more maintenance requirements. Only consider these fuels if you’re traveling where white gas is unavailable or for trips longer than three weeks where fuel resupply logistics favor universal availability over convenience. Always carry multiple jets sized specifically for these thicker fuels, as using a white gas jet with kerosene results in poor performance and dangerous flare-ups.
Fuel Quality and Storage
Fuel quality degrades over time, especially in partially filled containers where air exposure increases oxidation. For winter trips, always use fresh fuel purchased within the last six months. Store fuel bottles in your sleeping bag on extremely cold nights—warming fuel from 0°F to 70°F effectively doubles its vapor pressure, making ignition dramatically easier.
Never fill bottles completely to the brim; leave 10-15% air space to allow for pressure pumping. Overfilled bottles can’t build adequate pressure, and fuel expansion in warming temperatures can cause dangerous leaks. Carry fuel in multiple smaller bottles rather than one large container—this reduces spill risk and allows you to warm just the bottle you’re using.
Mastering the Preheating Process
Step-by-Step Cold-Weather Priming
Preheating transforms liquid fuel into vapor before it reaches the burner, preventing dangerous liquid fuel flare-ups and ensuring clean, efficient combustion. In temperatures below 20°F, this process becomes critical. Start by pressurizing your fuel bottle with 15-20 pump strokes. Open the control valve just enough to allow a teaspoon of fuel to fill the priming cup—never let liquid fuel pool in the burner itself.
Light the priming fuel and let it burn completely. You’ll see the flame transition from yellow to blue as the generator tube heats. Only when the priming flame is nearly extinguished should you slowly open the main fuel valve. The stove should ignite immediately with a clean blue flame. If you see yellow, sputtering flames, close the valve and repeat the priming process—forcing fuel through a cold generator creates dangerous fireballs and wastes fuel.
Troubleshooting Common Ignition Issues
If your stove fails to maintain pressure, check the pump leather first. Cold, dry leather gaskets leak air rather than building pressure. A drop of oil on the gasket often solves the problem. For stoves that light but won’t stay lit, the generator tube isn’t reaching vaporization temperature—try a longer preheat or partially cover the windscreen to trap more heat during startup.
In extreme cold, carry a small bottle of alcohol specifically for priming. Alcohol burns cleaner than white gas for priming and won’t leave residue. Pour a small amount into the priming cup and light it—this gentle, consistent flame warms the generator without the violent flare-up that can occur when priming with fuel in very cold conditions.
Performance Metrics That Actually Matter
Understanding Boil Times in Real Conditions
Manufacturer boil times, typically measured at 70°F with no wind, have little relevance to winter camping. In the field, you’re melting snow—which requires significantly more energy than heating liquid water—and battling sub-zero temperatures and wind. A stove that boils a liter in three minutes in a lab might take twelve minutes to melt snow into drinking water at 10,000 feet in a storm.
Focus instead on continuous burn time per bottle and the stove’s ability to maintain output as fuel level drops. A more useful metric is “snow-to-water efficiency”—how many liters of water you can produce from a full bottle while melting snow. This depends on pot design, windscreen efficiency, and heat exchanger use as much as raw burner power.
Burn Duration Calculations
Calculate your fuel needs based on winter realities: melting snow for drinking water requires approximately double the fuel of boiling existing water. Plan for 4-5 ounces of white gas per person per day for cooking and water production in temperatures below 20°F. This assumes efficient windscreen use and mostly snow-melting rather than cooking complex meals.
The pressure regulator design dramatically affects burn duration. Unregulated stoves deliver high initial output that gradually declines as bottle pressure drops, often leaving 5-10% of fuel unusable. Pressure-regulated systems maintain consistent output until the bottle is nearly empty, extracting maximum energy from every ounce of fuel you carry.
BTU Output vs. Real-World Efficiency
High BTU ratings look impressive on paper but tell an incomplete story. A 10,000 BTU stove without a windscreen might be less effective than a 7,000 BTU stove with an integrated heat exchanger system. Efficiency matters more than raw power—heat that escapes around your pot is wasted fuel you’ll have to carry.
Look for stoves that balance output with control. The ability to throttle down to 2,000 BTU for simmering saves enormous amounts of fuel when melting snow, while still providing 8,000+ BTU for rapid boiling. This versatility translates to lighter pack weight and longer trips between resupply.
Winter Setup and Positioning Tactics
Snow and Ice Platform Construction
Never place your stove directly on snow—it will melt unevenly, tilt, and potentially spill. Instead, create a stable platform using your snowshoes, a lightweight aluminum plate, or by packing snow into a firm block and letting it sinter for ten minutes. In deep cold, pour a small amount of water on the platform; it will freeze almost instantly, creating a rock-solid base.
For multi-day basecamps, dedicate a specific cooking area and stomp down the snow thoroughly. Let it harden overnight, then use the same spot throughout your stay. This prevents creating multiple melted holes and concentrates any spilled fuel in one area where it can dissipate safely away from tent sites.
Windscreen Optimization Techniques
A properly fitted windscreen should surround your pot with about ¼ inch clearance, creating a chimney effect that pulls air in from the bottom and vents it above the pot. In deep snow, dig a shallow pit for your stove so the windscreen extends from snow level upward, protecting the flame from ground-level gusts that can’t be blocked by above-ground screens alone.
Reflective windscreens serve dual purposes during preheating. Position the reflective side inward during startup to concentrate heat on the generator tube, then flip it outward once operating to reflect heat back toward your pot. Some ultralight campers carry a small piece of aluminum foil specifically for this preheating boost.
Fuel Temperature Management
Cold fuel requires more pump strokes to achieve adequate pressure—sometimes 30+ strokes in sub-zero temperatures. Warm your fuel bottle in your jacket for fifteen minutes before use, or sleep with it in your sleeping bag on extremely cold nights. Some expedition veterans carry their next fuel bottle in their pack’s back panel, using body heat to keep it ready.
In emergencies, you can warm a fuel bottle by placing it in a shallow pan of warm water (never hot water—thermal shock can damage seals). This technique proves especially useful when resuming stove use after a long break in cold conditions, when the fuel and stove have both cooled to ambient temperature.
Critical Safety Protocols
Carbon Monoxide Risks in Tents
The temptation to cook inside a tent during a winter storm can be overwhelming, but it’s a calculated risk that demands respect. Liquid fuel stoves produce significant carbon monoxide, especially during the priming phase when combustion is incomplete. If you must cook in a vestibule or highly ventilated tent, position the stove as far from sleeping areas as possible and never operate it while anyone is sleeping.
Always maintain ventilation—keep a door or vent open even in severe weather. Carbon monoxide is slightly lighter than air and will accumulate near the ceiling of enclosed spaces. A battery-powered CO detector weighs mere ounces and could save your life. Many winter camping tragedies occur when stoves are used for heat rather than cooking, a practice that should never be attempted.
Fuel Spill Prevention
Cold temperatures make fuel bottles and connections more brittle, increasing leak risks. Always check O-rings and seals before each trip, and carry spare seals specific to your stove model. When connecting fuel lines, hand-tighten only—over-tightening with pliers can crack cold-stressed fittings.
Fuel spills on snow create hidden hazards. The fuel sinks through the snow, creating a flammable layer that can ignite unexpectedly. If you spill fuel, mark the area with crossed ski poles or trekking poles and avoid it until the fuel has fully evaporated, which can take hours in cold temperatures. Never pour water on a fuel spill—it spreads the contamination wider.
Cold-Weather Priming Safety
Priming with liquid fuel in extreme cold requires extra caution. Wear gloves with good dexterity to control the valve precisely. Have your lighter or match ready before opening the valve—fuel can auto-ignite from a hot generator tube if delayed. Keep your face and body away from the stove during priming; cold fuel can create larger-than-expected flare-ups.
If the stove fails to light after priming, don’t immediately attempt to relight it. Wait two minutes for any pooled fuel to evaporate, then reprime with a smaller amount. Repeated failed ignition attempts can create a dangerous fuel accumulation that ignites violently. Always light stoves at arm’s length, never with your face over the burner.
Field Maintenance and Troubleshooting
Daily Cleaning Routines
Winter conditions demand daily stove maintenance. Each evening, burn the stove dry to prevent fuel residue from gumming up jets overnight. Wipe down the fuel line connections and inspect O-rings for cracks—cold makes rubber brittle, and a failed O-ring can end your trip. Carry a small brush (an old toothbrush works) to clean soot from the burner head.
Snow and ice can infiltrate burner ports during transport. Before each use, visually inspect the burner and clear any debris with a needle or the cleaning tool most stoves include. A single blocked port creates an uneven flame that wastes fuel and heats pots inefficiently.
O-Ring and Seal Care
Cold-weather O-ring failure represents the most common liquid fuel stove malfunction in winter. Treat all rubber seals with silicone grease before your trip, and reapply every few days in the field. Carry at least two complete sets of replacement O-rings, as cold temperatures accelerate degradation.
If an O-ring fails in the field and you lack a replacement, you can sometimes create a temporary seal by wrapping the connection with Teflon tape (if you carry a small roll for tent repairs) or even a strip of duct tape applied sticky-side-out. These are emergency measures only—replace the O-ring properly at your earliest opportunity.
Emergency Jet Clearing
Clogged jets shut down stoves without warning. Always carry the manufacturer’s jet cleaning needle, stored in a warm pocket so it doesn’t ice up when you need it. If a jet clogs during use, close the fuel valve and let the stove cool for two minutes before attempting to clear it—trying to clean a hot jet can weld debris in place.
For stubborn clogs, remove the jet completely and soak it in hot water (use water from your pot) for thirty seconds before cleaning. Never blow through a jet with your mouth—moisture causes instant freezing in cold conditions. Instead, use a small rubber bulb syringe or the pressure from your fuel bottle’s pump to force air through the jet backwards.
Weight, Size, and Packability Trade-offs
Group Size Considerations
Solo winter campers can get by with minimalist liquid fuel systems weighing under 12 ounces complete with pump and bottle. These compact stoves prioritize weight savings over stability and large-pot support. For two-person teams, stoves in the 14-18 ounce range offer better pot stability and more robust construction without significant weight penalties.
Groups of three or more should consider expedition-grade stoves approaching 20-25 ounces. These models feature wider pot supports that accommodate large snow-melting pots and more powerful burners that reduce cooking time for multiple people. The weight penalty is offset by efficiency gains—melting snow for four people with a small stove can take twice as long, burning more fuel overall.
Durability vs. Ultralight Designs
Ultralight liquid fuel stoves achieve weight savings through minimalist pot supports and thinner materials. These trade-offs become problematic in winter, where heavy pots filled with snow place significant stress on stove components. Cold temperatures make metals more brittle, so that ultralight stove that flexes slightly in summer might crack under winter loads.
Expedition-grade stoves use thicker steel and aluminum, robust pot supports, and reinforced connection points. The few extra ounces buy reliability that can make or break a trip. Consider your use case: if you’re doing occasional winter overnights, an ultralight model suffices. For month-long expeditions or guiding work, durability trounces weight savings every time.
Investment Analysis: Budget to Premium
Entry-Level Value Propositions
Budget liquid fuel stoves (typically $80-120) provide reliable white gas performance without frills. They lack pressure regulation and multi-fuel capability but handle basic winter camping admirably. These stoves often weigh more than premium models and offer less precise flame control, but their simplicity translates to field-reliability and easy maintenance.
The hidden cost of budget stoves appears in fuel efficiency—less sophisticated burner designs may require 20-30% more fuel for the same tasks. Over a season of frequent winter trips, this fuel cost difference can offset the initial price savings. Budget models also typically use cheaper plastics in pump construction that become brittle faster in cold conditions, requiring more frequent replacement.
Professional-Grade Features Worth Paying For
Premium stoves ($150-250) justify their cost through pressure regulation, multi-fuel capability, and superior materials. Pressure regulation alone can improve fuel efficiency by 15-20% on long trips, paying for the price difference in fuel savings. The ability to burn multiple fuels provides insurance on remote expeditions where white gas availability is uncertain.
Titanium and high-grade aluminum construction in premium models reduces weight without sacrificing durability. Precision-machined burner heads deliver more complete combustion, reducing soot and maintenance needs. For serious winter campers who spend more than ten nights per season in sub-zero conditions, these features transition from luxury to necessity.
Liquid Fuel vs. Canister Stoves: The Winter Showdown
The Pressure Differential Problem
Canister stoves rely on fuel vaporization inside the canister to push gas to the burner. As temperatures drop, vapor pressure plummets exponentially. By 0°F, a standard isobutane canister delivers less than 30% of its rated output, and by -10°F, many won’t light at all. Inverted canister systems perform slightly better but still depend on the fuel’s ability to vaporize in the pre-heat tube.
Liquid fuel stoves completely circumvent this physics problem. The manual pump generates pressure independent of temperature, delivering consistent fuel flow regardless of conditions. This reliability makes them the only rational choice for temperatures consistently below 15°F, where canister performance becomes unpredictable at best.
Altitude Performance Differences
Altitude affects both stove types, but liquid fuel systems handle it better. Above 10,000 feet, lower oxygen levels reduce combustion efficiency, but liquid fuel stoves’ ability to maintain high fuel pressure compensates somewhat. Canister stoves suffer doubly at altitude—lower temperatures and lower atmospheric pressure both reduce fuel flow.
The preheating process in liquid fuel stoves becomes even more critical at altitude, where the lower boiling point of fuel can cause premature vaporization in the fuel line. Quality stoves address this with longer generator tubes that ensure complete vaporization before the fuel reaches the burner, preventing the sputtering and pulsing common in poorly designed systems.
Environmental Considerations
Efficiency and Emissions
Modern liquid fuel stoves, when properly maintained, burn remarkably clean. Complete combustion produces primarily carbon dioxide and water vapor. Incomplete combustion, common during poor priming or with clogged jets, releases carbon monoxide and unburned hydrocarbons. The environmental impact is minimal compared to the broader footprint of travel to wilderness areas, but responsible use matters.
Fuel efficiency directly correlates with environmental impact. Using a windscreen and heat exchanger pot can reduce fuel consumption by 30-40%, meaning fewer fossil fuels burned and less weight carried. This efficiency also translates to less frequent resupply, reducing the overall logistical footprint of extended expeditions.
Spill Prevention Best Practices
Fuel spills represent the most significant environmental risk from liquid fuel stoves. Always fill bottles at least 50 feet from water sources, on durable surfaces like rock or compacted snow that won’t absorb fuel. Use a funnel with a filter screen to prevent spills and keep debris out of your fuel system.
If a spill occurs on snow, remove the contaminated snow and pack it out in a sealed container when possible. In backcountry situations where packing out isn’t feasible, scatter the contaminated snow over a wide area away from water sources and campsites to accelerate evaporation. Never bury fuel-contaminated snow—it can persist in the environment for months and contaminate groundwater during spring thaw.
Scenario-Based Selection Guide
Basecamp and Glamping Needs
Winter basecampers prioritize capacity and stability over weight. Large-pot support becomes essential when melting snow for groups, and powerful burners reduce the time spent on this tedious task. Look for stoves with at least 10,000 BTU maximum output and pot supports that accommodate 2-liter pots or larger. Integrated windscreen systems that attach securely to the stove prevent the constant adjustments that plague minimalist setups.
For basecamps, consider stoves with remote fuel bottles that can be positioned away from the cooking area, allowing multiple stoves to share a single large fuel bottle via a Y-connector. This setup reduces the number of bottles to manage and simplifies fuel rationing on extended stays.
Alpine and Mountaineering Requirements
Alpinists need stoves that balance weight with bombproof reliability in exposed conditions. Remote tank designs win here, as they allow you to shield the stove from wind while keeping the fuel bottle protected in your pack. The ability to operate the stove with bulky gloves is non-negotiable—large, textured control valves that you can manipulate with mittens separate usable stoves from dangerous ones.
Consider stoves with piezo ignition systems, but never rely on them exclusively. Cold and moisture disable piezo igniters regularly, so always carry multiple backup fire sources. The stove should be field-strippable without tools, as dropping a screw at 18,000 feet means it’s gone forever.
Extended Expedition Demands
Month-long or longer expeditions require stoves that can burn multiple fuel types and be completely rebuilt in the field. Look for models with comprehensive repair kits available, including replacement jets, O-rings, pump leathers, and generator tubes. The ability to clean the jet without disassembling the entire burner head saves hours of frustration.
Stoves with metal pump housings withstand the abrasion of daily use better than plastic versions. Consider models that can be mounted to a stable baseplate, creating a permanent cooking station that doesn’t require setup each time. On long trips, convenience and reliability trump minor weight differences—the stove that works flawlessly every evening preserves morale and energy for the day’s objectives.
Frequently Asked Questions
Can I use my liquid fuel stove inside my tent in winter?
Only in the vestibule with maximum ventilation. Carbon monoxide risks increase dramatically in enclosed spaces, and tent materials are highly flammable. If you must cook inside due to extreme weather, keep a door fully unzipped, position the stove as far from fabric as possible, and never leave it unattended. A battery-powered CO detector is mandatory safety equipment.
How do I prevent my fuel line from freezing during use?
Fuel lines freeze when moisture contaminates the fuel or when fuel vaporizes in the line due to insufficient pressure. Keep connections dry, use fresh filtered fuel, and maintain adequate bottle pressure with regular pumping. If a line freezes, warm it in your hands or place it in your jacket for a few minutes—never use direct flame.
Why does my stove work fine in my backyard but sputter in the mountains?
Altitude and cold create a double-whammy. Lower oxygen levels reduce combustion efficiency, while cold temperatures increase fuel viscosity. The solution is longer preheating and more frequent pumping to maintain pressure. Some stoves also require jet changes for altitudes above 12,000 feet—check your manual for high-altitude jets.
How many fuel bottles should I carry for a week-long winter trip?
Plan on 4-5 ounces of white gas per person per day for snow melting and cooking. For two people on a 7-day trip, that’s 56-70 ounces, or about three 20-ounce bottles. Carry one more bottle than your calculations suggest as emergency reserve. It’s better to return with extra fuel than to run out 20 miles from the trailhead.
Is it worth buying a multi-fuel stove if I only use white gas?
For most North American campers, no. Dedicated white gas stoves are lighter, simpler, and more efficient. Multi-fuel capability only becomes valuable on international trips or expeditions longer than three weeks where fuel resupply uncertainty exists. The added complexity and maintenance requirements aren’t justified for typical winter camping.
How do I clean soot from my pot after using kerosene?
Soot is inevitable with kerosene. While the pot is still warm, wipe it with snow—this creates a mild abrasive slurry that removes most soot. For stubborn buildup, use a paste of baking soda and water. Never use soap and water on a hot pot; thermal shock can warp aluminum. Prevent future buildup by ensuring complete priming before opening the main fuel valve.
Can I refill my fuel bottle from a larger container in sub-zero temperatures?
Yes, but take precautions. Warm both containers first (sleeping bag or jacket), and fill in a sheltered area to prevent wind from blowing fuel. Use a funnel with a filter, and pour slowly to minimize spillage. Metal funnels work better than plastic in extreme cold. Wipe any spills immediately, and wash your gloves afterward—fuel-soaked gloves lose insulation value and pose fire hazards.
What’s the best way to transport fuel bottles on a sled or in a pack?
Store fuel bottles upright in an external pocket or dedicated fuel bottle holder. Wrap them in a small towel or stuff sack to prevent abrasion and contain any leaks. Never pack fuel inside your main bag with sleeping gear and clothing. On sleds, secure bottles so they can’t tip over, and separate them from food supplies with a waterproof barrier.
How often should I replace O-rings and seals?
Inspect O-rings before each trip and replace them at the first sign of cracking or flattening. As a rule, replace all rubber seals annually if you camp more than 10 nights per year in winter. Cold accelerates degradation, and a $2 O-ring is cheap insurance against a stove failure. Always use manufacturer-specific O-rings; generic hardware store versions may not withstand fuel exposure.
Why does my stove’s flame turn yellow when melting snow?
Yellow flames indicate incomplete combustion, usually from inadequate preheating or a partially clogged jet. The stove is vaporizing water from the snow, which cools the burner and disrupts the fuel-air mixture. Increase your preheat time, clean the jet, and ensure your windscreen isn’t restricting oxygen flow. A properly tuned stove should maintain a blue flame even when melting snow.
See Also
- Stop Heavy Packs with the 10 Lightest Liquid Fuel Camping Stoves This Year
- Stop Freezing with the 10 Best Liquid Fuel Camping Stoves for Winter Camping
- The 10 Ultimate Best Liquid Fuel Camping Stoves for Winter Expeditions in 2026
- The Complete Guide to the 10 Best Liquid Fuel Camping Stoves for Expeditions
- Stop Fuel Spills with the 10 Best Solid Fuel Tablet Camping Stoves This Year