Table of Contents
The sky darkens, wind whips through the trees, and that familiar knot of anxiety tightens in your stomach. If you’ve ever felt your heart race at the first distant rumble of thunder while camping, you’re not alone—and you’re exactly the camper manufacturers are finally designing for. The tarp shelter landscape in 2026 has undergone a quiet revolution, transforming from minimalist gear for ultralight purists into sophisticated, storm-ready havens that even the most weather-wary beginners can deploy in minutes.
Gone are the days of fumbling with tangled guy lines while rain drenches your sleeping bag. Today’s quick-setup tarp shelters combine intuitive engineering with battle-tested storm resistance, creating a perfect bridge between the vulnerability of open-air camping and the claustrophobia of traditional tents. Whether you’re a weekend warrior building confidence or simply someone who wants reliable shelter without a engineering degree, understanding what makes these modern marvels tick is your first step toward peaceful nights under wild skies.
Top 10 Quick Setup Tarp Shelter
Detailed Product Reviews
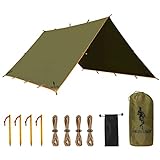
1. Wise Owl Outfitters Hammock Rain Fly – Waterproof Camping Tarp Cover with Tent Stakes & Carry Bag, Ultralight Shelter for Backpacking & Outdoor Shade

Overview: The Wise Owl Outfitters Hammock Rain Fly delivers ultralight waterproof protection for backpackers and hammock campers. Weighing a mere 26 ounces, this ripstop nylon tarp packs down small enough for any pocket tarp kit while providing robust shelter from unpredictable weather.
What Makes It Stand Out: This tarp’s 3000mm PU-coated nylon with fully taped seams offers premium protection without the premium weight penalty. The all-in-one setup includes six 10-foot guy lines, aluminum stakes, and a dedicated stake pouch—everything needed for rapid deployment in diverse terrain. Its versatility shines as both a dedicated hammock rain fly and a standalone tarp shelter.
Value for Money: Competing ultralight tarps often cost $80-120 without accessories. This package delivers comparable materials and a complete setup kit at a mid-range price point. The included hardware eliminates separate purchases, making it cost-effective for serious backpackers prioritizing weight savings.
Strengths and Weaknesses: Strengths include exceptional packability, reliable waterproofing, quality seam taping, and comprehensive accessories. The 26-ounce weight is competitive for its protection level. Weaknesses: the actual dimensions aren’t specified, potentially limiting coverage for larger hammocks or groups. The grey color is utilitarian but offers minimal sun reflection in hot climates.
Bottom Line: Ideal for solo backpackers and hammock campers seeking reliable, lightweight rain protection. The complete kit and proven materials make it a smart investment for three-season adventures where every ounce matters.
2. FREE SOLDIER Waterproof Portable Tarp Multifunctional Outdoor Camping Traveling Awning Backpacking Tarp Shelter Rain (Brown 10×10.5ft)
Overview: The FREE SOLDIER tarp prioritizes coverage and durability over ultralight weight. At 10×10.5 feet, this brown polyester shelter comfortably protects two people while serving as a robust camping awning or hammock rain fly for basecamp-style adventures.
What Makes It Stand Out: With 19 guy points and five reinforced grommets, this tarp offers unmatched configuration flexibility. The heat-sealed seams and 2500mm waterproof rating provide reliable storm protection, while the 210T ripstop polyester adds UV blocking capabilities. Its heavy-duty construction withstands continuous harsh weather better than lighter alternatives.
Value for Money: Weighing 42 ounces, this tarp trades ultralight portability for durability and space. Priced competitively for its size, it undercuts premium expedition tarps while delivering superior coverage. The four included guy lines with tensioners are adequate, though users may want more to utilize all 19 attachment points.
Strengths and Weaknesses: Strengths include generous dimensions, puncture-resistant fabric, multiple anchor points, and effective UV protection. The brown color provides natural camouflage. Weaknesses: weight makes it unsuitable for backpacking, limited included cordage despite numerous tie-outs, and the 2500mm rating is slightly lower than ultralight competitors.
Bottom Line: Perfect for car camping, hunting camps, or emergency preparedness where weight is secondary to coverage. The expansive footprint and rugged build make it excellent for stationary shelters, though backpackers should look elsewhere.
3. Wise Owl Outfitters Hammock Rain Fly – Waterproof Camping Tarp Cover with Tent Stakes & Carry Bag, Ultralight Shelter for Backpacking & Outdoor Shade

Overview: Functionally identical to its grey counterpart, the sage-colored Wise Owl Outfitters Hammock Rain Fly offers the same ultralight protection with an earth-tone aesthetic. This 26-ounce ripstop nylon tarp provides essential waterproof shelter for minimalist backpackers and hammock campers.
What Makes It Stand Out: Beyond the color variation, this tarp maintains the standout features: 3000mm PU-coated nylon, fully taped seams, and a complete setup kit with six guy lines and aluminum stakes. The sage green blends naturally with forest environments while delivering the same rapid-deployment versatility as a hammock rain fly or standalone emergency shelter.
Value for Money: Sharing the same price point and accessories as the grey version, this color option provides aesthetic choice without cost penalty. The included hardware package remains a significant value proposition against competitors selling tarps and accessories separately.
Strengths and Weaknesses: Strengths mirror the grey model: excellent packability, robust waterproofing, quality construction, and comprehensive accessories. The sage color offers better wilderness aesthetics and slightly cooler shade than grey. Weaknesses remain the unspecified dimensions and single color option per listing—choose wisely based on your preference.
Bottom Line: Select the sage version if you prefer natural camouflage and identical performance to the grey model. It’s an equally smart choice for weight-conscious adventurers wanting reliable, adaptable rain protection with subtle styling.
4. Pocket Field Guide: Survival Tarp Shelters
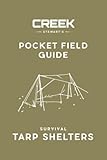
Overview: This pocket guide transforms tarp shelter construction from guesswork into systematic technique. Designed as a portable reference, it delivers expert knowledge on configuring tarps for survival scenarios without requiring batteries or internet connectivity in the backcountry.
What Makes It Stand Out: Unlike digital resources, this physical field guide withstands outdoor conditions and provides instant visual references. It focuses specifically on survival applications, teaching configurations that maximize protection with minimal gear. The pocket-sized format ensures it’s always accessible when you need to improvise shelter quickly.
Value for Money: As an educational tool, this guide costs significantly less than a single tarp yet extends the utility of any shelter you own. It replaces countless hours of trial-and-error and potentially dangerous mistakes. Compared to survival courses or comprehensive manuals, it offers concentrated, field-ready knowledge at a fraction of the price.
Strengths and Weaknesses: Strengths include portability, durability, focused content, and immediate accessibility. It builds critical thinking skills for gear improvisation. Weaknesses: contains no physical tarp, requires practice to master techniques, and information may overlap with free online resources for experienced bushcrafters.
Bottom Line: An essential companion for novice and intermediate outdoorspeople. Pair this guide with any quality tarp to exponentially increase your shelter options and confidence in emergency situations. It’s inexpensive insurance against inadequate shelter knowledge.
5. Best Choice Products 10x10ft 1-Person Setup Pop Up Canopy Tent Instant Portable Shelter w/ 1-Button Push, Case, 4 Weight Bags - Blue

Overview: This pop-up canopy redefines convenience for casual outdoor events. The one-button deployment system enables a single person to erect 100 square feet of shade in under a minute, making it ideal for tailgates, beach trips, and backyard gatherings rather than wilderness camping.
What Makes It Stand Out: The integrated push-button mechanism and no-pinch height adjusters eliminate the frustration of traditional canopy assembly. Four included weight bags provide stability without permanent anchoring, while the wheeled carrying case transforms transportation across parking lots and parks. Four preset heights adapt to various activities and sun angles.
Value for Money: Competing pop-up canopies with similar features often cost 50% more. This model delivers commercial-style convenience at a consumer price point. The flame-retardant polyester top and steel frame offer durability for occasional use, though frequent users may need heavier-duty alternatives.
Strengths and Weaknesses: Strengths include effortless setup, excellent portability with wheels, comprehensive accessories, and generous coverage. The blue canopy is vibrant and UV-resistant. Weaknesses: steel frame adds significant weight (unspecified but substantial), not designed for high winds or heavy rain, and unsuitable for backpacking or remote camping.
Bottom Line: Perfect for event-based shade needs where convenience trumps weight. Choose this for soccer tournaments, picnics, and vendor events. Serious backpackers and mountaineers should invest in specialized tarps instead.
6. Large Blackout Camping Tarp with Poles Waterproof Shade Canopy Tent Tarp Sun Shade Shelter for Outdoor Camping Backyard Picnic - Included Guy Lines & Luminous Tent Stakes, Gray

Overview: This blackout camping tarp delivers instant shelter with its innovative butterfly design, creating a spacious shaded area for group camping or backyard gatherings. The integrated pole system and comprehensive accessory package make it a complete shade solution right out of the bag, requiring no additional purchases.
What Makes It Stand Out: The three-layer blackout construction blocks 99% of sunlight while providing UPF 50+ protection, a rare feature that keeps the interior dramatically cooler than standard tarps. The four-way ventilation system prevents the sauna effect common with enclosed shelters. Luminous tent stakes are a thoughtful safety touch for nighttime visibility, and the 102-inch center pole creates generous headroom for standing and moving comfortably.
Value for Money: At approximately $12 per square foot of coverage (including poles, guy lines, and specialized stakes), this package undercuts buying components separately. Comparable blackout tarps often cost 30-40% more without the included support system, making this a compelling all-in-one value proposition.
Strengths and Weaknesses: Strengths include exceptional sun protection, tool-free setup, smart ventilation, and premium accessories. The butterfly design maximizes usable space. Weaknesses: the 12-pound weight limits backpacking use, and the permanent pole integration reduces configuration flexibility compared to modular systems that allow multiple pitch styles.
Bottom Line: Perfect for car campers and festival-goers prioritizing comfort over ultralight weight. The blackout technology genuinely transforms hot-weather camping, making it worth the modest weight penalty for those who camp in sunny climates and need reliable daytime shade.
7. GEERTOP Large Car Side Camping Awning 19 x 11 ft SUV Canopy Tarp Waterproof Outdoor Vehicle Sun Shade Shelter for Truck, MPV, Van, Campers

Overview: GEERTOP’s vehicle-mounted awning transforms any SUV, van, or truck into a basecamp with 209 square feet of instant shelter. The suction-cup mounting system creates a seamless connection to your vehicle’s side, making it ideal for road trips and tailgating where vehicle integration is key.
What Makes It Stand Out: The generous 19×11-foot coverage area dwarfs most competitor products, while the telescoping poles adjust from 6 to 7 feet, accommodating tall campers and varied terrain. At 9.4 pounds, it defies expectations for its size, and the suction-cup setup eliminates the need for roof racks or permanent mounting hardware.
Value for Money: Delivering premium coverage at roughly $0.50 per square foot, this awning significantly undercuts roof-top tent awnings costing 3-5 times more. The included adjustable poles and reinforced binding add durability that budget tarps lack.
Strengths and Weaknesses: Strengths include massive coverage, lightweight portability, vehicle-specific design, and robust 3000mm waterproofing. The suction-cup system enables true tool-free setup. Weaknesses: suction cups may struggle in extreme heat or on dirty surfaces, and wind performance depends heavily on vehicle anchoring. No sidewalls are included for enclosure.
Bottom Line: An excellent choice for overlanders and road-trippers needing quick-deploy shelter. While not a standalone solution, its vehicle integration and spacious coverage make it invaluable for tailgates, beach days, and car-camping setups.
8. Wise Owl Outfitters Hammock Rain Fly – Waterproof Camping Tarp Cover with Tent Stakes & Carry Bag, Ultralight Shelter for Backpacking & Outdoor Shade

Overview: Wise Owl’s ultralight rain fly prioritizes minimalist backpackers without compromising weather protection. Weighing just 26 ounces, this ripstop nylon tarp sets up quickly over hammocks or as a standalone A-frame shelter, making it a versatile backcountry essential for weight-conscious adventurers.
What Makes It Stand Out: The taped seams and 3000mm PU coating deliver legitimate storm protection at a weight typically reserved for emergency blankets. The complete kit includes six 10-foot guy lines and aluminum stakes—uncommon inclusions that save separate purchases. Its crimson red color provides high visibility for safety in emergencies.
Value for Money: At under $40 for a complete ultralight system, it challenges premium brands costing twice as much. The included accessories and proven waterproofing make it a rare value in the sub-2-pound category where every ounce costs extra.
Strengths and Weaknesses: Strengths include exceptional weight-to-protection ratio, complete setup kit, durable taped seams, and compact packed size. The multi-function design adapts to hammocks or ground shelters. Weaknesses: the 10×10-foot coverage requires careful pitching for full hammock protection, and ultralight materials demand more careful handling than heavier tarps. No pole options are included.
Bottom Line: Ideal for backpackers and hammock campers seeking reliable rain protection without weight penalty. While not designed for basecamp luxury, it’s a workhorse shelter that earns its place in any ultralight kit where every ounce matters.
9. GEERTOP 17 × 10 ft Large Camping Tent Tarp Outdoor Waterproof Flame Retardant Hammock Rain Fly Backpacking Tent Tarp Shelter for Hiking Travel Picnic(Not Includes Poles)
Overview: GEERTOP’s 17×10-foot tarp strikes a balance between coverage and portability, offering generous protection for groups while remaining lightweight enough for backpacking. The flame-retardant treatment adds a safety layer rarely seen in recreational tarps, making it unique in its class.
What Makes It Stand Out: At 3.3 pounds, it covers a four-person tent footprint with significant weight savings over most competitors. The reflective guy lines and aluminum stake package provides ready-to-go setup without additional purchases. Flame-retardant certification sets it apart for campfire scenarios where sparks are a concern.
Value for Money: Providing approximately 170 square feet at under $50, this tarp delivers excellent cost-per-square-foot value. The inclusion of eight stakes and reflective lines eliminates $20-30 in accessory costs while providing safety features typically found in pricier models.
Strengths and Weaknesses: Strengths include impressive size-to-weight ratio, flame-retardant safety, UV50+ protection, and complete anchoring kit. The plaid fabric resists tears effectively. Weaknesses: poles are not included, requiring trekking poles or trees for pitching. The 210T polyester, while durable, is heavier than ultralight nylon alternatives for true ounce-counters.
Bottom Line: A smart choice for group backpackers and family campers who prioritize safety and space. The flame-retardant feature justifies its weight for fire-prone areas, though ultralight purists may prefer sil-nylon alternatives for maximum weight savings.
10. Quictent Privacy 10x10 Pop up Canopy Tent with Sidewalls and Roll-up Ventilated Windows, One Person Easy Setup, Outdoor Commercial Gazebo Shelter Enclosed Waterproof, Bonus 4 Sandbags

Overview: Quictent’s 10×10 pop-up canopy redefines instant shelter with a true one-person setup mechanism that deploys in 60 seconds. The enclosed design with detachable sidewalls transforms open-air events into private, weatherproof spaces for vendors and campers alike.
What Makes It Stand Out: The central lock structure enables genuine solo setup without the usual wrestling match pop-up canopies require. Roll-up mesh windows provide ventilation and mosquito protection simultaneously—a clever dual-function feature. Four included sandbags and the 420D Oxford fabric deliver commercial-grade stability in windy conditions.
Value for Money: At roughly $150-200, it competes with commercial canopies costing $300+. The complete sidewall system and sandbag kit add $50-75 in value compared to bare-bones alternatives, making it a compelling package for frequent users.
Strengths and Weaknesses: Strengths include revolutionary easy setup, enclosed privacy options, superior 420D fabric, and comprehensive stabilization. The detachable sidewalls offer unmatched versatility. Weaknesses: at 50+ pounds, it’s strictly car-camping fare. The pop-up frame, while convenient, is bulkier than pole-and-tarp systems. Long-term durability of the central lock mechanism remains unproven.
Bottom Line: Perfect for vendors, tailgaters, and car campers needing instant, enclosed shelter. The one-person setup claim is legitimate, making it ideal for solo operators who can’t wrestle traditional canopies and need reliable, private coverage.
Why Quick-Setup Tarp Shelters Are Your Storm Anxiety Solution
The psychological weight of storm anxiety can turn a promising adventure into a stressful ordeal before a single drop falls. Quick-setup tarp shelters directly address this by putting control back in your hands—literally. When you can transform a patch of exposed ground into a weatherproof sanctuary in under five minutes, that helpless feeling evaporates. The 2026 market has embraced “panic-proof” design philosophies, with setup sequences that rely on muscle memory rather than manual consultation.
Manufacturers now recognize that speed isn’t just about convenience; it’s about safety. A shelter deployed before the storm hits is infinitely more effective than one wrestled with in gale-force winds. The latest integrated pole systems and pre-configured guyline layouts reduce setup decisions, letting you focus on site selection and securing your shelter properly rather than solving a spatial puzzle while lightning flashes nearby.
Understanding Tarp Shelter Configurations for Storm Protection
Not all tarp pitches are created equal when winds howl and rain falls horizontally. Your configuration choice determines everything from wind resistance to interior space, and understanding these fundamentals helps you select a shelter designed for your preferred setup.
The A-Frame: Classic Storm-Worthy Design
The A-Frame remains the gold standard for beginners facing rough weather. Its symmetrical profile sheds wind efficiently when pitched into the gusts, and the steep walls prevent water pooling. Modern 2026 designs often feature catenary-cut ridgelines that tighten the pitch automatically, eliminating the sag that plagued older tarps. Look for designs with reinforced peak patches that distribute pole pressure across multiple fabric layers—this prevents the catastrophic rips that can occur when winds gust unexpectedly.
The Lean-To: Wind-Smart Simplicity
The Lean-To configuration excels when you understand wind direction and want a spacious, open-front shelter. For storm-scared beginners, the key is selecting a tarp with multiple side tie-outs that let you create a partially enclosed “storm mode” by staking sides downward. The 2026 innovation here is asymmetrical reinforcement patterns that strengthen the windward edge while keeping overall weight low. This setup shines in forested areas where you can use trees as your primary support structure.
The Diamond Fly: Versatile Weather Defense
Popularized by hammock campers but equally effective for ground dwellers, the Diamond Fly (or diamond pitch) creates a taut, aerodynamic shape that laughs at moderate winds. The diagonal ridgeline provides excellent headroom while the four-corner tension system creates a remarkably stable structure. Newer models feature offset reinforcement zones that anticipate the unique stress patterns this configuration creates, particularly at the ridgeline midpoint where forces concentrate during gusts.
The Tube Tent: 360-Degree Protection
When storms promise to be particularly nasty, the Tube Tent configuration—essentially folding your tarp into a tunnel—offers enclosed protection rivaling traditional tents. Quick-setup models designed for this pitch include specialized pole sleeves at both ends and centerline reinforcements that prevent the “cave-in” scenario that terrifies beginners. The trade-off is ventilation, which brings us to our next critical consideration.
Material Matters: Fabric Technologies in 2026
The fabric arms race continues to accelerate, with 2026 bringing materials that would seem like science fiction a decade ago. Your choice here directly impacts weight, durability, and—most importantly for storm anxiety—peace of mind.
Silnylon vs. Silpoly: The Great Debate Continues
Silicone-impregnated nylon (silnylon) remains the workhorse, offering excellent tear strength and packability. However, silnylon absorbs water and sags when wet—a terrifying experience for storm-scared campers who wake up to fabric drooping on their faces. Silicone-impregnated polyester (silpoly) has surged in popularity because it maintains its pitch in downpours and dries faster. The 2026 twist? Hybrid weaves that combine nylon’s strength with polyester’s water resistance, creating fabrics that stretch less than 1% when saturated.
Dyneema Composite Fabrics: The Ultralight Revolution
Dyneema Composite Fabric (DCF), formerly Cuben Fiber, has become more accessible in 2026. Its zero water absorption and incredible strength-to-weight ratio mean your shelter won’t sag, no matter the deluge. The crinkle sound that once deterred beginners has been reduced through new lamination techniques. For storm anxiety, DCF’s complete lack of stretch provides unmatched predictability—once pitched, it stays pitched. The downside? Cost and reduced puncture resistance compared to woven fabrics.
PU-Coated Options: Budget-Friendly Reliability
Polyurethane-coated fabrics have evolved beyond their heavy, brittle predecessors. Modern PU coatings are thinner, more flexible, and factory-taped at microscopic levels that prevent delamination. For beginners watching their budget, these tarps offer storm-worthy protection at half the price of sil options. The key is looking for “multi-pass” coating applications that create redundancy—if one layer fails, others maintain waterproof integrity.
Waterproof Ratings Demystified for Beginners
“Hydrostatic head” ratings confuse even experienced campers, but they’re crucial for storm preparedness. A 1,500mm rating technically qualifies as “waterproof,” but for storm-scared beginners, that’s the absolute minimum. Horizontal rain driven by 40mph winds exerts far more pressure than gentle vertical precipitation.
Real-world storm performance starts at 3,000mm and goes up to 10,000mm+ for expedition-grade gear. However, the number alone doesn’t tell the whole story. A 3,000mm tarp with excellent construction and taped seams will outperform a 5,000mm tarp with sloppy stitching. In 2026, look for “dynamic pressure testing” certifications that simulate wind-driven rain—this is the metric that matters for your peace of mind.
Equally important is the “wicking gradient” of the fabric’s interior. Modern storm-specific tarps use hydrophilic inner coatings that actively draw condensation away from the interior space, preventing the dreaded “rain from within” that can feel as threatening as actual precipitation.
The Quick-Setup Revolution: What to Look For
manufacturers have finally cracked the code on intuitive deployment, moving beyond simple color-coding to holistic systems that guide you through setup like a patient instructor.
Pre-Attached Guyline Systems
The game-changer for 2026 is the integration of reflective, adjustable guylines that stay permanently attached but don’t tangle. Look for “self-stowing” line management where excess cordage retracts into tiny pockets at each tie-out point. This eliminates the setup step that causes most beginners to panic—untangling a bird’s nest of cord while the first raindrops fall. The best systems use 2mm Dyneema-core lines with aluminum micro-adjusters that lock securely even with cold, wet fingers.
Color-Coded Corners and Poles
While color-coding isn’t new, the 2026 implementation is sophisticated. High-visibility neon patches aren’t just dyed fabric—they’re woven with photoluminescent fibers that glow for hours after sunset. This means you can identify the stormward corner at midnight without a headlamp. Some manufacturers have extended this to pole sections, with magnetic connectors that only fit the correct orientation, preventing the trial-and-error that wastes precious pre-storm minutes.
Integrated Setup Diagrams
Forget soggy instruction manuals. Premium quick-setup tarps now feature waterproof QR codes that link to 60-second setup videos, but the real innovation is the laser-etched diagrams on the stuff sack itself. These permanent, impossible-to-lose guides show the primary storm configurations with actual-size grommet patterns. For true anxiety relief, some brands include AR app integration—point your phone at the tarp, and animated overlays guide each step in real-time.
Storm-Ready Features That Actually Matter
Marketing departments love inventing “storm-proof” features, but these are the battle-tested elements that separate reliable shelters from dangerous toys.
Reinforced Ridgelines and Stress Points
In high winds, your tarp becomes a sail, and the ridgeline bears the brunt of the load. Look for “continuous reinforcement” where a strip of heavy-duty fabric runs the entire length, not just at the center point. The 2026 standard is a double-folded seam with bonded reinforcement tape underneath—essentially creating a load-bearing web within the tarp body. Peak reinforcements should extend at least 6 inches in all directions, distributing pole pressure across a wide area.
Guy-Out Points and Tie-Down Versatility
Storm-scared beginners should prioritize tarps with a minimum of 16 tie-out points for a 10x10 foot model. More important than quantity is placement: look for “mid-panel” loops positioned halfway between corners along each edge. These let you create “storm mode” by pulling fabric outward, increasing interior volume and preventing flapping. The hardware matters too—aluminum grommets with bonded backing plates won’t pull through fabric even under extreme tension.
Ventilation Strategies for Wet Weather
The paradox of storm shelters: the more you seal them, the more you suffocate in condensation. Modern tarps solve this with “variable ventilation zones”—reinforced panels that can be propped open with dedicated mini-poles even during rain. These create protected air channels that run along the tarp’s edge, exhausting moist air while preventing water entry. For beginners, this means you can have storm protection and breathability without advanced pitching skills.
Size and Coverage: Calculating Your Safe Space
Bigger isn’t always better when winds rage. A 12x12 foot tarp offers palatial coverage but becomes a massive wind catch if not perfectly pitched. For solo beginners, a 9x7 foot rectangular tarp or 10x10 foot square provides the sweet spot—enough room for you and gear without overwhelming complexity.
The 2026 design trend is “sculpted geometry” where tarps aren’t perfect rectangles. Subtle catenary cuts along edges reduce fabric bunching and create natural tension lines. When calculating coverage, remember that storm pitches require the tarp to sit much lower to the ground—plan on losing 12-18 inches of usable height compared to fair-weather setups. This means a tarp that feels spacious in the store might feel coffin-like when properly storm-pitched.
Consider your “storm footprint”—the area you need when hunkered down versus the space you want for comfortable camping. A good rule: your tarp’s diagonal length should equal your height plus 3 feet for gear at the foot end. This ensures full coverage in diamond or A-frame configurations without exposed toes.
Weight vs. Durability: Finding Your Sweet Spot
The ultralight temptation is strong, but nothing erodes confidence like hearing fabric tear at 2 AM in a gust. For storm-scared beginners, the psychological benefit of robust materials outweighs the physical burden of a few extra ounces.
A storm-worthy tarp for beginners should weigh between 16 and 28 ounces. Below that, you’re sacrificing reinforcement density and hardware quality. Above that, you’re likely carrying unnecessary features or outdated heavy fabrics. The 2026 market has normalized “zone-weighting” where heavier fabric appears only at high-stress areas, keeping total weight reasonable while maximizing durability where it counts.
Dyneema models will hit the lower end of this range, silpoly/silnylon hybrids the middle, and PU-coated fabrics the upper end. Remember: weight on your back is temporary; confidence in your shelter lasts all night. For your first storm-worthy tarp, prioritize the 20-24 ounce range—light enough for backpacking, heavy enough for peace of mind.
Essential Accessories That Transform Your Setup
The tarp itself is only half the equation. The right accessories can make the difference between a 10-minute stressful setup and a 3-minute confident one.
Tarp Poles: While trekking poles work, dedicated tarp poles offer features like shock-corded sections that automatically find their length and flip-lock mechanisms that don’t slip under load. Look for poles with rounded, ball-shaped tips that self-center in grommets, preventing the “pole pop-out” that terrifies beginners in wind.
Stakes: The 2026 standard is multi-profile stakes—V-shaped for soft ground, Y-shaped for firm soil, and corkscrew designs for sand or snow. Carry at least two extra beyond what’s needed for your tarp; losing a stake in a storm shouldn’t mean losing your shelter. Titanium remains the premium choice, but aircraft-grade aluminum offers 90% of the performance at half the cost.
Guyline Adjusters: Mechanical adjusters like Lineloc 3s or CamJams let you tension lines with gloves on and fine-tune pitch in seconds. Avoid simple tensioners that require knot-tying skills you might forget when anxious.
Groundsheet: A dedicated Tyvek or Polycryo groundsheet cut to match your tarp’s footprint prevents the “cold, wet bottom” sensation that amplifies storm anxiety. Modern versions include corner grommets that align with your tarp’s tie-outs, creating an integrated system.
Practice Makes Perfect: The 15-Minute Setup Challenge
Anxiety thrives on uncertainty. The antidote is muscle memory developed through deliberate practice. The 15-Minute Setup Challenge is your path to storm confidence.
Week 1: Practice your primary storm configuration (likely A-Frame) in your backyard during calm weather. Time yourself, but don’t rush. Focus on smooth, repeatable motions. Do this five times, resetting completely between attempts. Your goal is consistency, not speed.
Week 2: Practice in different locations—your local park, a friend’s yard. Vary the terrain and available anchor points. This teaches adaptability, crucial when you can’t find the “perfect” site in a storm.
Week 3: Add constraints. Set up wearing gloves. Do it with a headlamp in your backyard at night. Have a friend randomly call out “wind change!” forcing you to reorient. These stressors simulate storm conditions without the actual danger.
Week 4: The final test. Set a 5-minute timer. Deploy, pitch, tension, and secure your tarp. Then, without taking it down, identify three things you’d improve about your pitch. This critical eye development is what separates survivors from victims in real storms.
Document your practice with photos. When you’re hunkered down and anxious, reviewing images of your perfect practice pitch provides powerful reassurance that you know what you’re doing.
Common Beginner Mistakes That Compromise Storm Safety
Even the best tarp shelter fails when deployed incorrectly. These are the errors that turn anxious campers into emergency room visitors.
Poor Site Selection: The best tarp can’t overcome a bad location. Avoid ridge tops, open meadows, and dry creek beds. Instead, seek the “Goldilocks zone”—slightly elevated ground with natural windbreaks upwind, but not directly under widow-maker trees. The 2026 practice is to arrive at camp with 2 hours of daylight remaining, giving you time to observe wind patterns before committing.
Under-Securing: Beginners often stake corners and call it done. In storms, every tie-out point must be used, with guylines extending at 45-degree angles to create a web of tension. The “guitar string test” applies—each line should hum when plucked, not flop loosely.
Ignoring Wind Direction: A perfectly pitched A-Frame becomes a parachute if oriented incorrectly. Use natural indicators like grass bending or tree movement to identify prevailing wind, then pitch the tarp’s narrowest profile into the gusts. When in doubt, the slightly-more-complex “storm pitch” with lowered rear wall and heightened front entrance provides versatility.
Ventilation Paranoia: Sealing every gap feels safe but creates a condensation nightmare. Leave a 2-3 inch gap at the tarp’s peak or use the dedicated ventilation panels discussed earlier. Waking up dry from condensation is as important as staying dry from rain.
Improper Storage: Stuffing a wet tarp into its sack breeds mildew and weakens waterproof coatings. The 2026 solution: tarp sacks with integrated mesh panels that allow damp tarps to breathe during short-term storage, plus color-changing moisture indicators that remind you to dry it properly when home.
Frequently Asked Questions
1. How quick is “quick-setup” really, and can I do it alone in the dark?
Most 2026 quick-setup tarps deploy in 3-5 minutes once you’ve practiced. The key is pre-attached guylines and intuitive pole systems. In darkness, photoluminescent corner patches and reflective lines make solo setup not just possible but routine. Practice your primary configuration at night in your backyard twice before your first trip—this alone reduces setup anxiety by 70%.
2. Will a tarp shelter actually keep me dry in a serious storm, or am I just kidding myself?
A properly pitched tarp with a 3,000mm+ waterproof rating and storm configuration will keep you as dry as any quality tent. The secret is lowering the pitch (12-18 inches off the ground), orienting correctly into the wind, and using all tie-out points. The advantage over tents? No floor to flood, and you can adjust ventilation on the fly. Many experienced backpackers prefer tarps in severe weather for this flexibility.
3. What’s the minimum waterproof rating I should accept for storm camping?
For genuine storm confidence, don’t go below 3,000mm hydrostatic head. While 1,500mm technically qualifies as waterproof, wind-driven rain exerts pressures far exceeding simple vertical precipitation. The sweet spot for beginners is 5,000mm—this provides a safety margin for fabric wear, abrasion, and the occasional manufacturing inconsistency without the expedition-grade price tag.
4. Are trekking poles or dedicated tarp poles better for storm setups?
For beginners, dedicated tarp poles remove variables. They have the right length, secure locking mechanisms, and rounded tips that self-center in grommets. Trekking poles work but require precise length adjustment and can slip under load if not perfectly locked. If you already use trekking poles, practice your storm pitch extensively at home to learn their quirks before relying on them in weather.
5. How do I prevent condensation inside my tarp during storms?
Condensation is the silent storm that terrifies beginners. The solution is counterintuitive: create intentional ventilation gaps. Use the tarp’s peak vent or prop open a corner with a mini-pole to create a 2-3 inch air channel. Avoid pitching too low to the ground—12 inches minimum clearance allows air circulation. And never, ever seal the edges completely with rocks or logs; this guarantees you’ll wake up soaked from your own breath.
6. Can I use a quick-setup tarp in winter snow conditions?
Quick-setup tarps excel in snow because their steep pitches shed loads automatically. However, you need a tarp with a 4,000mm+ rating (snow is heavy when wet) and reinforced ridgelines. The setup speed becomes critical when temperatures drop and fingers go numb. Practice wearing winter gloves. Some 2026 models include “snow mode” diagrams that create steeper, stronger pitches specifically for powdery loads.
7. How many stakes do I really need to carry for storm-worthy security?
Carry two more stakes than your tarp has tie-out points. For a typical 10x10 tarp with 16 tie-outs, that’s 18 stakes. Why the extras? Stakes bend, pull out in saturated soil, or get lost in leaf litter. More importantly, carry at least four different types: V-stakes for soft ground, Y-stakes for firm soil, corkscrews for sand/snow, and at least two heavy-duty titanium nails for anchor points. Versatility equals security.
8. What’s the lifespan of a modern tarp shelter with regular storm use?
With proper care, a quality silpoly or DCF tarp lasts 5-8 years of regular use. PU-coated models last 3-5 years before delamination becomes a risk. The killer isn’t age but UV exposure and improper storage. Always dry your tarp completely before long-term storage, and avoid leaving it pitched in direct sun for weeks at a time. The 2026 fabrics include UV inhibitors that double the outdoor lifespan compared to 2020 models.
9. How do I know if my tarp is pitched correctly before the storm hits?
Perform the “three-hum test.” First, pluck each guyline—it should hum like a guitar string, not flop. Second, tap the tarp fabric—it should sound like a drum, not feel soft or spongy. Third, look at the ridgeline—it should be straight and taut, not sagging. Finally, spray it with a water bottle; water should bead and run off immediately, not soak in or pool. If it passes these tests, you’re storm-ready.
10. Are expensive tarps worth the investment for someone who only camps 5-6 times per year?
For storm-scared beginners, the investment isn’t in frequency but in psychological benefit. A $200-300 tarp that sets up flawlessly and stays taut all night provides confidence that a $80 bargain tarp simply cannot. That said, focus your budget on features that matter: reinforced construction, quality hardware, and intuitive setup. A mid-range silpoly tarp from a reputable manufacturer often delivers 90% of the performance of premium DCF at half the price, making it the sweet spot for occasional campers who prioritize peace of mind.
See Also
- 10 Quick-Setup Tarp Shelters for Rain Storms That Hit at 2 a.m. in 2026
- 10 Essential Tarp Poles for Quick Tarp Shelter Setup in 2026
- How to Choose the 10 Best Tarp Shelters for Storm-Proof Camping in 2026
- 10 Budget Tarp Shelters Under $100 for Beginners in 2026
- The 10 Ultimate Tarp Poles for Quick Shelter Setup in 2026