Table of Contents
The morning ritual of a thru-hiker is sacred. As the first light filters through your tarp and the trail calls from just beyond your sleeping bag, the promise of hot coffee or a warm breakfast becomes the motivation to unzip and face another 20-mile day. But when you’re carrying everything you own on your back for 2,000+ miles, that simple pleasure hinges on one critical piece of gear: your stove. The difference between a reliable, efficient cooking system and a finicky, fuel-guzzling nightmare can mean the difference between a energized morning and a frustrating start, between carrying extra pounds or shaving ounces that accumulate over months of walking.
Choosing the perfect ultralight backpacking stove for thru-hiking isn’t about finding the “best” product on the market—it’s about finding the best solution for your specific trail, hiking style, resupply strategy, and personal tolerance for trade-offs. This guide cuts through the marketing hype to examine what actually matters when you’re depending on a tiny piece of metal to feed you for six months straight. We’ll explore the nuanced world of heat output, fuel availability, failure points, and real-world trail scenarios that product specs alone never address.
Top 10 Backpacking Stoves
Detailed Product Reviews
1. AOTU Portable Camping Stoves Backpacking Stove with Piezo Ignition Stable Support Wind-Resistance Camp Stove for Outdoor Camping Hiking Cooking

Overview: The AOTU Portable Camping Stove is a compact, wind-resistant burner designed for small group outdoor cooking. Weighing minimally with its aluminum alloy construction, this piezo-ignition stove delivers 3000W of power in a package that folds down to pocket size. It’s built for backpackers and campers who need reliable performance without bulk.
What Makes It Stand Out: The integrated windproof net system sets this stove apart, using a honeycomb design that increases oxygen circulation while shielding flames. The four-dimensional support structure provides unusual stability for a stove this compact. Its ability to handle 20cm diameter cookware makes it surprisingly versatile for 1-3 person meals, while the all-aluminum construction ensures durability without weight penalty.
Value for Money: Priced in the budget-friendly range, this stove competes with options costing twice as much. The inclusion of a storage case and robust build quality means you won’t need a replacement soon. For casual campers and entry-level backpackers, it offers professional features—wind resistance, piezo ignition, and stable support—without the premium price tag of established brands.
Strengths and Weaknesses: Strengths include excellent wind resistance, sturdy four-point pot support, reliable piezo ignition, and remarkable compactness. The integrated windscreen is genuinely effective. Weaknesses involve questionable long-term durability of the ignition system, potential clogging in dirty conditions, and limited flame control finesse compared to premium models. The non-standard fuel compatibility might frustrate some users.
Bottom Line: The AOTU stove delivers exceptional value for casual outdoor enthusiasts. While it lacks the refinement of high-end alternatives, its windproofing and stability make it a reliable choice for weekend warriors and budget-conscious backpackers.
2. Fire-Maple “Fixed Star 1” Backpacking and Camping Stove System | Outdoor Propane Cooking Gear | Portable Pot/Jet Burner Set | Ideal for Hiking, Trekking, Fishing, Hunting Trips and Emergency Use

Overview: The Fire-Maple Fixed Star 1 is an integrated cooking system that combines a 1-liter pot with an efficient heat-exchange stove. Weighing just 18 ounces complete, this all-in-one solution nests all components including a fuel canister inside the pot. It’s engineered for backpackers who prioritize cooking efficiency and space optimization in their packs.
What Makes It Stand Out: The integrated heat exchanger technology delivers up to 30% faster boiling times than conventional stoves, making it exceptionally fuel-efficient. The complete system design—where stove, bowl, and canister store inside the pot—eliminates packing guesswork. The locking handle with neoprene insulation and built-in piezo ignitor create a seamless, safe user experience that competitors struggle to match at this price point.
Value for Money: This system punches above its weight class, offering Jetboil-like performance for significantly less money. The fuel savings from the heat exchanger quickly offset the initial investment. While it doesn’t include a fuel canister, the durability of the hard-anodized construction ensures years of service, making it a smart long-term purchase for frequent adventurers.
Strengths and Weaknesses: Strengths include rapid boiling, exceptional fuel efficiency, compact nesting design, and secure locking handle. The neoprene cozy is genuinely useful. Weaknesses are the Coleman canister incompatibility, reduced performance in wind without additional screening, and limited pot size for groups larger than two. The integrated design means you can’t use your existing cookware.
Bottom Line: For solo travelers and couples seeking Jetboil performance without the premium cost, the Fixed Star 1 is a compelling choice. Its integrated efficiency and thoughtful design make it ideal for fast-and-light missions where every ounce counts.
3. MSR PocketRocket 2 Ultralight Camping and Backpacking Stove

Overview: The MSR PocketRocket 2 is the gold standard for ultralight canister stoves, weighing a mere 2.6 ounces. This minimalist burner folds to the size of a small lighter yet delivers robust performance, boiling a liter of water in 3.5 minutes. Trusted by thru-hikers worldwide, it represents decades of refinement in compact stove design.
What Makes It Stand Out: The serrated pot supports provide exceptional stability for various pot sizes, a feature many ultralight stoves sacrifice. MSR’s precision flame control allows true simmering capabilities rare in stoves this light. The self-centering design and protective case show attention to detail that cheaper imitations miss. Its legendary reliability has been proven on long-distance trails across every continent.
Value for Money: While pricier than budget alternatives, the PocketRocket 2’s durability justifies every penny. This stove will last thousands of miles where cheaper options fail. The fuel efficiency and precise control save money on canisters over time. For serious backpackers, it’s an investment that pays dividends in reliability and performance per ounce.
Strengths and Weaknesses: Strengths include class-leading weight-to-power ratio, exceptional flame control, rock-solid reliability, and broad pot compatibility. The included case is a nice touch. Weaknesses are the lack of integrated wind protection, higher price point, and the need for careful handling due to its tiny size. It requires a separate windscreen for optimal efficiency.
Bottom Line: The PocketRocket 2 remains the benchmark for ultralight stoves. If you demand proven reliability, precise control, and minimal weight for serious adventures, this is your stove. Budget campers may find better value elsewhere.
4. BRS Outdoor BRS-3000T Ultra-Light Titanium Alloy Miniature Portable Picnic Camping Gas Cooking Stove Portable Ultralight Burner 25gram

Overview: The BRS-3000T pushes ultralight boundaries at just 25 grams, making it one of the lightest functional canister stoves available. This titanium alloy burner delivers 2700W of power, boiling a liter of water in under three minutes. It’s designed for gram-counting backpackers who refuse to compromise cooking speed for weight savings.
What Makes It Stand Out: The sheer weight—or lack thereof—dominates conversation. At less than an ounce, it makes the PocketRocket 2 seem heavy. Despite this feathery build, it maintains stable flame control and respectable power output. The nesting capability with a 750ml pot and 110g canister creates an incredibly packable cooking system that disappears in your pack.
Value for Money: This Chinese-made stove offers astonishing value, costing a fraction of premium brands while delivering comparable performance. The titanium construction ensures durability despite the low weight. For ounce-counters on a budget, it’s arguably the best value in backpacking stoves. However, quality control can be inconsistent, making it a bit of a lottery.
Strengths and Weaknesses: Strengths are the incredible 25-gram weight, fast boiling time, compact nesting design, and unbeatable price. Weaknesses include potential durability issues with the pot supports, occasional quality control problems, and less refined flame control than premium stoves. The minimalist design offers no wind protection or piezo ignition.
Bottom Line: The BRS-3000T is a triumph of minimalist engineering for weight-obsessed backpackers. Accept the quality control gamble, and you’ll own the lightest functional stove available. For extreme ultralight missions, it’s hard to beat—just inspect it carefully upon arrival.
5. Odoland Camping Cookware Stove Carabiner Canister Stand Tripod and Stainless Steel Cup, Tank Bracket, Fork Spoon Kit for Backpacking, Outdoor Camping Hiking and Picnic,Green
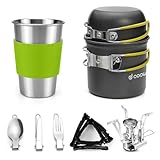
Overview: The Odoland 9-Piece Camping Cookware Set is a complete outdoor kitchen solution that includes a mini stove, two pots, utensils, cup, and canister stand. Designed for budget-conscious campers, this green-colored kit provides everything needed for outdoor cooking in one package. It’s aimed at families and groups who want convenience over ultralight performance.
What Makes It Stand Out: The comprehensive nature of this kit eliminates the need for piecemeal purchasing. The inclusion of a canister tripod stand significantly improves stability—a feature rarely included in budget sets. Anti-slip and anti-heat handles throughout demonstrate surprising attention to safety. The nesting design, while not the most compact, keeps everything organized in the included mesh bag.
Value for Money: This set offers remarkable value, costing less than many standalone stoves while including pots and utensils. For beginners or occasional campers, it eliminates research and compatibility guesswork. The anodized aluminum pots conduct heat well, though they won’t match premium brands. It’s disposable-price gear that actually lasts multiple seasons with reasonable care.
Strengths and Weaknesses: Strengths include complete package convenience, excellent stability from the tripod stand, effective anti-heat handles, and unbeatable price. The nesting system works well. Weaknesses are the heavier weight, bulkier packed size, lower burner quality compared to dedicated stoves, and limited durability for hardcore use. The stove lacks refinement and wind protection.
Bottom Line: Perfect for family camping or beginners, the Odoland set delivers surprising functionality at an entry-level price. Serious backpackers should look elsewhere, but for car camping and casual adventures, it’s an excellent value that gets you cooking immediately.
6. Portable Camping Stove Backpacking Stove, Specialized Hiking Stove Camping Stove with Piezo Ignition Stable Support Wind-Resistance, Camp Stove for Outdoor cooking Camping Hiking Adventure Cooking

Overview: The YCDMLJC portable camping stove targets budget-conscious adventurers seeking minimal weight and maximum portability. Weighing just 0.24 pounds and packing down to pocket-sized dimensions, this aluminum alloy stove delivers 3000W of cooking power through piezo ignition. Designed for compatibility with standard EN 417 fuel canisters, it supports pots up to 8 inches while maintaining a tiny footprint in your pack.
What Makes It Stand Out: This stove’s primary selling point is its extreme portability-to-power ratio. At under four ounces, it’s among the lightest functional stoves available. The integrated piezo ignition eliminates lighter dependency, while the compact folding design makes it genuinely pocketable. The 3000W output competes with heavier models, offering surprising boiling speed for its weight class. The adjustable valve provides decent flame control for simmering.
Value for Money: Priced in the entry-level segment, this stove delivers exceptional value for casual campers and beginners. It costs significantly less than premium brands while covering essential functions. However, the low price reflects in material quality and long-term durability. For occasional weekend trips, it’s a steal compared to $50+ alternatives. Frequent backpackers should consider investing more for better reliability.
Strengths and Weaknesses: Pros: Extremely lightweight and compact; budget-friendly; simple operation; reliable piezo ignition; decent power output. Cons: Questionable long-term durability; basic wind resistance; unknown brand reputation; minimal stability in windy conditions; no included carrying case.
Bottom Line: The YCDMLJC stove excels as a backup or starter stove for fair-weather camping. While it won’t replace premium models for serious expeditions, its featherlight design and bargain price make it ideal for occasional hikers, emergency kits, or ultralight enthusiasts on a strict budget. Manage expectations regarding longevity.
7. Odoland 3500W Windproof Camp Stove Camping Gas Stove with Fuel Canister Adapter, Piezo Ignition, Carry Case, Portable Collapsible Stove Burner for Outdoor Backpacking Hiking and Picnic
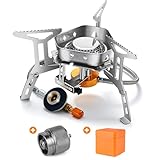
Overview: Odoland’s 3500W stove positions itself as a mid-range workhorse for serious outdoor enthusiasts. This windproof model combines aluminum alloy and stainless steel construction with a built-in windshield, piezo ignition, and versatile fuel compatibility. The included canister adapter and carry case add practical value, making it ready for varied outdoor scenarios from backpacking to picnic cooking.
What Makes It Stand Out: The integrated windshield design dramatically improves fuel efficiency in adverse conditions, a feature often missing in this price range. The 3500W power output delivers rapid boiling, reportedly heating 1L of water in approximately three minutes. Dual connector compatibility expands fuel options beyond standard threaded canisters. The complete package—stove, adapter, and case—provides out-of-the-box readiness that competitors typically charge extra for.
Value for Money: This stove hits the sweet spot between budget and premium options. For $30-40, you get wind protection and accessories that usually cost $50+ separately. The robust construction suggests multi-season durability, amortizing the investment over years of use. While ultralight purists might prefer lighter options, the feature set justifies every dollar for most campers.
Strengths and Weaknesses: Pros: Effective wind protection; high power output; included adapter and case; sturdy construction; reliable ignition. Cons: Heavier than minimalist stoves; bulkier packed size; aluminum components may bend under heavy pots; not ideal for ultralight backpacking.
Bottom Line: The Odoland stove serves as an excellent primary stove for weekend warriors and three-season backpackers. Its wind resistance and comprehensive accessory package make it more versatile than basic models without approaching premium prices. If you prioritize reliability over ultralight weight, this stove deserves serious consideration.
8. Fire-Maple Backpacking and Camping Stove Series | Outdoor Propane Camp Cooking Gear | Portable Pot/Jet Burner | Ideal for Hiking, Trekking, Fishing, Hunting Trips and Emergency Use (Greenpeak)

Overview: Fire-Maple’s Greenpeak stove targets ultralight enthusiasts unwilling to compromise on quality. Weighing a mere 85 grams (3 ounces), this premium burner folds to just 2.1 x 2.8 inches while utilizing stainless steel, ceramic, aluminum alloy, and silicone components. Designed for maximum fuel efficiency, it serves minimalist backpackers, trekkers, and emergency preparedness kits where every ounce matters.
What Makes It Stand Out: The exceptional materials selection distinguishes this from budget alternatives. The combination of stainless steel and ceramic ensures durability while maintaining incredible lightness. Its fuel-efficient jet burner design extracts maximum energy from each canister, reducing carried fuel weight. The precision engineering provides reliable performance in varied altitudes and temperatures where cheaper stoves falter. It pairs seamlessly with Fire-Maple’s G3 pot system.
Value for Money: At $40-50, this sits in the premium tier for standalone burners. The price premium buys genuine weight savings and durability that cheaper aluminum stoves can’t match. For ounce-counting thru-hikers, the investment pays dividends over long trails. Casual campers may not justify the cost, but serious adventurers recognize the value in reliable, lightweight gear that lasts multiple seasons.
Strengths and Weaknesses: Pros: Ultralight yet durable; superior fuel efficiency; premium materials; compact folding design; reliable in harsh conditions. Cons: No built-in ignition system; premium pricing; requires separate pot support for larger cookware; minimal wind protection without accessories.
Bottom Line: The Fire-Maple Greenpeak excels for dedicated ultralight backpackers and technical trekkers. If shaving ounces without sacrificing reliability is your priority, this stove justifies its price through exceptional engineering. For family camping or casual use, cheaper alternatives suffice. This is a specialist’s tool, not an all-rounder.
9. KUBQLIG Portable Camping Stove Backpacking Stove, Specialized Camping Stove with Piezo Ignition Stable Support Wind-Resistance, Camp Stove for Camping Hiking&Outdoor Adventure Cooking

Overview: The KUBQLIG stove appears nearly identical to other budget ultralight models, weighing 0.24 pounds with piezo ignition and aluminum alloy construction. Marketed with anti-rust properties, it targets the same entry-level segment as the YCDMLJC model. Packaged slightly larger at 3.74 x 2.95 x 2.56 inches, it promises reliable performance for casual outdoor cooking and emergency preparedness.
What Makes It Stand Out: Beyond the standard features, KUBQLIG emphasizes rust and corrosion resistance—a genuine concern for aluminum stoves in humid environments. The piezo ignition and 3000W output match competitors, while the lifetime after-sales service suggests better support than typical no-name brands. The adjustable valve offers reasonable flame control for a stove in this class.
Value for Money: Positioned similarly to other sub-$20 stoves, KUBQLIG provides basic functionality at minimal cost. The rust-resistant coating may extend lifespan compared to bare aluminum alternatives, improving long-term value. However, the unknown brand reputation and lack of third-party testing make it a gamble versus established budget brands. It suits occasional users not ready to invest in proven gear.
Strengths and Weaknesses: Pros: Extremely affordable; lightweight; rust-resistant coating; piezo ignition included; lifetime warranty promise. Cons: Larger packed size than competitors; questionable brand reliability; basic wind performance; durability concerns under heavy use; no carrying case.
Bottom Line: The KUBQLIG stove functions as a serviceable entry-level option with a slight edge in corrosion resistance. It’s best suited for emergency kits, car camping backup, or first-time backpackers testing gear preferences. Serious enthusiasts should invest in proven brands. Consider this a disposable learning tool rather than a long-term investment.
10. Jetboil Flash 1.0L Portable Fast Boil Stove for Camping and Backpacking with 1-Step Auto Ignition, Propane/Isobutane Burner with Cooking Cup, Mountainscape

Overview: The Jetboil Flash represents the pinnacle of integrated cooking systems, combining burner and 1-liter cooking cup into a single efficient unit. This premium stove features one-step auto ignition, boils 16 ounces of water in just two minutes, and packs all components into the insulated cup. The Mountainscape colorway adds aesthetic appeal to the performance-driven design.
What Makes It Stand Out: Speed defines the Flash—its proprietary flux-ring heat exchanger and optimized burner deliver unmatched boiling efficiency. The one-step auto ignition eliminates fiddling with separate lighters or piezo buttons. Safe-Touch zones prevent burns, while the improved three-point locking system ensures secure pot connection. The entire system nests together, including a fuel canister, creating an organized, space-saving package no modular setup can match.
Value for Money: At $120-130, the Flash commands a premium price. However, the integrated design eliminates separate pot purchases, and the fuel efficiency saves money on canisters over time. For frequent backpackers covering long distances, the time and weight savings justify the cost. Weekend warriors may find better value in separate components, but the convenience factor is undeniable.
Strengths and Weaknesses: Pros: Lightning-fast boiling; integrated system; excellent fuel efficiency; safe-touch insulation; reliable auto ignition; compact nesting design. Cons: Expensive; limited to boiling/simmering; proprietary components; heavier than minimalist setups; not ideal for gourmet cooking.
Bottom Line: The Jetboil Flash dominates for backpackers prioritizing speed, convenience, and integrated design. If your backcountry menu revolves around dehydrated meals and hot drinks, nothing beats it. Gourmet cooks and ultralight purists should look elsewhere. For the target user, it’s worth every penny and remains the category leader despite the premium price.
Why Your Stove Choice Matters on a Thru-Hike
Your stove becomes your kitchen, your coffee shop, and your safety net during a thru-hike. Unlike weekend warriors who can tolerate finicky gear, thru-hikers need reliability across thousands of uses, diverse weather conditions, and varying elevations. A stove failure doesn’t just mean a cold dinner—it can impact your nutrition, morale, and even safety in cold environments. The weight savings of an ultralight stove multiply over the course of a long trail; saving 3 ounces on your stove translates to carrying 3 ounces less for 2,000+ miles, which means millions of fewer foot-pounds of energy expended. But that weight savings means nothing if the stove requires twice as much fuel or fails when you’re exhausted and hungry in a downpour.
The Weight vs. Performance Trade-off
The ultralight philosophy celebrates minimalism, but experienced thru-hikers understand that “ultralight” doesn’t mean “ultra-minimal” at the expense of function. A stove weighing under 2 ounces might seem ideal until you factor in required accessories like pot stands, windscreens, or specialized fuel bottles. Conversely, a slightly heavier integrated system might actually save weight in your total cook kit by eliminating the need for separate components. The key is calculating your total system weight—stove, fuel container, required accessories, and typical fuel load—rather than just comparing stove weights in isolation. On the Pacific Crest Trail, where resupply points are frequent, you might prioritize the lightest possible stove. On the more remote Continental Divide Trail, durability and fuel efficiency might outweigh pure weight savings.
Fuel Efficiency Over Thousands of Miles
Fuel efficiency becomes a financial and logistical consideration on long trails. A stove that burns 20% more fuel per boil might not matter on a weekend trip, but over 150 boils, that inefficiency means purchasing and carrying 30% more fuel canisters or bottles. At trail town prices, where a small canister might cost $8-12, this adds up significantly. More importantly, inefficient stoves require more frequent fuel resupply, which can dictate your town stops and increase your overall pack weight. The most efficient stoves maximize heat transfer to your pot while minimizing heat loss to the environment, achieving a rolling boil with minimal fuel regardless of wind or temperature.
Understanding Ultralight Stove Categories
The backpacking stove market fragments into distinct categories, each with passionate advocates who’ve proven their system’s viability through thousands of trail miles. Understanding the fundamental differences helps narrow your choices before diving into specific features.
Canister Stoves: The Popular Choice
Canister stoves screw directly onto pre-filled isobutane/propane fuel canisters, offering convenience and precise flame control. Their popularity on long trails stems from reliability, fast boil times, and minimal maintenance. Most weigh between 2-4 ounces for the stove alone, with integrated systems adding several more ounces but including pot and windscreen. The threaded Lindal valve standard means most stoves work with most canisters, though performance varies with canister brand and altitude. However, the reliance on proprietary canisters creates waste and potential resupply challenges in smaller trail towns.
Alcohol Stoves: The DIY Favorite
Alcohol stoves, particularly simple open-jet designs, represent the lightest commercially available options and can be made at home from cat food cans. Weighing less than an ounce, they burn denatured alcohol available at hardware stores and some pharmacies. Their simplicity means virtually no moving parts to fail, making them incredibly reliable. The trade-off? No flame control, slower boil times (typically 6-10 minutes), and poor performance in wind without a robust windscreen. Alcohol stoves also require measuring fuel and can’t be easily extinguished and resealed, making them less convenient for short water-boiling sessions.
Solid Fuel Tablets: The Minimalist Option
Esbit tablets and similar solid fuel options represent the absolute minimum for hot water. The stoves themselves weigh mere grams—often just a folding titanium plate to hold the tablet and pot. Each tablet provides about 12-15 minutes of burn time, enough to boil 2 cups of water. The fuel is stable, packable, and available online. Downsides include a chemical smell, sticky residue on cookware, relatively high fuel cost per boil, and inability to control heat output. Many thru-hikers carry these as backup emergency stoves rather than primary cook systems.
Wood Burning Stoves: The Renewable Approach
Wood stoves eliminate carried fuel entirely, using twigs and natural debris. This appeals to hikers on long trails where resupply is challenging and environmental impact concerns are high. Modern designs incorporate battery-powered fans for efficient combustion. The obvious drawback is dependence on dry fuel availability—in wet conditions or above treeline, you simply can’t cook. They also leave soot on cookware and require constant tending. For most thru-hikers, the unpredictability outweighs the fuel savings, though some CDT hikers swear by them for remote stretches.
Liquid Fuel Stoves: The Workhorse (but heavier)
White gas stoves excel in cold weather and high altitude where canister stoves struggle. They burn hot, work with various fuel types internationally, and the fuel bottles are refillable, reducing waste. However, they’re significantly heavier (8-12 ounces), require priming and maintenance, and can be finicky. Some winter thru-hikers on the Appalachian Trail carry them, but for most three-season hikes, the weight penalty is too severe for ultralight purists.
Key Features That Define Ultralight Performance
Beyond basic categories, specific design features separate adequate stoves from exceptional ones for thru-hiking applications. These details matter when you’re using the same stove 150+ times in challenging conditions.
BTU Output and Boil Times
Manufacturers love to advertise boil times, but these numbers are typically measured in ideal lab conditions with no wind and room-temperature water. Real-world performance varies dramatically. A stove rated at 10,000 BTU will boil water faster than a 7,000 BTU model but may consume more fuel doing so. For thru-hikers, a 3-minute vs. 5-minute boil time is less important than whether the stove maintains that performance as the fuel canister empties or in gusty ridge winds. Focus on efficiency rather than raw power—a stove that sips fuel while delivering consistent performance is more valuable than a fuel-guzzling speed demon.
Stability and Pot Support Systems
Nothing wastes fuel and patience like a tippy stove. Ultralight stoves achieve low weight through minimal pot supports—often three small titanium arms. These work fine with narrow-based pots but become unstable with wider cookware or when cooking on uneven ground. Some designs use a separate base for canister stabilization, which adds weight but prevents catastrophic tip-overs. Consider your pot size and typical cooking surfaces. The Appalachian Trail’s flat shelters differ from the PCT’s sloped tent sites. A stable stove means less spilled dinner and less wasted fuel.
Ignition Systems: Piezo vs. Manual
Integrated piezo igniters offer push-button convenience but represent a common failure point. Moisture, impact, or simple wear can render them useless, forcing you to use a backup lighter anyway. Many experienced thru-hikers prefer stoves without igniters, eliminating a potential failure point and saving a few grams. If your stove has an igniter, always carry a mini Bic lighter as backup—preferably two, stored in different places. Manual ignition is reliable, simple, and teaches you to protect your fire-starting tools.
Wind Resistance and Heat Retention
Wind is the enemy of stove efficiency, stealing precious heat and doubling fuel consumption. Some ultralight stoves incorporate built-in wind resistance through clever design, while others require separate windscreens (which can be dangerous with canister stoves, causing overheating). Integrated systems with heat exchangers capture more heat and protect the flame, often justifying their weight penalty. When evaluating stoves, consider whether the design works with a simple aluminum foil windscreen or requires a proprietary solution that adds weight and bulk.
Fuel Types Deep Dive
Fuel strategy affects everything from resupply planning to daily pack weight. Each fuel type has a distinct personality on long trails.
Isobutane Canisters: Pros and Cons
The ubiquitous threaded canister contains a blend of isobutane and propane, offering good cold-weather performance and clean burning. Standard sizes include 100g, 230g, and 450g. For thru-hiking, 100g canisters are most common, providing roughly 10-12 boils. The sealed design prevents spills, and the canister itself serves as the fuel bottle. The major downside is the partial canister problem—you can’t take exactly the fuel you need, and partially full canisters accumulate. Some hikers use a canister recycler in town, but many simply carry extra weight. Disposal also creates environmental waste, though some brands offer recycling programs.
Denatured Alcohol: Availability on Trail
Denatured alcohol, also called methylated spirits, is available at hardware stores, some pharmacies, and occasionally at trail town outfitters. It’s sold by the quart or gallon, meaning you can carry exactly the amount you need in a lightweight plastic bottle. On the Appalachian Trail, resupply is straightforward. The Pacific Crest Trail poses more challenges, requiring advance planning or mailing fuel to yourself. The CDT often necessitates carrying larger quantities between towns. Alcohol’s lower energy density means you need more volume per boil—typically 0.5-0.75 ounces for 2 cups of water.
Esbit Tablets: Weight and Waste Considerations
Each 14-gram Esbit tablet provides about 12-15 minutes of burn. For a hiker boiling 2 cups twice daily, that’s roughly one tablet per day. A week’s supply weighs about 100 grams, comparable to a small alcohol fuel bottle. The tablets leave no liquid waste but generate a sticky residue on pot bottoms and produce a distinct fishy odor. Packaging waste is minimal—tablets come in waterproof blister packs. Cost per boil is higher than other fuels, but the simplicity appeals to hikers who prioritize reliability over economy.
Wood: When It Makes Sense
Wood fuel is free, unlimited (in theory), and creates no packaging waste. In practice, it only works consistently on trails with reliable dry wood below treeline. The Appalachian Trail’s humid climate and frequent rain make wood stoves frustrating. The PCT’s long dry stretches and fire bans often prohibit their use. The CDT’s remote sections and high-altitude terrain limit fuel availability. Wood stoves also require constant attention—feeding twigs every few minutes—which is tiring after a long day. Most thru-hikers who try wood stoves switch to other systems within the first few weeks.
White Gas: The Cold Weather Champion
White gas (naphtha) burns hot and clean, performing excellently in sub-freezing temperatures where canister stoves fail. The refillable bottles allow precise fuel quantity management. However, white gas is heavier than other fuels, requires priming (pumping and preheating), and the stoves need periodic maintenance. Spilled fuel can contaminate gear, and the systems are inherently more complex. For winter AT hikers or those starting early on the PCT, white gas might be justified, but for the typical April-September thru-hike season, it’s overkill.
Weight Considerations Beyond the Stove Itself
Obsessing over stove weight misses the bigger picture. Your complete cook system weight determines what you actually carry.
Stove Base Weight
The stove itself is just the beginning. A 1-ounce alcohol stove seems unbeatable until you add a separate pot stand, windscreen, and measuring cup. A 3-ounce canister stove includes integrated pot supports and valve. Compare complete systems, not just the stove unit. Some integrated canister systems combine stove, pot, and heat exchanger into one unit, often weighing 10-15 ounces total but eliminating separate components.
Fuel Container Weight
An empty 100g isobutane canister weighs about 3.5 ounces. An empty 230g canister weighs about 6.5 ounces. These are tare weights you carry regardless of fuel remaining. A 16-ounce plastic bottle for alcohol weighs under an ounce. A refillable white gas pump bottle weighs 4-6 ounces empty. For short resupply sections, small canisters make sense. For long stretches, larger canisters reduce the tare weight penalty.
Fuel Consumption Rates
Calculate your typical daily fuel use. If you boil 4 cups of water daily, a canister stove might use 8-10 grams of fuel, giving you 10-12 days from a 100g canister. An alcohol stove might use 1 ounce daily, meaning a 12-ounce bottle lasts 12 days. On the AT with frequent towns, this is manageable. On the PCT’s long waterless stretches where you might need to boil water for purification, consumption increases. Track your usage during shakedown hikes to develop accurate estimates.
Total Cook System Weight
Add everything: stove, pot, lid, windscreen, fuel container, full fuel load, lighter, and any accessories. A minimalist alcohol system might total 8 ounces including fuel for 3 days. An integrated canister system might be 20 ounces with a full canister. For a fair comparison, calculate weight per day of food preparation. Over a week, the alcohol system’s lighter fuel container might offset the canister stove’s faster boils and convenience.
Durability for 2,000+ Mile Journeys
Thru-hiking is a brutal gear test. Your stove will be packed and unpacked hundreds of times, dropped, exposed to moisture, and subjected to temperature swings.
Material Construction
Titanium offers the best strength-to-weight ratio but costs significantly more than aluminum. Stainless steel is durable but heavy. Brass valves in canister stoves resist corrosion better than aluminum. Look for stoves with minimal weld points and solid construction. Alcohol stoves made from thicker titanium or aluminum resist crushing better than ultrathin DIY versions. The valve mechanism on canister stoves is the most common failure point—quality machining matters more than brand reputation.
Maintenance in the Field
Canister stoves occasionally need cleaning of the fuel jet—carbon buildup or debris can clog the tiny orifice. Carry a small wire cleaning tool (some stoves include one). Liquid fuel stoves require more extensive maintenance: O-ring replacement, pump lubrication, and occasional rebuilding. Alcohol and solid fuel stoves are virtually maintenance-free, which is why they appeal to hikers who want simplicity. Before your hike, practice disassembling and cleaning your stove at home.
Common Failure Points
Piezo igniters fail first. Next, pot support arms can bend or break if stepped on. Canister stove valves can develop leaks if over-tightened or contaminated. O-rings dry out and crack. Plastic pump parts in liquid fuel stoves crack in cold. Alcohol stove walls can develop stress cracks after repeated heating cycles. Inspect your stove regularly in town, and carry a small repair kit with spare O-rings and a tube of silicone lubricant.
Environmental and Regulatory Factors
Your stove choice impacts both the environment and your legal compliance on public lands.
Fire Bans and Stove Restrictions
During drought conditions, land managers implement fire bans that often restrict stove types. Generally, canister stoves with shut-off valves are permitted during Stage 1 and Stage 2 fire restrictions. Alcohol stoves, which can’t be easily extinguished, are frequently banned. Wood stoves are almost always prohibited during bans. Solid fuel tablets exist in a gray area—some jurisdictions permit them, others don’t. Always check current restrictions before each trail section. The PCT sees extensive fire bans in California and Oregon. The AT has seasonal bans in many states. Violating these can result in hefty fines and endanger the trail community.
Leave No Trace Cooking Practices
Your stove affects your LNT footprint. Canister stoves produce empty canisters—plan to pack them out to a recycling center (some outfitters accept them). Alcohol stoves produce no waste if you use a refillable bottle. Wood stoves seem LNT-friendly but can over-harvest scarce wood in popular camping areas and leave fire scars. Always use a stove on a durable surface, not vegetation. Carry a small piece of aluminum foil as a ground protector. Never bury or burn trash, and pack out all food waste.
Budget Considerations for Thru-Hikers
Gear costs matter when you’re already spending thousands on a thru-hike. Stove economics involve both initial purchase and ongoing fuel costs.
Initial Investment vs. Long-Term Value
Alcohol stoves can be made for pennies or purchased for $15-30. Canister stoves range from $30-80 for simple screw-on models to $150+ for integrated systems. Liquid fuel stoves start around $80 and go up to $200+. A $150 stove that lasts 3,000 miles costs 5 cents per mile. A $20 stove that fails after 500 miles and needs replacement actually costs more. Consider durability and warranty support. Some manufacturers offer free repair or replacement for thru-hikers—a valuable insurance policy.
Fuel Cost Over a Thru-Hike
Calculate your total fuel budget. A typical AT thru-hiker might use 15-20 canisters at $8 each = $120-160. The same hiker using alcohol might buy 2-3 quarts at $15 each = $30-45. Solid fuel tablets cost about $0.50 per tablet—150 tablets = $75. Wood is free but costs time and effort. These numbers matter on a tight budget. Many hikers mail themselves fuel drops to expensive sections, especially on the PCT where town prices are inflated.
Real-World Thru-Hiker Scenarios
The “best” stove depends on how you hike. Your daily mileage, cooking style, and trail choice dictate optimal features.
Solo Hiker Cooking Styles
If you’re a “boil-only” hiker who rehydrates meals, any simple stove works. You need enough power to boil 2 cups of water, nothing more. If you actually cook—simmering rice, frying fish—you need flame control only canister or liquid fuel stoves provide. Consider your pot size too: a solo hiker with a 550ml pot has different needs than someone using a 1-liter pot for bigger meals. The narrow flame pattern of some stoves works poorly with wide pots, creating hot spots and wasted fuel.
Couple or Group Cooking Systems
Two hikers can share a stove, but this changes the math. A larger, more powerful stove that boils 4 cups efficiently might be lighter than two separate systems. Integrated canister systems with larger pots work well for couples. Alcohol stoves can be sized up, but efficiency drops. Group cooking (3+ people) usually requires a robust canister or liquid fuel system. Consider that sharing means sharing failure risk—if the group stove breaks, everyone eats cold food.
Cold Weather and High Altitude Performance
Canister stoves struggle below 20°F as the isobutane/propane blend stops vaporizing efficiently. Inverting the canister (using a remote canister stove) helps, but adds complexity. Alcohol stoves lose about 20% efficiency per 5,000 feet of elevation and perform poorly in cold. Liquid fuel stoves excel in these conditions. If you’re starting the AT in March or finishing the CDT in October, plan for cold-weather performance. High altitude (above 10,000 feet) also affects boil times and fuel consumption—plan for 30% more fuel in the Sierra Nevada or Colorado Rockies.
Making Your Final Decision
With all these factors swirling, how do you choose? Systematic evaluation beats impulse purchases or following trendy recommendations.
Creating Your Priorities Matrix
List your non-negotiables: weight limit, required boil time, fuel type based on your trail, budget. Then rank preferences: flame control, stability, wind resistance, ease of resupply. Score each stove category against these criteria. This objective approach prevents emotional decisions based on cool designs or forum hype. Be honest about your cooking skills and patience—an expert’s favorite stove might frustrate a novice.
Testing Before You Commit
Never take an untested stove on a thru-hike. Conduct at least three shakedown trips, including one in adverse weather. Measure actual fuel consumption: boil your typical meal, time it, and weigh fuel before and after. Test your complete system—stove, pot, windscreen, lighter. Can you operate it with cold, tired hands? Does it fit your cook pot when packed? Can you light it in wind? These real-world tests reveal issues that spec sheets hide. Many hikers end up swapping stoves in the first month because they skipped this step.
Frequently Asked Questions
What’s the absolute lightest stove option for a thru-hike?
A simple open-jet alcohol stove made from a cat food can weighs under 0.5 ounces, making it the lightest functional option. However, you must add a pot stand and windscreen, bringing the system to 1-2 ounces. For a complete cooking system including fuel for 3 days, this setup can be under 8 ounces total. The trade-off is slower boil times and no flame control. For pure weight savings, it’s unbeatable, but most hikers prefer a 2-3 ounce canister stove for convenience, ending up with a 12-ounce total system weight.
How much fuel should I carry between resupply points?
Calculate your daily consumption: typically 8-10 grams of canister fuel or 0.75 ounces of alcohol per day for boiling 4 cups. Multiply by days between towns, then add a 25% safety margin. For a typical 5-day stretch on the AT, a 100g canister is plenty. On the PCT’s 10-day Sierra stretches, you might need two canisters or a larger alcohol fuel bottle. Always check water sources—dry stretches requiring boiled water increase consumption. Many hikers mail fuel ahead to long sections rather than carrying excess weight.
Can I fly with my backpacking stove and fuel?
You cannot fly with any fuel—canisters, alcohol, or white gas. Ship fuel to your starting point or buy it after arrival. Stoves themselves are allowed in checked baggage if cleaned thoroughly. For canister stoves, remove any residual fuel smell. Alcohol stoves must be completely dry. Liquid fuel stoves need empty tanks and cleaned fuel lines. TSA agents have discretion, so arrive early. Some hikers prefer to buy a new stove at their destination to avoid any issues.
What do I do during fire bans?
During Stage 1 restrictions, canister stoves with shut-off valves are typically allowed. During Stage 2 bans, some jurisdictions prohibit all open flames, including stoves. Check current restrictions on forest service websites before each section. Carry extra no-cook food (tuna, tortillas, nut butter) as backup. Some hikers go stoveless through ban areas. Never assume—rangers do ticket violators. The PCTA and ATC maintain updated restriction information.
Are alcohol stoves really practical for long trails?
Absolutely. Thousands of AT and PCT hikers complete entire thru-hikes with alcohol stoves. Their simplicity, low cost, and light weight make them ideal for boiled-water meals. The key is mastering windscreen setup and fuel measurement. The main challenge is resupply—planning alcohol sources in trail towns. Some hikers mail alcohol to themselves. The learning curve is steeper than canister stoves, but once mastered, alcohol stoves are reliable and satisfying.
How do I prevent my stove from failing mid-hike?
First, choose a simple design with fewer failure points. Carry a backup lighter and know how to manually light your stove. For canister stoves, protect the valve from dirt and never over-tighten. Store your stove in a protective case (a small stuff sack works). In town, inspect O-rings and clean the jet with the provided tool. For alcohol stoves, check for cracks in the metal. Test your stove in town after any significant drop or impact. Most failures are preventable through care and inspection.
Is it worth carrying a stove at all, or should I go stoveless?
Going stoveless saves 8-20 ounces and simplifies resupply. Many hikers successfully go stoveless, eating cold-soaked meals, tortillas, and no-cook foods. However, stoves provide psychological comfort, hot drinks in cold weather, and food versatility. The weight penalty is minimal compared to morale benefits. Most hikers who start stoveless eventually add a simple stove. Consider your start date—cold morning coffee is hard to give up in March on the AT. Try stoveless on a shakedown hike before committing.
How do I calculate total fuel costs for a thru-hike?
Estimate total boils: 150 days × 2 boils per day = 300 boils. For canister stoves, that’s roughly 25-30 canisters at $8-12 each = $200-360. For alcohol, 300 boils × 0.5 ounces = 150 ounces (1.2 gallons). At $15 per quart, that’s about $75. Add 20% for inefficiency and cold weather. These are trail-town prices—mailing fuel from cheaper sources saves money. Solid fuel tablets cost about $0.50 each, so 150 tablets = $75. Budget more for the PCT’s expensive resupply points.
What’s better: integrated canister systems or standalone stoves?
Integrated systems (stove, pot, and heat exchanger combined) offer superior fuel efficiency and wind resistance, often boiling water 30% faster with 30% less fuel. They pack neatly and are very stable. However, they’re heavier, more expensive, and lock you into one pot size. Standalone stoves offer flexibility—you can use any pot, replace components individually, and they’re lighter. For solo hikers prioritizing simplicity, integrated systems excel. For hikers who like to customize or cook real meals, standalone stoves provide more control.
How do I cook for two people with an ultralight setup?
Share a larger pot (1.3-1.8 liters) and a more powerful stove. A remote canister stove with a wide burner head distributes heat better for larger volumes. Boil 4 cups of water, split it—one for coffee, one for rehydrating two meals. Some couples carry two small stoves for redundancy, but this is heavier. A single integrated system like those designed for two people often weighs less than two separate minimalist kits. Test your setup at home: can you boil enough water for two meals before the first one gets cold? Efficiency matters more when cooking larger volumes.
See Also
- The Complete Guide to the 10 Best Backpacking Stoves for Thru-Hikers
- 10 Ultralight Backpacking Stoves That Shave Pounds Off Your Pack in 2026
- Top 10 Best Backpacking Hammocks for Solo Thru-Hikers in 2026
- 10 Best Ultralight Backpacks for Thru-Hikers Cutting Weight in 2026
- Top 10 Best Backpacking Hammocks for Thru-Hikers Counting Ounces in 2026