Table of Contents
Choosing the right expedition backpack for winter camping isn’t just about strapping on the biggest bag you can find and hoping for the best. As we approach 2026, the convergence of advanced materials science, biomechanical engineering, and cold-weather-specific design has transformed these essential tools into highly specialized systems. Whether you’re planning a multi-week traverse through the Canadian Rockies or a technical ascent in the Alaska Range, your pack becomes your mobile basecamp—carrying everything from critical safety gear to your shelter from brutal sub-zero conditions.
The stakes couldn’t be higher. In winter environments, gear failure isn’t an inconvenience; it’s a potential survival situation. Your backpack must manage heavier loads (winter gear routinely adds 30-40% more weight), provide effortless access while wearing bulky gloves, and withstand abrasion from ice tools, skis, and frozen terrain. This comprehensive guide cuts through marketing hype to focus on the engineering principles, fit mechanics, and feature sets that separate exceptional expedition packs from merely adequate ones.
Top 10 Expedition Backpacks


Detailed Product Reviews
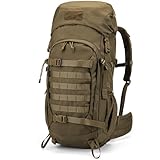
6. REEBOW GEAR Military Tactical Backpack Large Army 3 Day Assault Pack Molle Bag Backpacks

Overview: The REEBOW GEAR tactical backpack delivers military-inspired functionality for outdoor enthusiasts and everyday users. With a 40-liter capacity measuring 13"x20"x11", this pack balances substantial storage with manageable dimensions. Constructed from high-density, water-resistant fabric, it’s built to withstand demanding conditions while keeping gear protected.
What Makes It Stand Out: The comprehensive MOLLE webbing system sets this pack apart, allowing users to customize their loadout with additional pouches and accessories. The hydration bladder compatibility (though bladder not included) transforms it into a capable hiking companion. Double-stitched seams and heavy-duty zippers with utility pulls demonstrate attention to durability, while the ventilated mesh padding on the back panel and shoulder straps provides breathable comfort during extended wear.
Value for Money: Positioned as an affordable tactical option, this backpack offers impressive features typically found in higher-priced alternatives. For budget-conscious buyers seeking MOLLE functionality and military-grade aesthetics without premium brand pricing, it represents solid value. It’s particularly cost-effective for casual users who need versatility over specialized performance.
Strengths and Weaknesses: Strengths include robust construction, versatile MOLLE system, comfortable ventilated padding, and multi-purpose design suitable for range trips, hiking, or daily commuting. Weaknesses involve the lack of included hydration bladder, potentially less refined fit compared to premium brands, and limited organizational compartments within the main storage area.
Bottom Line: This REEBOW GEAR pack excels as an entry-level tactical backpack. While it won’t replace high-end military or hiking packs, it’s an excellent choice for users wanting versatile, rugged storage at an accessible price point.
7. ALPS OutdoorZ Commander + Pack Bag – 5,250 in³ Hunting Backpack with Freighter Frame, Rifle Holder, Spotting Scope Pocket, Ripstop Fabric, Adjustable Coyote Brown Pack

Overview: The ALPS OutdoorZ Commander is a serious hunting pack designed for backcountry versatility. Combining a 5,250 cubic inch pack bag with a robust freighter frame, this system addresses the unique demands of hunters who need to haul gear in and meat out. The coyote brown ripstop construction withstands harsh wilderness conditions.
What Makes It Stand Out: The dual-function design is revolutionary—a removable pack bag reveals a freighter frame with lashing straps and shelf for transporting heavy, awkward loads like quartered game. Purpose-built features include a rifle holder, spotting scope pocket, and internal horizontal divider that demonstrate hunting-specific engineering. The adjustable anodized aluminum frame accommodates torsos from 17-23 inches, ensuring proper weight distribution.
Value for Money: While priced at a premium, the Commander justifies its cost through specialized functionality that eliminates the need for separate packs. For dedicated hunters, the ability to transition from gear transport to meat hauling in one system offers exceptional value compared to buying multiple specialized packs.
Strengths and Weaknesses: Strengths include the versatile dual-system design, heavy-duty ripstop fabric, excellent organization, adjustable torso fit, and comfortable suspension for heavy loads. Weaknesses are its substantial weight even when empty, complex setup for casual users, and premium price point that may exceed weekend hunters’ budgets.
Bottom Line: For serious backcountry hunters requiring a pack that performs double duty, the Commander + Pack Bag is an outstanding investment. Its specialized features and durable construction make it worth every penny for the right user.
8. The North Face Terra 55 Backpack - Unisex Hiking Pack, Cinch-Top Opening with Zipper, Pole & Ice Axe Attachments, Forest Olive/New Taupe Green-NPF, Large/X-Large

Overview: The North Face Terra 55 is a purpose-built multi-day backpacking pack that balances capacity with user-friendly design. Available in Large/X-Large sizing, this 57-liter pack offers ample space for extended adventures while maintaining the brand’s reputation for quality and comfort. The forest olive colorway provides a classic outdoor aesthetic.
What Makes It Stand Out: The full-length two-way U-zipper grants exceptional access to the entire main compartment, eliminating the frustration of digging through top-loaded gear. The combination of a cinch-top opening with this zipper creates versatile packing options. Trail-ready features like dedicated pole and ice axe attachments, stretch bottle pockets, and a removable lid with internal pocket demonstrate thoughtful design for serious hikers.
Value for Money: Positioned in the mid-range price segment, the Terra 55 offers The North Face’s proven durability and design at a reasonable cost. While not the lightest option available, its feature set and build quality provide good value for recreational backpackers seeking reliable performance without ultralight premiums.
Strengths and Weaknesses: Strengths include excellent access via U-zip, comfortable padded suspension system, versatile attachment points, and reputable brand backing. Weaknesses include a relatively heavy 4-pound weight, limited capacity compared to some 65L competitors, and a basic hipbelt pocket design.
Bottom Line: The Terra 55 is a dependable workhorse for multi-day adventures. Its combination of comfort, access, and durability makes it an excellent choice for backpackers who prioritize practicality over ultralight minimalism.
9. Osprey Rook 65L Men’s Backpacking Backpack, Dark Charcoal/Silver Lining, Extended Fit

Overview: The Osprey Rook 65L Extended Fit addresses a critical gap in backpacking gear: inclusive sizing without compromising performance. This pack adapts Osprey’s proven design to accommodate larger frames, fitting hips up to 70 inches while maintaining the brand’s signature comfort and durability in a dark charcoal finish.
What Makes It Stand Out: The Extended Fit system isn’t just resized—it’s reengineered with longer hipbelt and shoulder straps, repositioned pockets, and an extended sternum strap. The AirSpeed suspension with tensioned mesh backpanel delivers exceptional ventilation, crucial for heavy loads on long trails. An included raincover adds value and protection, while Daylite compatibility offers expansion options.
Value for Money: Osprey packs command a premium, but the Extended Fit’s specialized sizing justifies the cost for users underserved by standard packs. The included raincover and Osprey’s legendary warranty enhance value, making it a smart long-term investment for extended backpacking trips.
Strengths and Weaknesses: Strengths include outstanding ventilation, inclusive sizing, raincover inclusion, durable construction, and compatibility with Daylite attachment. Weaknesses involve the 65L capacity being excessive for weekend trips, a weight penalty compared to ultralight alternatives, and the extended features adding complexity for average-sized users.
Bottom Line: For larger-framed adventurers seeking a capable extended-trip pack, the Rook 65L EF is a game-changer. It combines Osprey’s trusted performance with thoughtful sizing adjustments, making it the go-to choice for inclusive backpacking.
10. NWT XPEDITION Military Tactical Backpack,Sturdy Work & Molle Laptops Rucksack, Heavy Duty Pack for Hiking Camping Travel Fishing Gym,Black

Overview: The NWT XPEDITION tactical backpack brings military-grade construction to everyday and outdoor use. With a 40-liter capacity and dimensions of 12.6" x 9.6" x 19.6", this pack offers substantial storage in a manageable size. The black 900D oxford fabric provides a professional appearance suitable for work and adventure.
What Makes It Stand Out: The 3mm precision stitching with double-needle techniques and reinforced critical load areas demonstrates exceptional build quality rarely seen at this price point. Cross-stitching and knotting at stress points create superior tear resistance. The foam-padded shoulder phone pocket offers modern convenience for quick device access, while the multi-pocket compartment design keeps gear organized.
Value for Money: This pack delivers premium construction features with a 2-year guarantee at a competitive mid-range price. The warranty coverage against quality defects (excluding misuse) provides peace of mind that rivals more expensive brands. For buyers prioritizing durability over brand recognition, it represents excellent value.
Strengths and Weaknesses: Strengths include 900D tear-resistant fabric, meticulous stitching, water-resistant protection, versatile organization, and strong warranty support. Weaknesses involve lesser-known brand reputation, 3.2-pound weight being slightly heavy for a 40L pack, and tactical aesthetics that may not suit all environments.
Bottom Line: The NWT XPEDITION pack is a hidden gem for durability-focused users. Its construction quality and warranty make it a reliable choice for anyone needing a rugged, versatile backpack for outdoor adventures or daily heavy-duty use.
Understanding the Demands of Winter Expedition Backpacking
What Makes Winter Camping Different?
Winter expedition backpacking exists in a completely different paradigm than three-season adventuring. You’re not just carrying warmer sleeping bags and extra layers—you’re transporting a full arsenal of technical equipment that fundamentally changes how a pack must perform. Snowshoes, crampons, ice axes, bulky mountaineering boots, and possibly skis or a splitboard create unique load distribution challenges. The pack must accommodate sharp points without compromising fabric integrity and provide stable carry dynamics when loaded with asymmetric gear.
Moreover, accessibility becomes paramount when removing your pack means exposing yourself to wind chill and losing precious body heat. Every zipper pull, buckle, and pocket placement must be operable with gloved hands, often in whiteout conditions. The pack’s center of gravity shifts dramatically with rope bags, avalanche gear, and extra fuel canisters, requiring a suspension system that maintains stability while post-holing through deep snow or navigating technical terrain.
The Anatomy of an Expedition Backpack
Modern expedition packs are built around a chassis system—the integrated combination of frame, suspension, and harness that transfers weight to your hips. In 2026 models, we’re seeing a departure from traditional designs toward adaptive systems that respond to both load weight and body movement. The chassis must remain rigid enough to support 60-80 pound loads without barreling (when the pack sags away from your back), yet flexible enough to move with your body during dynamic movements like ice climbing or skiing.
Key structural elements include the frame sheet (often carbon fiber or composite in premium models), peripheral aluminum stays that maintain vertical structure, and a hip belt that functions more like a climbing harness than a simple webbing strap. The pack bag itself—the fabric container—must work synergistically with this chassis, not against it. Every strap, daisy chain, and compression point affects the overall system’s performance.
Capacity Considerations for Extended Winter Trips
Volume Requirements: How Much is Enough?
The “how big” question torments many winter adventurers. The answer lies not in a single number but in your trip duration, group size, and technical requirements. A solo week-long expedition might demand 75-85 liters, while multi-week basecamp-style trips or group leadership roles often require 95-110 liters. The critical factor is that winter gear doesn’t compress like summer equipment. Your -20°F sleeping bag alone might fill a 20-liter stuff sack, and insulated boots refuse to pack small.
Consider your gear’s “lofted volume” rather than its weight. Create a mock packlist and physically measure your gear’s bulk using a storage bin of known volume. This empirical approach prevents the common mistake of buying a pack that’s technically large enough but practically too small once you factor in the awkward shapes of winter equipment.
The 70-100+ Liter Sweet Spot
Most winter expedition packs cluster in the 70-100 liter range for good reason. Below 70 liters, you’re forced to attach everything externally, creating a snag hazard and throwing off weight distribution. Above 100 liters, the pack becomes unwieldy, encouraging overpacking and making it difficult to maintain balance in technical terrain. The sweet spot allows internal organization of critical gear while providing strategic external attachment points for items you need quick access to or that are too awkward to fit inside.
2026 design trends show modular volume systems becoming standard—packs with expandable collars, removable lids that convert to summit packs, and compression systems that shrink the pack for lighter days. This adaptability means your 85-liter pack can function as a 65-liter daypack for summit pushes, then expand back to full capacity for the approach.
The Science of Fit: Your Body’s Biomechanics
Torso Length Measurement: The Foundation
Fit remains the non-negotiable factor that outweighs every feature and specification. An improperly fitted expedition pack will cause pain, limit mobility, and potentially lead to injury under heavy loads. Measure your torso length correctly: have a partner measure from the C7 vertebra (the prominent bone at the base of your neck when you tilt your head forward) to the iliac crest (the top of your hip bones). This measurement, not your overall height, determines pack size.
Most 2026 packs offer micro-adjustable torso lengths through sliding harness systems, allowing 3-4 inches of customization. This is crucial because your effective torso length changes slightly when wearing bulky base layers and insulation. The hip belt must sit directly on your iliac crest, not above or below it, to properly transfer 70-80% of the pack’s weight to your lower body.
Hip Belt Sizing and Load Distribution
The hip belt deserves obsessive attention. In winter, you’re likely wearing it over shell pants and possibly a belay jacket, so the effective circumference changes dramatically. Look for belts with at least 6-8 inches of adjustment range and padding that extends 5-6 inches on either side of the center buckle. The padding should be firm, not plush—soft foam compresses under load and creates pressure points.
Premium 2026 models feature heat-moldable hip belts that conform to your specific anatomy after a brief heating process in specialized ovens at retail stores. This customization eliminates the hot spots and slippage that plague standard belts when sweating or moving through varied terrain. The belt’s geometry should wrap slightly upward, cupping the iliac crest rather than sitting flat against it.
Women’s Specific and Adjustable Fit Systems
Women’s-specific designs have evolved far beyond simple color changes and shorter torso lengths. Modern female-fit packs feature differently angled shoulder straps that account for narrower shoulders and a higher sternum, hip belts with increased flare to accommodate wider pelvic structures, and load lifters positioned to work with a lower center of gravity. However, the best approach is fit-first: many women find that unisex or men’s packs with adjustable harnesses provide a better personal fit than poorly-designed women’s models.
Gender-neutral adjustable harness systems are becoming the gold standard in 2026, allowing infinite customization of shoulder strap width, angle, and height. This is particularly valuable for winter athletes whose body composition changes throughout a season or those who share gear within a household.
Frame Architecture: Internal vs. External in 2026
Modern Internal Frame Innovations
Internal frame packs dominate the expedition market for their stability and sleek profile, but 2026 innovations have solved many traditional weaknesses. Crossed aluminum stays now feature pre-curved geometries that match spinal contours, while removable frame sheets allow you to adjust stiffness based on load. Some manufacturers are experimenting with inflatable lumbar supports that let you fine-tune back panel contouring in the field—add air for heavy loads, release it for lighter days.
The critical advancement is in lateral stiffness. Older internal frames would collapse when loaded asymmetrically (like carrying a rope bag on one side). Modern designs use perimeter tubing or composite reinforcements that maintain pack shape regardless of load distribution, preventing the dreaded “barreling” effect that pulls weight away from your center of gravity.
The External Frame Resurgence for Winter
Believe it or not, external frame packs are experiencing a niche renaissance for certain winter applications. Their advantage lies in creating space between your back and the pack, allowing snow to fall through rather than accumulating against your back. They also excel at carrying awkward, heavy loads like fuel canisters and water jugs that can be strapped low, maintaining a high center of gravity for balance.
New 2026 external frames use carbon fiber hoops and minimalist designs that shave pounds off traditional aluminum ladder frames. They’re not for everyone—technical climbing and dense forests remain problematic—but for glacier travel and open alpine terrain, they offer compelling advantages. The key is selecting models with modern suspension that doesn’t feel like a 1970s relic.
Suspension Systems and Load Management
Hip Belt Technology and Padding
The hip belt’s suspension mechanics determine how efficiently weight transfers from pack to body. Look for “pivoting” or “rotating” hip belts that move with your hips as you walk, preventing the pack from swinging like a pendulum. The padding should use multi-density foam: firmer foam against your body for support, softer foam against the pack to absorb shock.
In 2026, we’re seeing the integration of “load cells”—small pressure sensors in the hip belt that communicate with a smartphone app to show real-time weight distribution. While this might seem gimmicky, it’s invaluable for learning how to pack properly and identifying when your load has shifted dangerously during travel.
Shoulder Strap Design for Heavy Loads
Shoulder straps should carry only 20-30% of the total weight, but they must do so without pinching nerves or restricting arm movement. Look for S-curved straps that wrap around your neck and under your arms, with adjustability at both the top (load lifters) and bottom (sternum strap). The sternum strap should ride 2-3 inches below your collarbones and include an elastic section to allow deep breathing without constriction.
Winter-specific straps feature reinforced daisy chains for clipping gloves or goggles, and some include integrated pockets for easy-access items like lip balm or a headlamp. The strap fabric should be low-profile to prevent ice buildup yet durable enough to withstand crampon points when you’re shouldering the pack in a hurry.
Back Panel Ventilation vs. Insulation Balance
Here’s a paradox: you want ventilation to prevent sweat buildup, but in winter, a ventilated back panel can become an ice sheet against your spine. The solution is “active insulation” back panels that use perforated foam covered with a water-resistant, breathable membrane. This allows moisture vapor to escape while preventing snow and ice from penetrating.
Some 2026 models feature removable back panels that can be flipped based on conditions: mesh side out for spring corn snow approaches, insulated side out for sub-zero belays. The panel should be easy to remove for drying in your tent at night—a critical feature when condensation freezes inside pack cavities.
Material Technology and Weather Resistance
Waterproof vs. Water-Resistant Fabrics
The waterproof backpack myth needs busting. Truly waterproof packs (with welded seams and roll-top closures) exist, but they’re heavy, expensive, and often less durable than their water-resistant counterparts. For most winter expeditions, a highly water-resistant pack with a rain cover is more practical. Water-resistant fabrics use tightly woven nylon or polyester with DWR (durable water repellent) coatings that cause snow and water to bead up and roll off.
The compromise comes in high-abrasion areas like the pack bottom and sides where skis and tools rub. Look for packs that use waterproof fabric in these zones while using lighter, more breathable materials in less critical areas. This hybrid approach saves weight while protecting your most vulnerable points.
Denier Ratings and Abrasion Resistance
Denier measures individual yarn thickness—higher numbers mean more durability but also more weight. For expedition packs, you’ll see a mix: 1000D nylon on the pack bottom and high-wear zones, 500D on the main body, and 210D on secondary pockets. The key is strategic placement, not uniform heavy fabric throughout.
2026 innovations include “ripstop grid” weaves that stop tears from propagating and fabric treatments that increase abrasion resistance without adding weight. Some manufacturers are experimenting with UHMWPE (ultra-high-molecular-weight polyethylene) blended fabrics—the same material in cut-resistant gloves—that offer exceptional durability at half the weight of traditional nylon.
Coating Technologies: DWR and Beyond
Traditional DWR coatings degrade with dirt and abrasion, requiring periodic reapplication. New “permanent DWR” technologies bond at the molecular level, lasting the pack’s lifetime. More importantly, 2026 packs are moving toward C0 (PFC-free) formulations that are environmentally benign yet perform comparably to older, polluting C8 formulations.
Look for packs with “face fabric” treatments that remain pliable in extreme cold. Some coatings become brittle and crack at -20°F, compromising water resistance when you need it most. Manufacturers now test fabrics in environmental chambers that simulate arctic conditions, ensuring performance at temperature extremes.
Access and Organization in Extreme Conditions
Top-Loading vs. Panel Access
Traditional top-loading packs excel at maximizing volume and minimizing zipper failure points—critical when a broken zipper could end your trip. However, they force you to unpack everything to reach items at the bottom. Panel-loading packs (with full-length side zippers) solve this but introduce more potential failure points and weight.
The 2026 solution is the “hybrid loader”: primarily top-loading with a strategic side panel that accesses only the sleeping bag compartment. This gives you emergency access to overnight gear without unpacking your entire kit. Some designs include a center zip that splits the pack into two halves, essentially creating a clamshell opening while maintaining structural integrity.
Brain Lid vs. Roll-Top Closures
Floating brain lids (removable top pockets) remain popular for their versatility and additional storage, but they create a snag hazard in tight chimneys and add weight. Roll-top closures save weight and provide excellent weather sealing but limit quick access to small items. The emerging compromise is the “speed lid”—a minimal, semi-rigid top that clips on with glove-friendly buckles and includes a small, secure pocket for essentials.
For winter, ensure any lid has interior organization for sunscreen, headlamp, and map, plus external straps for securing a rope or crampons temporarily. The lid-to-pack attachment should be metal, not plastic, as plastic buckles can shatter when cold-soaked.
External Pockets and Quick-Access Features
Side pockets must be large enough for Nalgene bottles or thermoses, with compression straps that secure them without blocking access. Stretch woven pockets that expand are ideal, but ensure the fabric remains pliable at low temperatures—some become brittle and tear easily when frozen.
Hip belt pockets should be generously sized for a satellite communicator, snacks, and a small camera. Look for water-resistant zippers or storm flaps, as these pockets are most exposed to snow and ice. Some 2026 models integrate “drop pockets” on the shoulder straps—simple elastic pouches that hold gloves or a buff while you adjust layers.
Attachment Systems for Winter Gear
Ski and Snowboard Carry Systems
A proper ski carry system must work with both A-frame and diagonal configurations while keeping ski edges away from the pack fabric. The A-frame method (skis strapped to pack sides) offers the best balance but requires reinforced side panels and dedicated lower ski loops that won’t slip. Diagonal carry (one ski across the back) is faster but can interfere with helmet clearance.
Look for packs with “ski-specific” compression straps that feature metal hardware and wide webbing to distribute pressure. The straps should be long enough for fat skis (up to 120mm underfoot) and adjustable enough to secure skis with or without skins attached. Some 2026 packs include quick-release ski carriers that let you deploy skis without removing the pack—game-changing for ski mountaineering transitions.
Ice Axe and Crampon Attachment Points
Ice axe loops should be reinforced with hypalon or similar cut-resistant material, positioned low enough that the axe head doesn’t hit your helmet. The axe shaft should be secured with a variable-position strap, not a fixed loop, accommodating different shaft lengths and head shapes. For technical tools with offset handles, look for packs with dual attachment points that keep picks covered and protected.
Crampon pouches are non-negotiable for winter expeditions. A dedicated, puncture-proof pocket protects your pack contents from sharp points and keeps snow and ice from melting inside your main compartment. The pouch should be accessible without opening the pack’s main body and include drainage grommets at the bottom. Some designs integrate the crampon pouch into the brain lid, keeping sharp points far from your back.
Snowshoe and External Gear Loops
Snowshoes present a unique challenge: they’re bulky, awkward, and often covered in ice. The best systems use a combination of lower compression straps and upper quick-release buckles that secure snowshoes flat against the pack back. Daisy chains (rows of webbing loops) along the pack sides provide infinite lashing points for shovels, wands, or extra gear.
Look for gear loops positioned to avoid interference with your arms’ natural swing. Loops placed too far forward catch on ice tools; too far back and they’re unreachable. The ideal configuration places primary loops at 45-degree angles from your shoulder blades, with secondary loops lower for larger items.
Weight vs. Durability: The Eternal Compromise
Ultralight Trends in Expedition Packs
The ultralight movement has finally penetrated expedition-level gear, but with caveats. A 3-pound 80-liter pack sounds appealing until a crampon point punches through the floor or a shoulder strap delaminates at -10°F. The key is “intelligent ultralight”—saving weight through design efficiency rather than material compromise.
2026 ultralight expedition packs achieve weight savings through minimalist frames (removing stays for lighter loads), integrated compression (eliminating redundant straps), and pattern efficiency (less fabric waste in construction). They maintain durability in high-stress zones while using lighter materials in low-impact areas. Expect to see more packs in the 4-5 pound range that previously weighed 6-7 pounds, without sacrificing critical strength.
The Durability Factor for Multi-Week Trips
For trips exceeding two weeks or involving technical climbing, durability trumps weight savings. A pack failure 10 days from the trailhead is a serious emergency. Look for bar-tacked stitching (dense zigzag patterns) at all stress points, double-layered fabric on the bottom, and reinforced haul loops that can support the pack’s full weight for short pitches.
Consider the “cost per use” equation. A $500 pack that lasts 50 expeditions costs $10 per trip; a $300 pack that fails after 10 trips costs $30 per trip plus the risk of failure. In winter, durability isn’t a luxury—it’s insurance.
Cold Weather Specific Features
Hydration System Compatibility in Freezing Temps
Hydration reservoirs are problematic in winter—tubes freeze, bite valves ice up, and cleaning becomes a nightmare. If you insist on a reservoir, look for packs with insulated tube sleeves, neoprene-covered bite valves, and routing that keeps the tube close to your body heat. Better yet, choose a pack with side bottle pockets sized for insulated bottles.
The most innovative 2026 solution is the “bottle parka”—an insulated sleeve integrated into the pack side that holds a 1-liter bottle upside-down (so ice forms at the bottom, leaving liquid at the spout). Combined with a lightweight insulated bottle, this system is more reliable than any reservoir in sub-zero conditions.
Frame Sheet Stiffness in Sub-Zero Conditions
Plastic frame sheets become brittle and can crack in extreme cold. Premium packs use composite materials or aluminum frames that maintain flexibility across temperature ranges. Some manufacturers now publish “cold crack ratings” for their frames, typically tested down to -40°F. If you’re planning arctic or high-altitude expeditions, verify this specification.
The frame sheet should be removable for both weight savings and emergency use—an aluminum stay can become a splint or snow anchor in a pinch. Check that removal and reinstallation don’t require specialized tools or excessive force that could damage cold-stiffened fabric.
Zipper and Hardware Performance
Zippers are the weakest link in any pack. In winter, ice crystals can jam zipper teeth, and pulling forces increase as fabric stiffens. Look for oversized, metal-toothed zippers (size #8 or #10) with long, glove-friendly pulls. Coil zippers are lighter but more prone to failure; toothed zippers are bulkier but repairable in the field with a simple zipper repair kit.
All plastic hardware should be rated for low-temperature use. Cheap side-release buckles can shatter when dropped on frozen ground or stressed at -20°F. Look for hardware from reputable manufacturers that publish cold-temperature specifications. Metal hardware is heavier but bombproof; some 2026 packs use titanium or aluminum buckles in critical locations for this reason.
Safety and Emergency Preparedness Integration
Avalanche Gear Compartments
Dedicated avalanche gear compartments aren’t just convenient—they’re a safety essential. This pocket should be accessible in seconds without opening the main pack body, large enough for shovel blade and handle, probe, and ideally a small repair kit. The compartment should be brightly colored inside (orange or red) to make gear visible in low-light rescue scenarios.
Look for drainage holes at the bottom and construction that prevents snow from entering the main pack when you open the avy pocket. Some designs integrate a small loop inside to attach a transceiver—keeping it separate from other metal objects that could interfere with signal search mode.
SOS and Communication Device Pockets
Satellite communicators and PLBs need to be accessible but protected. A dedicated shoulder strap pocket with RF-transparent fabric (so you don’t have to remove the device to send messages) is ideal. The pocket should have a clear plastic window for checking status lights and a secure closure that won’t accidentally open when brushing against rocks or ice.
Consider packs with integrated wire channels for antenna routing if you use a device with an external antenna. This prevents snagging and keeps the antenna vertical for optimal satellite connectivity. Some 2026 models include small solar panels on the brain lid for trickle-charging devices, though these add minimal weight and are more gimmick than necessity for most trips.
Reflective Elements and Visibility
Winter conditions mean short days and low visibility. Reflective strips on the pack brain, sides, and shoulder straps make you visible to partners during pre-dawn starts or whiteout navigation. These should be subtle enough not to compromise stealth camping but prominent enough for safety. Some packs integrate a small LED light loop on the back for attaching a red blinker during road approaches or helicopter evacuations.
Color choice matters more than you think. Bright colors (orange, yellow, red) are easier to spot in an avalanche debris search and stand out against snow for photography. Dark colors absorb solar radiation, slightly improving interior warmth on sunny days but making the pack invisible in shade. The 2026 trend is two-tone designs: bright top for visibility, dark bottom to hide grime.
Budget Planning for Premium Gear
The Investment Perspective
Expedition backpacks represent one of your highest gear investments, but amortize the cost over years of use. A quality pack lasts a decade with proper care. When budgeting, factor in that your pack choice affects every other gear decision—its capacity determines what you can bring, its durability affects replacement frequency, and its comfort impacts your overall expedition success.
Consider the “critical three” rule: spend money where failure is catastrophic. Your pack, boots, and shelter protect your life; skimping here is false economy. A $600 pack that prevents a back injury or gear failure is cheaper than a helicopter evacuation or premature trip termination.
When to Save vs. When to Splurge
Save weight on features you won’t use. If you never ski, don’t pay for a premium ski carry system. If you always use a rain cover, skip the waterproof fabric upcharge. Splurge on the chassis system—frame, hip belt, and shoulder straps—as these directly impact comfort and can’t be easily upgraded. A pack with a replaceable harness system offers the best long-term value, allowing you to refresh worn components without buying a whole new bag.
Look for brands offering “expedition warranties” that cover failures in normal use, not just manufacturing defects. These warranties signal confidence in materials and often include discounted repair services, extending pack life significantly. Some manufacturers now offer trade-in programs, providing credit toward new purchases when your old pack is truly worn out.
Brand Philosophy and Innovation Trajectory
Established Legacy Brands
Legacy brands bring decades of field testing and proven designs but can be slow to adopt new materials. Their strength lies in refined suspension systems and extensive sizing options developed through millions of user-miles. They typically offer better long-term support and more extensive repair parts inventories—critical for expedition packs that see hard use.
When evaluating legacy brands, look for their “heritage lines” versus their “fast and light” collections. The heritage lines often use more durable materials and classic designs that have stood the test of time, while lighter collections may sacrifice longevity for weight savings. Read user reviews from winter mountaineers specifically, not just general backpackers, as their use cases align more closely with expedition needs.
Emerging Tech-Focused Manufacturers
Newer companies often pioneer material innovations and smart features but may lack the deep biomechanical research of established brands. They excel at solving specific problems—like integrated avy gear systems or novel ski carries—but sometimes miss the forest for the trees in overall load carriage comfort. Their packs often appeal to younger users prioritizing weight and features over proven durability.
The sweet spot is often a collaboration: established brands licensing technology from innovators. This brings cutting-edge materials into proven chassis designs. When considering a tech-focused brand, investigate their testing protocols. Do they have a professional athlete team providing feedback? Do they publish failure rates or warranty claim data? Transparency indicates confidence and quality control.
Hands-On Evaluation Before Committing
In-Store Fit Testing Protocols
Never buy an expedition pack without trying it loaded. Most specialty retailers have sandbags for this purpose. Load the pack with 40-50 pounds (representing a moderate winter load) and walk around for at least 15 minutes. Climb stairs, bend over to tie your shoes, and simulate reaching for gear. The hip belt should stay put without overtightening, and the shoulder straps shouldn’t dig into your neck or slip off your shoulders.
Wear the clothes you’ll actually wear in winter—bring your shell jacket and insulation to the store. The pack must fit over these layers without compressing insulation and reducing its warmth. Test all buckles and zippers with gloves on. If the store doesn’t have winter gloves, bring your own. A buckle you can’t operate with mittens is a non-starter.
Load Testing with Real Weight
If possible, borrow the pack for an overnight trip or rent it for a weekend. Nothing reveals design flaws like actual use. Pay attention to how the pack carries when not fully loaded—many expedition packs feel sloppy and unbalanced until filled to capacity. The best designs maintain stability across a wide range of volumes through aggressive compression systems.
Test the pack’s stability by walking on uneven ground or simulating a sidehill traverse. The load should move with you, not against you. A pack that feels tippy or wants to pull you backward will be exhausting after 8 hours on a glacier. Check how easily you can access water, snacks, and navigation tools without removing the pack—every stop in winter costs time and body heat.
Maintenance and Longevity Strategies
Post-Trip Cleaning for Winter Conditions
Winter trips leave packs caked in road salt, sweat, and melted snow chemicals. Clean your pack after every major trip: empty all pockets, shake out debris, and hand-wash in a bathtub with mild soap. Never machine wash—agitators destroy frame sheets and delaminate waterproof coatings. Pay special attention to zippers: use a toothbrush to remove grit, then apply a zipper lubricant designed for cold weather.
Dry your pack completely before storage, ideally in a warm room with good air circulation. Pack fabric can hold surprising amounts of moisture in its weave, leading to mildew and coating degradation. Remove the frame sheet and harness if possible, drying them separately. Never use direct heat like a hairdryer or radiator, which can melt laminates and warp plastic components.
Storage Best Practices
Store your pack unclipped and uncompressed. Long-term compression damages foam padding and stresses fabric coatings. Hang it in a closet or store it loosely stuffed with old towels to maintain shape. Keep it away from UV light, which degrades nylon, and extreme temperatures, which can make plastics brittle.
Before seasonal storage, apply a fresh DWR treatment if water no longer beads on the fabric. This preventive maintenance takes 10 minutes but extends the pack’s weather resistance significantly. Check all buckles and hardware for cracks, replacing any questionable pieces through the manufacturer’s parts program—a $2 buckle replacement beats a field failure.
Looking Ahead: 2026 Innovations and Trends
Smart Integration and IoT Features
The most controversial trend in 2026 is smart pack integration. Some models now include Bluetooth-enabled load sensors, GPS trackers embedded in the frame, and even heated hip belts powered by lightweight batteries. While these features sound appealing, they add complexity and potential failure points. A GPS tracker might help locate a lost pack, but it’s useless if the battery dies in the cold.
More practical is the integration of RFID tags in critical gear pockets, allowing you to inventory your pack with a smartphone app before leaving basecamp. This prevents the classic “did I pack my headlamp?” uncertainty without unpacking everything. The best smart features are those that enhance safety without creating dependency—like avalanche airbag integration that uses the pack’s frame as a trigger mechanism.
Sustainable Materials and Manufacturing
Sustainability has moved from marketing buzzword to engineering requirement. Many 2026 packs use recycled face fabrics, bio-based laminates, and PFC-free water repellents. Some manufacturers now publish “cradle-to-grave” carbon footprints for each pack, allowing environmentally conscious consumers to make informed choices.
The most significant advancement is in repairability. Modular designs let you replace individual components—hip belt, shoulder straps, frame sheet—without discarding the entire pack. Some brands are experimenting with “take-back” programs where worn packs are disassembled, with usable parts refurbished into new packs. This circular approach reduces waste and often results in lower-cost replacement parts for consumers.
Frequently Asked Questions
What size backpack do I really need for a 10-day winter expedition?
For a 10-day solo winter trip, an 80-90 liter pack typically suffices, assuming you have modern, compressible gear. However, if you’re carrying mountaineering equipment, a pack closer to 95 liters provides necessary wiggle room. The key is measuring your gear’s actual bulk rather than relying on manufacturer volume claims, which vary significantly. Always size up if you’re between sizes—it’s easier to compress a too-large pack than to strap overflow gear precariously to the outside.
How much should a winter expedition backpack weigh when empty?
A robust winter expedition pack should weigh between 4.5 and 6.5 pounds empty. Anything lighter typically sacrifices durability or load-bearing comfort; heavier often indicates outdated designs or unnecessary features. Premium ultralight models can dip to 3.5 pounds but require careful packing and are best for experienced users who prioritize weight over bombproof construction. Remember, a pound on your pack is a pound off your gear budget.
Can I use my regular 65-liter backpacking pack for winter camping?
You can, but you’ll compromise safety and comfort. A 65-liter pack forces you to attach critical gear externally, creating snag hazards and poor weight distribution. The suspension system likely isn’t rated for the 50-70 pound loads common in winter, and the hip belt may lack the padding and support needed for extended wear with heavy layers. If budget limits you to one pack, choose an expandable 70-75 liter model with a robust frame that can handle occasional winter overloads.
What’s the difference between waterproof and water-resistant, and which do I need?
Waterproof means fully submersible with welded seams and roll-top closures—overkill for most winter camping where snow, not rain, is the primary concern. Water-resistant uses DWR-coated fabrics and storm flaps to shed snow and light moisture. For winter, water-resistant with a pack cover for wet snow conditions is ideal. The pack’s interior should stay dry from snowmelt and condensation, but you should still pack critical items in waterproof stuff sacks as backup.
How do I prevent my hydration system from freezing during winter use?
The most reliable method is switching to insulated bottles carried upside-down in insulated side pockets. If you must use a reservoir, run the tube inside your jacket, insulate it with neoprene, and blow water back into the bladder after each sip. Choose packs with insulated tube sleeves that route along the shoulder strap’s interior, not exterior. Always carry a stove and fuel to melt snow as backup—no hydration system is 100% reliable in sub-zero temperatures.
Are women’s-specific winter expedition packs worth the investment?
Only if they fit you better. Modern adjustable harness systems mean many women achieve better fit in “unisex” packs than in poorly-designed women’s models. The key is trying both. A truly women’s-specific pack accounts for narrower shoulders, a shorter torso-to-hip ratio, and a different hip angle. However, if a unisex pack with adjustable torso and hip belt fits perfectly, there’s no functional reason to choose a women’s model. Fit transcends gender labels.
How much should I budget for a quality winter expedition backpack?
Expect to spend $400-$600 for a pack that will last 5-10 years of hard use. Budget options around $250-$300 can work for occasional use but often use cheaper hardware and less sophisticated suspension. Premium models at $700+ offer marginal weight savings and exotic materials that most users don’t need. The sweet spot is $450-$550, where you get professional-grade suspension and durability without paying for ultralight materials or gimmicky features.
How long should a winter expedition backpack last?
With proper care, a quality pack should last 300-500 heavy-use days—roughly 7-10 years of annual expeditions. The hip belt and shoulder straps typically wear first, which is why replaceable harness systems are valuable. Frame sheets can delaminate after 5-7 years of heavy loads, and zippers fail based on use frequency. Regular cleaning, proper storage, and prompt repairs significantly extend lifespan. Many expedition guides use the same pack for a decade, replacing only wear components.
Can I carry skis and a snowboard on the same pack?
Most packs designed for ski mountaineering can carry a splitboard using the same A-frame or diagonal systems, but dedicated snowboard carry (vertical, board strapped flat to back) requires specific hardware. If you regularly switch between skis and boards, look for packs with versatile strap systems and removable hardware. The bigger challenge is boot compatibility—ski boots and snowboard boots have different volumes and attachment points. Prioritize the carry system for your primary sport.
What features are worth the extra weight in a winter expedition pack?
Dedicated avalanche gear compartments, reinforced crampon pouches, and robust hip belt padding are worth their weight in gold. Metal hardware in critical buckles adds ounces but prevents catastrophic failures. A floating brain lid that converts to a summit pack saves weight by eliminating the need for a separate daypack. Conversely, skip integrated rain covers (use a separate ultralight cover), excessive external pockets, and smart technology that adds complexity without proven field benefit. Every feature should earn its place by solving a specific winter problem.
See Also
- How to Choose the 10 Best Expedition Backpacks for Arctic Camping in 2026
- We Tested 50 Expedition Backpacks—Here Are the 10 Best for Arctic Treks in 2026
- Stop Shoulder Strain with the 10 Best Women-Specific Camping Backpacks in 2026
- The 10 Best Kids Camping Backpacks That Grow with Them in 2026
- 10 Most Durable Kids Camping Backpacks Based on Real Scout Reviews in 2026