Table of Contents
There’s something magical about paddling to a remote campsite with everything you need tucked into your kayak’s hatches—except when your cooler bulges like an overstuffed suitcase, forcing you to strap it on deck where it catches wind and throws off your trim. The difference between a clumsy floating garage and a sleek expedition machine often comes down to one piece of gear: a personal cooler that actually fits where it’s supposed to go. Hatch-compatible coolers aren’t just smaller versions of their bulky cousins; they’re precision tools engineered for the unique constraints of kayak camping, where every cubic inch matters and compromise isn’t an option.
Choosing the right one requires more than checking dimensions. You need to understand how insulation performs in confined spaces, how materials respond to saltwater and UV exposure, and how weight distribution affects your kayak’s handling when you’re twenty miles from the launch. This guide cuts through the marketing fluff to give you the technical knowledge and practical strategies that seasoned kayak campers use to keep food fresh without sacrificing performance or precious hatch space.
Top 10 Personal Coolers For Kayaking


Detailed Product Reviews
6. EVERFUN Small Cooler Lunch Box Mini Leak-Proof Soft Double Deck 24 Can Personal Insulated Collapsible Portable Waterproof Lunch Bag Ice Chest for Men Women Work Travel Car Picnic Beach, Black
Overview: The EVERFUN cooler is a compact double-deck lunch bag designed for personal use, accommodating 24 cans across two separate compartments. Measuring 12"L x 10"W x 9.5"H, it targets professionals and casual adventurers who need reliable temperature control for work, travel, picnics, and beach outings without carrying bulk.
What Makes It Stand Out: The dual-compartment design is genuinely innovative, with a 3.96-gallon bottom section for drinks and ice packs and a top section that keeps food dry and uncrushed. The 8mm thickened foam insulation promises up to 20 hours of cooling—exceptional for a lunch-box-sized cooler. The hot-pressed PEVA liner and waterproof nylon exterior create a truly leak-proof barrier, while the radiant heat barrier blocks external warmth effectively.
Value for Money: This cooler delivers premium features at a mid-range price. The dual-compartment functionality alone justifies the cost over basic lunch bags, while the 20-hour cooling performance rivals expensive brands. For daily commuters or weekend picnickers, the durability and smart design make it a worthwhile investment that replaces cheaper, less effective alternatives.
Strengths and Weaknesses: Strengths: Excellent 20-hour insulation; smart two-tier design prevents food crush; genuinely leak-proof; versatile carrying options; compact footprint; easy to clean. Weaknesses: 24-can capacity limits group use; black color absorbs heat; shoulder strap lacks padding for heavy loads; velcro straps may wear over time.
Bottom Line: Perfect for individuals or couples needing reliable temperature control without bulk. The dual-compartment design solves common lunch-bag problems, making it an excellent daily driver for work and short outdoor adventures.
7. BALEINE Extra Large Soft Cooler Bag, Portable Leakproof Cooler, 40/60 Cans Volume for Beach, Camping, Kayaking, Travel, and Road Trips (9.5 Gallon, Yellow)

Overview: BALEINE’s extra-large soft cooler is built for serious outdoor enthusiasts who need maximum capacity. Available in 9.5-gallon (40 cans) or 12.5-gallon (60 cans) sizes, this rugged bag targets beach-goers, campers, and kayakers requiring reliable cooling for group adventures without the weight of hard-sided coolers.
What Makes It Stand Out: The leakproof interior lining completely contains spills and condensation—a game-changer for water sports and car travel. The collapsible design folds flat for storage in tight spaces, solving the perennial cooler storage problem. BALEINE’s 30-day money-back guarantee demonstrates confidence in their durable construction, which withstands rugged outdoor abuse.
Value for Money: For a cooler that holds 60 cans and keeps them cold all day, this is competitively priced against both soft and hard-sided alternatives. Comparable hard coolers cost significantly more and occupy permanent storage space. The versatility across camping, kayaking, and road trips makes it a smart, cost-effective purchase for frequent adventurers who need capacity and portability.
Strengths and Weaknesses: Strengths: Massive capacity options; completely leakproof; collapses for compact storage; rugged construction; padded shoulder strap; strong warranty; versatile for multiple activities. Weaknesses: Large size when full can be unwieldy; insulation duration not specified; yellow color shows dirt; lacks external organizational pockets; may tip when partially loaded.
Bottom Line: Ideal for families or groups needing maximum capacity without hard cooler bulk. The leakproof design and collapsible feature make it a practical choice for regular outdoor enthusiasts who prioritize space-saving storage.
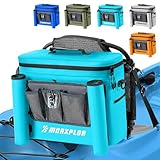
8. MORXPLOR Waterproof PVC Paddleboard Cooler Deck Bag - 12 Can Soft Insulated Cooler for Paddleboarding, Camping, Kayaking

Overview: Specifically engineered for paddleboard enthusiasts, this deck bag combines cooler functionality with complete waterproof protection. Holding 12 cans, it attaches securely to board D-rings, keeping refreshments accessible during water adventures. The 14.6"x13"x4.7" size is optimized for SUP deck space without impeding movement.
What Makes It Stand Out: The 500D PVC construction with welded seams is truly waterproof, not just water-resistant—critical for water sports. The watertight zipper prevents water ingress even when submerged, significantly extending cooling time compared to standard zippers. The mesh top pocket provides handy storage for sunscreen, keys, or snacks, while included hooks enable secure attachment to bungees or D-rings.
Value for Money: While pricier than generic soft coolers, the specialized waterproof design justifies the cost for paddleboarders and kayakers. Cheaper alternatives would soak through, destroying ice and contents. For its niche purpose, it’s a worthwhile investment that protects both provisions and expensive boards from water damage and mess.
Strengths and Weaknesses: Strengths: Fully waterproof PVC with welded seams; watertight zipper prevents water entry; secure attachment system; compact deck-friendly size; mesh top pocket for organization; durable construction. Weaknesses: Only 12-can capacity; not leakproof (melted ice stays inside); specific to water sports; zipper can be stiff initially; limited insulation time rating.
Bottom Line: A must-have accessory for serious paddleboarders and kayakers. The waterproof construction and secure mounting system make it worth every penny for keeping drinks cold and dry on the water, despite its limited capacity.
9. Lifewit Insulated Cooler Bag, 32 Can Large Leakproof Beach Cooler, Lightweight Portable Double Layer Soft-Sided Travel Ice Chest for Camping, Kayaking, Road Trips, Grocery Shopping, Dark Gray

Overview: This versatile mid-sized cooler balances generous capacity with portability, holding 32 cans in a 23-liter (6-gallon) footprint. Measuring 14.9" x 8.6" x 11", it serves beach trips, camping, kayaking, and grocery runs. The dark gray color and lightweight build make it practical for multi-scenario use without conspicuous branding.
What Makes It Stand Out: The hot-pressed seamless liner eliminates seam leaks—the most common failure point in cooler bags. Multiple pockets (one wide top, two side, two front) provide exceptional organization rarely seen in coolers. The lightweight design combined with three carrying styles makes it surprisingly portable for its capacity, while the double-layer construction maintains temperatures for 5+ hours.
Value for Money: This cooler hits the sweet spot between budget lunch bags and premium expedition coolers. The leakproof construction and thoughtful pocket design add significant value at a moderate price point. For shoppers wanting one cooler that handles multiple scenarios without premium cost, it offers excellent functionality per dollar.
Strengths and Weaknesses: Strengths: Leakproof hot-pressed liner; multiple storage pockets; lightweight yet spacious; versatile for many uses; easy to clean; folds flat for suitcase packing; padded handle. Weaknesses: 5-hour insulation is modest; may be too large for single-person lunch; shoulder strap lacks padding; dark color shows dust; no specified ice retention time.
Bottom Line: An excellent all-purpose cooler for those needing flexibility. The leakproof design and smart storage make it perfect for families, shoppers, and weekend adventurers who want reliable performance without paying premium prices.
10. Niphean 4-Layer Insulated Paddle Board Cooler Box - 60 Hours Ice Retention, Convertible Seat on Paddle Board with D-Ring, 15-Liter Rigid Kayak Cooler for Camping, Beach, Kayaking-Sup Accessories

Overview: This rigid, feature-packed cooler is specifically designed for paddleboarding but versatile enough for camping and beach use. With 15-liter capacity and an impressive 60-hour ice retention claim, it doubles as a seat for on-water comfort. The hard-shell construction provides durability that soft coolers can’t match.
What Makes It Stand Out: The 4-layer insulation system delivering 60-hour ice retention is exceptional for a cooler this compact. The convertible seat function is ingenious—insert the cushion into the groove for comfortable seating during long paddling sessions. The D-ring attachment system provides stable, secure mounting to paddleboards, while elastic rope storage on top adds practical utility for securing extra gear.
Value for Money: While more expensive than soft coolers, the rigid construction, extreme insulation performance, and dual functionality justify the premium. You’re essentially getting a cooler and kayak seat in one, making it cost-effective for paddleboarders who would otherwise purchase both separately. The 60-hour performance rivals expensive rotomolded coolers at a fraction of the weight.
Strengths and Weaknesses: Strengths: Outstanding 60-hour ice retention; converts to comfortable seat; secure D-ring mounting; rigid durable construction; top storage bungees; amphibious design; versatile beyond paddleboarding. Weaknesses: Higher price point; heavier than soft coolers; 15-liter capacity limits group use; specific mounting system may not suit all boards; seat cushion could be thicker.
Bottom Line: Perfect for paddleboarding enthusiasts who demand maximum performance and versatility. The seat conversion and 60-hour cooling make it a premium choice worth the investment for serious water adventurers who prioritize function over minimal cost.
Why Hatch-Friendly Coolers Transform Your Kayak Camping Experience
The moment you stop treating your kayak’s hatches as an afterthought, everything changes. A properly fitted cooler becomes part of your boat’s architecture rather than a liability. It sits flush, doesn’t shift during rolls or rescues, and leaves room for essential gear that can’t get wet. More importantly, it eliminates the dreaded “cooler tetris” game where you’re forcing gear into spaces never designed for it, potentially compromising hatch seals and risking water intrusion. The right cooler integrates seamlessly into your packing system, maintaining your kayak’s center of gravity and preserving the sleek hydrodynamics that make long-distance paddling efficient.
Understanding Hatch Dimensions: The First Step
Before you even think about cooler features, you need to become intimately familiar with your kayak’s hatch openings. Unlike car camping where you can measure trunk space once, kayak hatches present three-dimensional puzzles with curved hulls, tapered bulkheads, and narrow openings that can make a cooler impossible to load even if its dimensions technically fit.
Measuring Your Kayak’s Hatches
Grab a flexible measuring tape and record not just the hatch rim dimensions, but the internal path the cooler must travel. Many front hatches narrow significantly toward the bow, while rear hatches may have obstructions from rudder hardware or seat supports. Measure the diagonal depth from hatch rim to the farthest point inside, and note any width restrictions within the first 12 inches of the opening. This is where most coolers get stuck. Pro tip: create a cardboard template of your cooler’s footprint and test-fit it through the hatch before committing to a purchase.
Standard Hatch Sizes Across Kayak Types
Sea kayaks typically feature oval hatches around 16" x 10", while recreational kayaks often have round 8" hatches that eliminate most cooler options entirely. Fishing kayaks frequently include rectangular hatches up to 18" x 12", but these may have internal dividers or battery compartments that reduce usable space. Expedition touring boats sometimes offer massive 20" x 14" hatches, but the narrow entry path still demands coolers with tapered or flexible sides. Understanding your kayak’s category helps set realistic expectations about what’s actually possible.
Cooler Types That Actually Fit
The cooler market bombards you with options, but only a few categories truly work for hatch storage. Forget about traditional rotomolded chests—they’re designed for truck beds, not precision spaces. The sweet spot lives in specialized designs that prioritize dimensional efficiency over maximum capacity.
Soft-Sided vs. Hard-Sided: The Space Efficiency Debate
Soft-sided coolers offer the holy grail of hatch compatibility: they conform to irregular spaces and can be partially compressed during loading. High-performance models use closed-cell foam insulation that springs back to shape without permanent deformation. The trade-off? They typically achieve 60-70% of the ice retention of hard-sided coolers. Hard-sided coolers, when designed for hatch use, feature straight walls and precise dimensions that maximize internal volume while sliding smoothly into place. They protect contents better but demand exact measurements. The best choice depends on your hatch shape: irregular or narrow openings favor soft-sided; spacious, straight-walled hatches reward hard-sided models.
Modular and Collapsible Designs
Emerging designs feature coolers that collapse flat for transport, then expand to full height when packed. These use accordion-style walls with integrated insulation panels that lock into place. While clever, they sacrifice some thermal performance at the joints. Modular systems take a different approach: multiple smaller cooler units that connect together, allowing you to distribute cold storage across several hatches. This strategy excels for couples or groups, letting each paddler carry a portion of shared supplies while maintaining personal access to their own provisions.
Capacity Reality Check: What “Personal” Really Means
“Personal cooler” is marketing speak that can mean anything from a six-pack holder to a three-day food supply. For kayak camping, you need to think in terms of meals, not liters. A true personal cooler for a solo paddler on a two-night trip needs to hold roughly 2,500-3,000 calories per day plus ice—typically 15-20 quarts of usable space.
Day Trip vs. Multi-Day Needs
Day paddlers can get away with 8-12 quart coolers focused on beverages and lunch. The insulation demands are lower since you’re not storing overnight, allowing you to prioritize compact dimensions. Multi-day trips require 18-25 quarts minimum, but this is where the hatch constraint becomes critical. A 25-quart cooler that fits through your hatch might only hold 18 quarts of actual food because the tapered design reduces internal volume. Always subtract 20-30% from stated capacity when calculating real-world food storage.
Beverage-First vs. Food-First Packing Strategies
Your packing philosophy dramatically affects cooler choice. Beverage-first campers prioritize vertical space for bottles and cans, benefiting from taller, narrower coolers. Food-first paddlers need horizontal space for meal prep containers and require coolers with wide openings and flat interiors. The food-first approach is generally more efficient for multi-day trips, as you can repackage beverages in soft flasks that conform to leftover spaces, while food containers demand predictable dimensions.
Insulation Technology Explained
Manufacturers love throwing around terms like “commercial grade insulation” without explaining what actually matters for kayak camping. The truth is, insulation performance depends on density, thickness, and environmental conditions that differ dramatically from backyard barbecues.
Foam Density and R-Value
Look for foam insulation with a minimum density of 2.0 pounds per cubic foot. This spec is rarely advertised, but you can infer it from weight—a properly insulated 20-quart cooler should weigh at least 5-6 pounds empty. R-value matters less than total thermal mass; thicker walls (1.5-2 inches minimum) outperform thin walls with high R-value foam. In kayak hatches, where coolers are surrounded by relatively stable water temperature, insulation works more efficiently than in open air, giving you a 10-15% boost in ice retention compared to deck-mounted coolers.
Radiant Barriers and Multi-Layer Construction
Premium coolers incorporate reflective layers that block radiant heat transfer. In the confined space of a hatch, these barriers are less effective because there’s minimal air circulation to carry heat away from the cooler’s surface. However, they still provide value by reflecting heat from the hatch cover during midday sun. Multi-layer construction—where different insulation types address different heat transfer methods—shows real engineering rather than marketing fluff. Look for combinations of closed-cell foam, radiant barriers, and air-trapping fabrics.
Materials Matter: Durability in Marine Environments
Your cooler lives in a world of salt spray, UV bombardment, and abrasive plastic hatch rims. Materials that work fine for tailgating can fail catastrophically after a season of kayak camping.
UV Resistance and Color Fading
Dark colors absorb more heat, potentially adding 5-10°F to internal temperatures in direct sun. But light colors show stains and can develop a permanent grimy patina from sunscreen, fish slime, and river water. The sweet spot? Medium tones like sage green or tan with UV-inhibiting additives in the plastic. For soft-sided coolers, look for 1000-denier nylon with urethane coating and UV treatment. Avoid vinyl exteriors—they crack and peel when repeatedly flexed through hatch openings.
Abrasion Resistance for Tight Fits
Every time you slide your cooler through a hatch, the sides scrape against the rim. Hard-sided coolers need reinforced corners and edge protection—look for rubber bumpers or molded-in skid plates. Soft-sided models should have ballistic nylon reinforcement panels on the bottom and corners. Some manufacturers add a slick, low-friction coating to the exterior that makes loading effortless while protecting the underlying fabric. This feature alone can double the lifespan of a hatch-stored cooler.
Weight Considerations: Floatation and Portability
A loaded cooler can weigh 30-40 pounds, turning it into a projectile in a wet exit if not properly secured. But weight also affects your kayak’s performance in subtle ways that matter on long crossings.
Empty Weight vs. Packed Weight
Premium rotomolded coolers can weigh 10-12 pounds empty, which is dead weight when you’re portaging or loading. Soft-sided models might weigh just 2-3 pounds but sacrifice durability. The ideal kayak camping cooler weighs 4-6 pounds empty—light enough to handle easily but heavy enough to indicate solid construction. Always calculate packed weight (cooler + ice + food) and consider how that mass affects your kayak’s trim. A heavy cooler in the front hatch can make the bow plow; in the rear, it can lift the bow and reduce tracking.
How Weight Distribution Affects Stability
Coolers stored below the waterline in your hatches lower your center of gravity, actually improving initial stability. But concentrate too much weight in one hatch and you’ll create a list that requires constant correction. For optimal handling, distribute cooler weight symmetrically between front and rear hatches when possible, or position it near your center of buoyancy (typically just behind the cockpit). This placement minimizes the pitching moment and keeps your kayak responsive to edging and bracing.
Critical Features for Kayak-Specific Use
Generic cooler features don’t always translate to kayak utility. What works for car camping can be useless—or even problematic—when you’re threading gear through a hatch in choppy conditions.
Low-Profile Lids and Angled Designs
High-domed lids might provide extra capacity but prevent the cooler from sliding past hatch obstructions. Look for coolers with flat, low-profile lids that sit flush with the rim. Some models feature angled or beveled front edges that act like a wedge, guiding the cooler through tight spots. Latch placement matters too—recessed latches sit flatter and are less likely to snag on hatch rims during loading.
Tie-Down Points and Attachment Systems
A cooler that floats freely inside a hatch can damage your kayak’s interior and compromise stability in a capsize. The best designs include integrated tie-down points or daisy chains that let you secure the cooler to internal anchor points. For soft-sided coolers, look for reinforced webbing loops at all four corners. Hard-sided models should have molded-in tie-down cleats that don’t protrude beyond the cooler’s footprint. Never rely on bungee cords alone—they stretch and can allow dangerous movement.
Leakproof and Watertight Seals
In kayak camping, the cooler must keep water out, not just keep cold in. A cooler that leaks meltwater into your hatch creates a mess and can damage other gear. Look for freezer-grade gaskets with at least two contact points. Test the seal by closing the empty cooler and submerging it in your bathtub—any bubbles indicate a failure point. For soft-sided coolers, welded seams outperform stitched ones, and waterproof zippers (like those on dry suits) are worth the premium price.
Organization and Access Strategies
A cooler that’s packed perfectly but requires unpacking half your kayak to access is useless. Smart organization features make the difference between a cooler that works and one that frustrates.
Internal Compartments and Dry Zones
The best kayak coolers include removable dividers that let you separate ice from food, creating dry zones for items that can’t get wet. Some feature suspended baskets that keep delicate items above meltwater. Look for coolers with vertical dividers that create narrow channels—perfect for storing fishing rods or paddle floats alongside your food. These compartments also prevent contents from shifting, which can damage eggs, fruit, and other fragile items during rough water travel.
External Pockets for Quick Access
External pockets seem counterintuitive for a hatch-stored cooler, but they’re invaluable for items you need during the day: sunscreen, medications, or a chocolate bar for quick energy. These pockets should be waterproof and low-profile, adding minimal bulk. Some designs incorporate MOLLE webbing, letting you attach a small dry bag or fishing pliers. Just ensure these additions don’t prevent the cooler from fitting through your hatch.
Ice Retention Hacks for Extended Trips
Even the best cooler fails without proper ice management. Kayak camping presents unique challenges: you can’t run to the store for more ice, and opening the cooler in hot weather happens more frequently as you snack and hydrate.
Block Ice vs. Cube Ice
Block ice melts 30-40% slower than cubes because it has less surface area exposed to warm air. For multi-day trips, freeze water in rectangular containers that match your cooler’s internal dimensions. These blocks create a solid thermal mass that maintains temperature even with frequent openings. Supplement with cube ice to fill gaps around food, but rely on blocks for baseline cooling. Some paddlers freeze their food in vacuum-sealed bags, turning each meal into an additional ice block that gradually thaws.
Pre-Chilling Techniques
A cooler stored in a hot garage absorbs heat into its insulation, which will melt your ice before you even launch. Pre-chill your cooler overnight with a sacrificial bag of ice, then drain the water and reload with fresh ice before packing. For hard-sided coolers, store them in a cool place before your trip. Some extreme paddlers fill their cooler with dry ice for 24 hours before the trip, creating a deep cold sink that extends ice life by two days.
The 2:1 Ice-to-Contents Ratio Rule
The old camping adage of 2:1 ice to food by volume holds true, but kayak coolers require modification. Because you open them more frequently, aim for 2.5:1 or even 3:1 for trips over three days. This seems excessive until you’re on day four with lukewarm drinking water. Pack dense, calorie-rich foods that don’t require much space—hard cheeses, cured meats, nut butters—so the ice ratio doesn’t leave you hungry.
Maintenance and Odor Control in the Field
A cooler that smells like last month’s fish will ruin your appetite and attract wildlife. In kayak camping, you can’t always rinse with fresh water, so you need strategies that work with saltwater or limited resources.
Cleaning Without Fresh Water
Sea water cleans surprisingly well if you use it correctly. Wipe out your cooler with a damp cloth soaked in salt water, then dry it completely with a microfiber towel. The salt residue actually inhibits bacterial growth. For stubborn odors, pack a small container of baking soda and dust the interior after cleaning. Some paddlers swear by a drop of tea tree oil on a paper towel, which acts as a natural antimicrobial. Never use soap in salt water—it doesn’t rinse clean and can leave a residue that affects food taste.
Preventing Mold in Storage
A cooler stored damp in a hot garage will develop mold in days. After your trip, clean thoroughly with a mild bleach solution (1 tablespoon per gallon), rinse, and dry in the sun for several hours. Then—and this is critical—store it with the lid propped open 1-2 inches using a small block of wood. This allows air circulation while keeping dust out. For soft-sided coolers, hang them upside-down from a hook so any residual moisture drains away from seams and zippers.
Budget vs. Performance: Finding Your Sweet Spot
Cooler prices range from $30 to $300 for personal sizes, with performance differences that don’t always correlate with cost. Understanding what you’re paying for helps avoid both cheap disappointment and expensive overkill.
Understanding Price Tiers
Budget coolers ($30-60) use thin insulation and basic zippers, giving you 12-24 hours of ice retention—fine for day trips but risky for overnights. Mid-range options ($60-120) offer the best value: 48-72 hour ice retention, durable materials, and kayak-specific features like low-profile designs. Premium coolers ($120-300) provide marginal improvements in ice retention (up to 5 days) but excel in durability and warranty support. For most kayak campers, the mid-range hits the performance-to-price ratio perfectly.
When to Invest in Premium Features
Consider a premium cooler if you paddle in extreme heat (desert or tropical environments), take trips longer than four days, or rely on your cooler for medication storage. The extended ice retention can be a safety feature, not just a convenience. Also, premium warranties (some offer lifetime replacement) make sense if you paddle 50+ days per year. For weekend warriors, that money is better spent on other gear.
Environmental and Leave No Trace Considerations
Your cooler choices impact the environment beyond just keeping food cold. From wildlife interactions to end-of-life disposal, responsible paddlers think holistically.
Bear-Resistant Ratings and Wildlife Safety
In bear country, a cooler that fits in your hatch might not be certified bear-resistant. The Interagency Grizzly Bear Committee (IGBC) certification requires specific latch systems that many hatch-friendly coolers lack. If you’re paddling in grizzly territory, store your cooler in a bear canister or hang it from a tree away from camp, regardless of its rating. For black bear country, a cooler with locking latches and stored inside your kayak (which you can hang or store away from camp) is usually sufficient. Never store food in your kayak overnight at camp—it’s an invitation to wildlife.
Sustainable Materials and End-of-Life Disposal
Foam insulation is notoriously difficult to recycle. Some manufacturers now use recycled foam or biodegradable insulation materials that perform nearly as well. Look for coolers with replaceable parts—latches, gaskets, and handles that can be swapped out extend the product’s life dramatically. At the end of its life, check if the manufacturer offers a take-back program. Many will recycle the materials properly, keeping insulation out of landfills.
Safety Factors Often Overlooked
A cooler in a kayak is more than a convenience item—it’s a piece of safety equipment that can either help or hurt in an emergency.
Sharp Edges and Hull Damage
Hard-sided coolers with sharp corners can puncture your kayak’s hull during a wet exit or if they break free in a capsize. Run your hand along every edge and corner; if you can feel a sharp point, file it down or cover it with duct tape. Better yet, choose coolers with rounded corners and rubberized bumpers. In a rescue situation, a cooler with protruding latches can catch on deck lines or rescue slings, complicating an already stressful scenario.
Chemical Leaching in High Temperatures
Cheaper coolers can leach BPA and phthalates when exposed to hot interiors (think black kayak in summer sun). Even BPA-free plastics can release other concerning chemicals. Look for coolers explicitly rated for food contact at temperatures up to 120°F. For hot climates, wrap your cooler in a light-colored towel or store it deep in the hatch where hull temperature stays lower. Never leave a cooler in direct sun on deck—it’s bad for your food and potentially your health.
Frequently Asked Questions
How do I know if a cooler will definitely fit through my kayak’s hatch?
Create a cardboard mockup using the cooler’s external dimensions, but make it 1 inch larger in all directions to account for fabric thickness and latches. If the mockup fits with slight compression, the actual cooler will fit. Always test with the hatch cover removed first, then with it in place, as hinges and latches reduce clearance.
Can I use dry ice in a kayak cooler?
Yes, but with critical precautions. Use 2-3 pounds maximum in a 20-quart cooler, and never seal it completely—dry ice releases carbon dioxide that can cause pressure buildup. Wrap dry ice in newspaper to slow sublimation and prevent direct contact with food. Always ventilate your kayak’s hatch periodically, and never sleep with the cooler in your tent. The extreme cold (-109°F) can crack cooler interiors not designed for it.
What’s the best way to pack a cooler for maximum ice retention?
Start with a pre-chilled cooler, then add a 2-inch base layer of block ice. Place frozen items and dense foods directly on the ice, then fill gaps with cube ice. Put items you’ll access frequently (drinks, snacks) on top in a separate small dry bag that you can remove without digging. Keep a 1-inch air gap at the top—overpacking reduces ice life. Finally, place a wet towel over the contents before closing the lid; the evaporative cooling adds 4-6 hours of retention.
How do I secure a cooler inside a hatch that has no anchor points?
Use the “wedge method”: pack gear tightly around the cooler so it can’t shift. Inflate a small dry bag partially and wedge it between the cooler and hatch rim. For hard-sided coolers, use industrial-strength Velcro strips—attach the hook side to the cooler base and the loop side to the hull interior. Some paddlers glue small D-rings to the hull using marine-grade adhesive, creating permanent anchor points without drilling.
Should I drain meltwater from my cooler during the trip?
Never drain cold water—it actually helps maintain temperature and reduces ice melt. The water is at 32°F, while air replacing it is much warmer. Only drain if you need to keep items dry or if the cooler is so full that water threatens to leak through the seal. If you must drain, do it quickly and close the lid immediately to minimize warm air influx.
How do I prevent my cooler from smelling after a trip?
The key is immediate cleaning, even if you’re exhausted. At minimum, wipe it out with a disinfecting wipe and prop the lid open to dry. At home, wash with a solution of one part white vinegar to three parts water, which kills odor-causing bacteria without leaving a chemical residue. For persistent smells, fill the cooler with crumpled newspaper for 48 hours—the paper absorbs odors. Never store with the lid closed until you’re certain it’s completely dry.
Are soft-sided coolers durable enough for multi-week expeditions?
High-end soft-sided coolers with welded seams and 1000-denier fabric can absolutely handle extended trips. The key is treating them as precision gear, not toss-around equipment. Avoid dragging them across beaches, and never use them as a seat or step stool. Check seams weekly for abrasion, and apply seam sealer at the first sign of wear. Many expedition paddlers prefer soft-sided for trips over two weeks because they can be repaired in the field with a patch kit, unlike cracked hard-sided coolers.
What’s the ideal cooler placement for kayak stability?
Position your cooler as close to your center of buoyancy as possible—typically 12-18 inches behind the cockpit. This minimizes the pitching moment that affects handling. If using two coolers, balance weight between front and rear hatches, keeping the total weight within 10 pounds of equal. For solo hatch storage, place the cooler on the side opposite your dominant paddling side to counteract the natural weight bias from your stroke.
Can I store electronics in my cooler to protect them from heat?
Only if you use a completely waterproof dry bag inside the cooler. Condensation is guaranteed, and even “dry” coolers have humidity. Use silica gel packets in the dry bag with your electronics. Better yet, store electronics in a separate small dry bag in a different hatch. The temperature swings in a cooler—especially when opened frequently—can cause more harm than the steady heat of a dry hatch.
How long should a quality kayak cooler last with regular use?
With proper care, a mid-range hard-sided cooler should last 5-7 years of heavy use (30+ trips per year). Soft-sided coolers typically last 3-5 years before seams fail. Premium coolers can exceed 10 years, but the insulation degrades over time, losing 10-15% efficiency after year five. If your ice retention drops noticeably, it’s time to replace. UV exposure is the primary killer—even with treatment, plastic becomes brittle after years of sun. Storing your cooler out of sunlight between trips is the single best longevity practice.