Table of Contents
The open road calls, and your mobile lifestyle demands more than a bag of melting ice and soggy sandwiches. As van life evolves from weekend warrior escapes to full-time nomadic living, reliable refrigeration has become non-negotiable. In 2026, solar-powered electric coolers have transformed from luxury gadgets into essential infrastructure, offering compressor-driven performance that rivals residential refrigerators while sipping power so efficiently you might forget you’re off-grid. But not all solar-ready coolers are created equal, and choosing the wrong unit can leave you with spoiled food, drained batteries, and a serious case of buyer’s remorse.
Understanding what separates a true solar-optimized cooler from marketing hype requires diving deep into power systems, thermal dynamics, and real-world van constraints. Whether you’re building out a Sprinter conversion or sliding a unit into your weekend adventure van, the decisions you make about refrigeration ripple through your entire electrical ecosystem. This guide cuts through the noise to equip you with the technical knowledge and practical insights needed to select a cooler that will keep your provisions frosty from desert boondocking to alpine basecamps—all powered by nothing but the sun on your roof.
Top 10 Coolers
Detailed Product Reviews
1. Coleman Classic Series Insulated Portable Rolling Cooler with Wheels, Leak-Resistant Outdoor Hard Cooler Keeps Ice up to 5 Days, 100-Quart
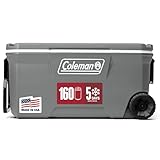
Overview: The Coleman Classic 100-Quart Rolling Cooler is a heavy-duty ice chest designed for serious outdoor adventures. With its massive capacity and integrated wheels, this cooler targets campers, tailgaters, and anyone hosting large gatherings where keeping provisions cold for days is essential.
What Makes It Stand Out: The five-day ice retention capability at temperatures up to 90°F sets this apart from basic coolers. The heavy-duty 6-inch wheels and swing-up handles make transport surprisingly manageable despite its size. Integrated cup holders molded into the lid accommodate 30-ounce tumblers, while the “Have-A-Seat” lid supports 250 pounds, doubling as sturdy seating. The leak-resistant channel drain plug allows easy water removal without tilting.
Value for Money: Priced in the mid-range category, this Coleman delivers premium features without the premium price tag of rotomolded competitors like Yeti. You’re getting legitimate multi-day performance, mobility, and durability for about half the cost of high-end brands, making it an excellent value for families and frequent outdoor enthusiasts.
Strengths and Weaknesses: Strengths include exceptional capacity, proven ice retention, convenient wheeled design, and versatile lid features. The stain-resistant liner simplifies cleanup. However, its size becomes a weakness when full—it’s heavy and requires considerable storage space. The insulation, while effective, isn’t as robust as rotomolded models, and the plastic hardware may wear over time with heavy use.
Bottom Line: For those needing maximum cold storage capacity with genuine multi-day performance, this Coleman rolling cooler delivers outstanding functionality at a reasonable price. It’s ideal for extended camping trips, large tailgates, or backyard parties where mobility matters.
2. Thermalright Peerless Assassin 120 SE CPU Cooler, 6 Heat Pipes AGHP Technology, Dual 120mm PWM Fans, 1550RPM Speed, for AMD:AM4 AM5/Intel LGA 1700/1150/1151/1200/1851,PC Cooler
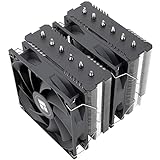
Overview: The Thermalright Peerless Assassin 120 SE represents exceptional value in CPU air cooling, bringing high-end performance to budget-conscious builders. This dual-tower cooler targets gamers, content creators, and overclockers seeking thermal headroom without liquid cooling complexity.
What Makes It Stand Out: Six 6mm heat pipes utilizing AGHP (Anti-Gravity Heat Pipe) technology solve orientation challenges, ensuring consistent performance whether mounted vertically or horizontally. The dual TL-C12C PWM fans operate at 1550 RPM while maintaining noise levels under 25.6dB(A), delivering 66.17 CFM airflow. Full electroplating reflow welding and a pure copper base demonstrate build quality typically found in premium competitors.
Value for Money: This cooler competes with $80-100 solutions from Noctua and be quiet! at a fraction of the cost. You’re getting dual-tower cooling, six heat pipes, and excellent RAM clearance design for budget-tier pricing. For performance-per-dollar, it’s nearly unbeatable in the air-cooling market.
Strengths and Weaknesses: Strengths include outstanding thermal performance, whisper-quiet operation, broad socket compatibility (Intel 115X/1200/1700/1851 and AM4/AM5), and thoughtful RAM clearance design. Build quality exceeds expectations. Weaknesses include its substantial 155mm height (case compatibility concerns), complex installation compared to single-tower designs, and limited brand recognition in North America. The requirement to reuse AMD’s stock backplate may inconvenience some users.
Bottom Line: The Peerless Assassin 120 SE is the undisputed champion of budget air cooling. If your case can accommodate its size, it delivers premium-tier cooling performance and acoustics that rival coolers costing twice as much, making it essential for value-focused performance builds.
3. Titan by Arctic Zone Deep Freeze Cooler - 16 Can Zipperless Hardbody Cooler with Deep Freeze Insulation, HardBody Liner, and SmartShelf - Sharkskin Gray

Overview: The Titan Deep Freeze 16-Can Cooler reimagines personal cooling with its innovative zipperless design and smart organization features. This compact cooler targets individuals and small groups for day trips, work lunches, and short outdoor excursions where convenience trumps capacity.
What Makes It Stand Out: The patented flip-open lid provides instant access without zipper hassle, while the Deep Freeze Performance Insulation with radiant heat barrier keeps contents cold for up to two days. The removable HardBody liner with SmartShelf prevents delicate items from being crushed—a thoughtful touch for sandwiches and fruit. The adjustable Backsaver shoulder strap with anti-slip pad enhances portability.
Value for Money: Positioned as a mid-tier personal cooler, it costs slightly more than basic soft-sided options but delivers superior organization and access convenience. The durability and smart features justify the premium over generic lunch coolers, though it’s not competing with heavy-duty rotomolded models.
Strengths and Weaknesses: Strengths include the innovative zipperless lid, crush-proof SmartShelf system, comfortable shoulder strap, and water-repellent Sharkskin exterior that’s easy to clean. Its compact 16-can capacity is perfect for personal use. Weaknesses include limited ice retention (only two days) and modest capacity unsuitable for groups. The hard liner adds weight compared to purely soft coolers, and the flip lid may not seal as tightly as zippered alternatives in rough conditions.
Bottom Line: For solo adventurers or couples prioritizing convenience and organization over maximum ice retention, this Titan cooler excels. It’s the perfect companion for day hikes, beach trips, or daily commuting where quick access and smart storage matter most.
4. Coleman Xtreme 50qt Rolling Cooler with Wheels, Extra-Walled Insulation Keeps Ice up to 5 Days, Portable Wheeled Hard Chiller

Overview: The Coleman Xtreme 50-Quart Rolling Cooler balances capacity and portability for weekend warriors. This midsize wheeled cooler serves families and small groups who need reliable ice retention without the bulk of larger models.
What Makes It Stand Out: Xtreme insulation technology maintains ice for up to five days at 90°F, matching larger models. Durable wheels navigate varied terrain effortlessly, while the leak-proof drain simplifies maintenance. The robust lid supports 250 pounds, providing extra seating at campsites or tailgates. Holding 84 cans, it hits the sweet spot for weekend trips.
Value for Money: This cooler occupies the budget-friendly sweet spot, offering multi-day performance and mobility at a price point well below premium rotomolded brands. For occasional campers and tailgaters, it delivers essential features without overpaying for extreme durability you may not need.
Strengths and Weaknesses: Strengths include excellent ice retention for the price, manageable size, reliable wheels, and the convenient no-tilt drain system. The lid’s weight capacity adds versatility. Weaknesses include plastic construction that lacks the longevity of rotomolded coolers, basic latches that may wear over time, and limited insulation thickness compared to high-end models. When fully loaded, it can still be heavy to maneuver despite the wheels.
Bottom Line: The Coleman Xtreme 50qt Rolling Cooler is the pragmatic choice for weekend adventurers seeking proven performance without premium cost. It handles most outdoor scenarios admirably, making it a versatile, cost-effective solution for families and casual outdoor enthusiasts.
5. Coleman Classic Series Insulated Portable Cooler, Leak-Resistant Outdoor Hard Cooler Keeps Ice up to 5 Days, 52/70/120/150 Quart

Overview: The Coleman Classic Series offers versatile hard-sided cooling across four sizes, catering to diverse needs from personal outings to large gatherings. This traditional cooler line emphasizes simplicity, durability, and proven five-day ice retention without the complexity of wheels or premium price tags.
What Makes It Stand Out: Available in 52, 70, 120, and 150-quart capacities, this series lets users choose the perfect size. The “Have-A-Seat” lid supports 250 pounds across all models, while molded cup holders secure drinks up to 30 ounces. Swing-up handles provide solid grip points for two-person carrying, and the leak-resistant design ensures mess-free transport.
Value for Money: These coolers represent exceptional value, delivering multi-day ice retention at entry-level pricing. Without wheels to increase cost or fail over time, you’re paying purely for reliable cooling capacity. They undercut premium brands significantly while meeting the needs of most casual users.
Strengths and Weaknesses: Strengths include size variety, proven ice retention, durable construction, and the versatile lid design. The absence of wheels means fewer failure points and lower cost. Weaknesses include difficulty moving when fully loaded (especially larger models), basic insulation compared to rotomolded coolers, and plastic hardware that may degrade with heavy use. Larger sizes absolutely require two people to carry safely.
Bottom Line: For buyers wanting reliable, no-frills cooling at maximum value, the Coleman Classic Series delivers. Choose your ideal capacity and enjoy proven performance for camping, fishing, or backyard entertaining without paying for unnecessary features.
6. Igloo Polar 120 Qt. Cooler

Overview: The Igloo Polar 120 Qt. Cooler is a behemoth built for serious outdoor enthusiasts and large gatherings. With its cavernous capacity, this cooler can handle everything from week-long hunting trips to family reunions. The UV inhibitors in the lid protect against sun damage, ensuring longevity even in harsh conditions, while the stain- and odor-resistant liner keeps the interior fresh after repeated use.
What Makes It Stand Out: The 120-quart capacity is the headline feature, accommodating over 190 cans. The threaded drain plug with hose hookup makes emptying melted ice effortless, while reinforced swing-up handles with tie-down loops add versatility for transport and securing. Dual snap-fit latches provide reliable lid closure, even when jostled during transport.
Value for Money: For large-scale cooling needs, this cooler offers exceptional value. Competitors with similar capacity often cost significantly more. The robust construction and thoughtful features like the hose-ready drain save time and effort, justifying every dollar for those who need maximum storage.
Strengths and Weaknesses: Strengths include massive capacity, durable UV-resistant construction, convenient drain system, and secure latches. Weaknesses are its substantial weight when full (over 100 pounds), requiring two people to move comfortably, and its oversized footprint that demands significant vehicle space. The basic insulation performs adequately but won’t match premium rotomolded coolers for multi-day ice retention.
Bottom Line: This is your workhorse cooler for big jobs. If you regularly host large events or venture into the backcountry for extended periods, the Igloo Polar 120 Qt. delivers capacity and durability at a fraction of the premium brand cost. For intimate gatherings, consider a smaller size.
7. Coleman Chiller 48qt Insulated Portable Cooler with Ice Retention & Heavy-Duty Handles, Made in USA, Great for Camping, Tailgating, Parties, Sports, Concerts & More

Overview: The Coleman Chiller 48qt strikes an ideal balance between portability and capacity for most outdoor adventures. Proudly made in the USA, this mid-size cooler holds 31 cans with 24 pounds of ice, making it perfect for weekend camping trips or tailgate parties. Its TempLock insulation delivers reliable ice retention for day-long activities.
What Makes It Stand Out: The clever 2-way handles swing up for easy carrying and fold flat for compact storage, solving a common transport annoyance. The extra height accommodates 2-liter bottles upright, preventing messy spills and maximizing space efficiency. This thoughtful design element sets it apart from similarly sized competitors.
Value for Money: As a USA-manufactured cooler with solid performance, it punches above its weight class. Priced competitively against imported alternatives, you’re getting domestic build quality without the premium tax. The feature set matches or exceeds coolers costing 20-30% more.
Strengths and Weaknesses: Strengths include versatile handle design, 2-liter bottle compatibility, adequate insulation for 1-2 day trips, and American manufacturing. Weaknesses involve basic latch design that may wear over time, and ice retention falls short of high-end rotomolded models for multi-day excursions. The plastic construction, while durable, can crack under extreme impact.
Bottom Line: This is the Swiss Army knife of coolers—versatile, reliable, and fairly priced. For camping, tailgating, or sports events lasting 1-3 days, it’s nearly perfect. Serious expedition-goers should upgrade to premium insulation, but for typical weekend warriors, this hits the sweet spot.
8. Igloo 54 Qt Marine Ultra Cooler, White

Overview: Engineered for life on the water, the Igloo 54 Qt Marine Ultra Cooler combines rugged durability with marine-specific features. The white color reflects sunlight, while UV inhibitors throughout prevent degradation from constant sun exposure. This cooler is built to withstand saltwater, spray, and the corrosive marine environment that destroys standard coolers.
What Makes It Stand Out: Marine-grade hardware is the star—stainless steel lid strap and screws resist rust, while hybrid latches pair stainless steel hinges with plastic snaps for longevity and secure closure. Riteflex resin hinges offer exceptional impact resistance and flexibility across temperature extremes. Non-slip comfort grips provide secure handling even when wet.
Value for Money: While pricier than basic 54-quart coolers, the marine-specific upgrades justify the cost for boaters and anglers. Standard coolers fail quickly in marine environments, making this a wise investment that outlasts cheaper alternatives by years. For landlocked users, the premium may be unnecessary.
Strengths and Weaknesses: Strengths include superior corrosion resistance, robust hardware, UV protection, and excellent wet-condition grip. Weaknesses are the white color’s tendency to show dirt, premium pricing that may not suit casual users, and weight that’s heavier than non-marine counterparts. The 54-quart capacity may be limiting for longer offshore trips.
Bottom Line: This is the cooler you buy when failure isn’t an option on the water. For boat owners, fishermen, and coastal adventurers, the marine-grade construction is worth every penny. Inland campers can save money with standard models unless they prioritize maximum hardware durability.
9. Coleman Chiller 16qt Insulated Portable Cooler with Ice Retention & Large Carry Handle, Made in USA, Great for Camping, Tailgating, Parties, Sports, Concerts, Lunches & More

Overview: The Coleman Chiller 16qt is the ultimate personal cooler, perfectly sized for individual use or small families on day trips. This compact powerhouse holds 11 cans with 8 pounds of ice, fitting easily behind a car seat or on a picnic table. Made in the USA, it delivers reliable performance for everyday adventures without the bulk of larger models.
What Makes It Stand Out: The large-grip bail handle enables true one-handed portability, a game-changer when you’re juggling gear. The quick-clean top features a smoother surface that wipes down in seconds, eliminating the textured crud-traps found on many coolers. This attention to everyday usability distinguishes it from basic lunch-box coolers.
Value for Money: As an American-made cooler priced under $30, it’s an exceptional value. Comparable personal coolers often cost more and lack the easy-clean feature. The durability ensures years of service, making it cheaper than repeatedly replacing soft-sided lunch bags.
Strengths and Weaknesses: Strengths include ultimate portability, one-hand carry convenience, easy-clean surface, and domestic manufacturing. Weaknesses involve limited capacity for groups, minimal insulation for multi-day use, and basic latch design. The small size means ice melts faster than in larger, thicker-walled coolers.
Bottom Line: This is your daily driver cooler. For work lunches, solo beach days, or short outings, it’s nearly perfect. The convenience and build quality make it a no-brainer for individuals. Don’t expect it to feed a crowd or keep ice for days, but for its intended purpose, it excels brilliantly.
10. Coleman Classic Series Insulated Portable Rolling Cooler with Wheels, Leak-Resistant Outdoor Hard Cooler Keeps Ice up to 5 Days, 100-Quart

Overview: The Coleman Classic Series Rolling Cooler redefines large-capacity cooling with its ingenious mobility features. This 100-quart behemoth boasts TempLock FX insulation that maintains ice for up to five days, making it ideal for extended camping trips or basecamp setups. The integrated heavy-duty wheels and telescoping handle transform transport from a two-person struggle into a one-person breeze.
What Makes It Stand Out: Mobility is the killer feature—heavy-duty wheels navigate rough terrain while the easy-tow handle provides leverage. Four integrated cup holders accommodate 30-ounce tumblers, adding functional utility at tailgates and campsites. The eco-conscious design uses 15% less plastic than comparable coolers without sacrificing durability.
Value for Money: Premium features command a premium price, but the wheel system alone justifies the cost for anyone who’s wrestled with a loaded 100-quart cooler. Five-day ice retention rivals coolers costing twice as much. The leak-proof tethered drain plug prevents messy surprises and loss.
Strengths and Weaknesses: Strengths include exceptional mobility, multi-day ice retention, generous capacity, cup holders, and leak-proof drain. Weaknesses involve bulky storage when not in use, weight even when empty, and wheels that add potential failure points. The large footprint requires significant vehicle space.
Bottom Line: If you need maximum capacity without breaking your back, this is your cooler. The wheel system makes it practical for solo use of a large cooler, while the five-day retention supports extended adventures. For car camping, tailgating, or any event where distance meets capacity, it’s unbeatable.
Understanding Solar-Powered Electric Coolers for Van Life
What Makes a Cooler “Solar-Ready”?
The term “solar-ready” gets thrown around liberally in product descriptions, but genuine solar compatibility runs deeper than a 12V DC plug. True solar-ready coolers in 2026 feature sophisticated power management systems that maximize every watt harvested from your panels. These units operate efficiently across a wide voltage range—typically 10.5V to 15V—accommodating the natural fluctuations of battery charging cycles without triggering protective shutdowns. They also incorporate adaptive compressor technology that modulates speed based on available power, rather than cycling on and off in power-hungry bursts.
Beyond electrical tolerance, solar-optimized coolers prioritize ultra-low standby consumption. When the compressor isn’t running, premium models draw less than 0.5 watts—critical for preserving battery reserves during cloudy days. Look for units with integrated solar priority circuits that can detect when panels are actively generating power and adjust cooling intensity accordingly, pre-cooling contents during peak sun hours to reduce nighttime energy demand.
The Evolution of Portable Refrigeration in 2026
The landscape of mobile refrigeration has shifted dramatically in recent years. Gone are the days of choosing between inefficient thermoelectric coolers that struggle below 40°F and power-hungry compressor fridges that demanded massive battery banks. Modern 2026 models leverage variable-speed SECOP compressors originally designed for medical transport, achieving energy efficiency ratios that rival Energy Star residential appliances. Some manufacturers now integrate phase-change materials into their insulation, creating thermal batteries that maintain stable temperatures for up to 12 hours without any power input.
Connectivity has also matured beyond basic Bluetooth temperature monitoring. Today’s smart coolers sync with your van’s broader power ecosystem, communicating directly with MPPT charge controllers and battery management systems. This integration allows predictive power management, where your cooler might automatically enter eco-mode when your battery monitor forecasts insufficient solar harvest based on weather data. The result is a refrigeration system that thinks ahead rather than simply reacting to temperature changes.
Compressor vs. Thermoelectric: Which Technology Wins for Van Dwellers?
For solar-powered van life, compressor technology has decisively won the battle. Thermoelectric coolers, while cheaper and lighter, suffer from three fatal flaws: they can only cool to about 20°F below ambient temperature, consume 3-5 times more power per degree of cooling, and lack the insulation depth needed for efficient operation. In a 90°F van interior, a thermoelectric unit might maintain 70°F at best—hardly food-safe temperatures.
Compressor coolers, conversely, function as true refrigerators, using refrigerant cycles to achieve sub-freezing temperatures regardless of ambient conditions. The latest DC compressors operate on as little as 35 watts during steady-state cooling, roughly equivalent to a single LED light strip. This efficiency means a 100Ah lithium battery can power a 45-liter compressor cooler for 3-5 days without any solar input, whereas a thermoelectric unit would drain the same battery overnight. The initial cost difference pays for itself in reduced solar panel and battery requirements.
Power Requirements and Solar Integration
Calculating Your Daily Energy Consumption
Before selecting any cooler, you must understand its true energy appetite. Manufacturers’ “average power consumption” figures are often optimistic, based on 70°F ambient temperatures and minimal door openings. For realistic planning, start with the cooler’s rated wattage and duty cycle. A typical 50-liter compressor cooler draws 45 watts when running, with a 30-40% duty cycle in moderate conditions. This translates to roughly 350-450 watt-hours per day.
However, van life introduces variables that dramatically increase consumption. Every door opening releases cold air and introduces warm, humid air that requires energy to condense and cool. Parking in direct sunlight can raise ambient temperatures inside your van to 120°F, potentially doubling the compressor’s duty cycle. Add 20% buffer for inverter losses if you’re running AC power, though direct DC connection eliminates this penalty. Smart nomads calculate based on worst-case scenarios—plan for 600 watt-hours daily in summer conditions to avoid power anxiety.
Matching Battery Capacity to Cooler Demand
Your battery bank is the heart of your solar refrigeration system, and lithium iron phosphate (LiFePO4) has become the undisputed champion for van life in 2026. Unlike lead-acid batteries that suffer capacity loss when discharged beyond 50%, lithium batteries deliver 90-95% of their rated capacity even under heavy loads. For a cooler consuming 500 watt-hours daily, you’ll need at least a 100Ah lithium battery to survive a single cloudy day, but this leaves no margin for other essential loads.
The golden rule is sizing for 2-3 days of autonomy without solar input. This means a 200-300Ah lithium bank for a single cooler, ensuring you can weather multi-day storms while still powering lights, fans, and device charging. Consider battery cycle life too—a 200Ah premium lithium battery rated for 3,000 cycles at 80% depth of discharge will outlast your van conversion, costing pennies per cycle over its lifetime. Never size your battery based on best-case scenarios; the wilderness doesn’t care about your spreadsheet optimism.
Solar Panel Sizing for Off-Grid Reliability
Oversizing your solar array is the cheapest insurance policy for reliable refrigeration. While a 100-watt panel might theoretically produce 500 watt-hours on a perfect day, real-world conditions tell a different story. Panel tilt, partial shading from roof racks, dust accumulation, and suboptimal sun angles can reduce actual harvest by 30-50%. For a cooler requiring 500 watt-hours daily, target 300-400 watts of solar capacity to ensure consistent performance year-round.
Monocrystalline panels with PERC (Passivated Emitter and Rear Contact) technology have become the van life standard, offering superior low-light performance critical for early morning and late afternoon charging. Consider split arrays—two 200-watt panels wired in parallel rather than a single 400-watt panel—to minimize shading losses. Your refrigerator doesn’t care about peak power at noon; it needs consistent charging from dawn to dusk to replenish overnight battery drain.
MPPT vs. PWM Charge Controllers for Cooler Systems
The choice between MPPT (Maximum Power Point Tracking) and PWM (Pulse Width Modulation) charge controllers directly impacts your cooler’s performance. MPPT controllers extract 20-30% more power from your panels by continuously optimizing voltage-current relationships, particularly valuable during low-light conditions when your cooler is already drawing power. For a 300-watt solar array, the $150 premium for MPPT technology pays for itself in faster battery recovery and extended compressor runtime.
PWM controllers, while cheaper, essentially throttle your panels to battery voltage, wasting excess voltage as heat. This inefficiency becomes pronounced with higher-voltage panels, where an MPPT controller can convert 18V panel output to optimal 14.4V charging while delivering full wattage. For refrigerator loads that run 24/7, every wasted watt compounds into significant energy loss. In 2026, many premium charge controllers now include load terminals with programmable low-voltage disconnect specifically designed for refrigerators, adding an extra layer of battery protection.
Essential Features That Define Quality
Insulation R-Values and Thermal Efficiency
A cooler’s insulation quality determines how hard the compressor must work, directly impacting power consumption. Premium van-life coolers in 2026 achieve R-8 to R-10 insulation values through vacuum-insulated panels (VIPs) combined with high-density polyurethane foam. This is roughly double the insulation of consumer-grade coolers, explaining why quality units can maintain freezing temperatures while using less power than a laptop.
The thickness of insulation matters more than marketing claims. Open the lid and measure—3 inches of wall thickness typically indicates R-8 performance, while 4 inches suggests R-10 or better. Pay attention to the lid seal quality; magnetic gaskets with compression locks prevent air infiltration far better than simple friction seals. Some manufacturers now incorporate thermal breaks in the lid hinge design, preventing metal components from creating thermal bridges that bleed cold. Remember, every degree of temperature maintenance saved is a watt-hour preserved.
Temperature Range and Climate Class Ratings
Understanding climate class ratings helps match a cooler to your travel ambitions. The European N-T (Normal-Tropical) rating system has become the global standard, with N-T rated units guaranteed to maintain safe temperatures in ambient conditions up to 109°F. For desert dwellers, SN-T (Sub-Normal to Tropical) ratings extend this to 115°F ambient, while ST (Sub-Tropical) ratings cover 90-100°F ranges typical of temperate climates.
Temperature range flexibility matters beyond just cooling. The ability to reach -8°F transforms your cooler into a freezer for long-term food storage, invaluable for remote basecamping. Dual-mode units that function as either refrigerator or freezer offer maximum versatility, though this flexibility often comes at the cost of slightly higher power consumption. Check the control panel’s precision—digital thermostats with 1°F increments allow fine-tuning that analog dials can’t match, preventing unnecessary compressor cycles from overshooting target temperatures.
Dual-Zone Versus Single-Zone Configurations
The dual-zone versus single-zone debate hinges on your culinary style and power budget. Dual-zone coolers feature separate compartments with independent temperature control, essentially giving you a fridge and freezer in one unit. This eliminates the need for two separate coolers but introduces complexity—a 50-liter dual-zone unit typically offers only 35 liters of refrigeration space when the freezer section is active, as the divider consumes volume and the freezer’s heat load affects the entire cabinet.
Single-zone coolers maximize internal volume and efficiency, using every liter for a single temperature setting. For many van lifers, a single-zone cooler set to 35°F paired with a small, dedicated freezer unit proves more practical than a compromised dual-zone design. Consider your shopping habits—if you buy fresh produce weekly and freeze meals in batches, separate units allow independent power management. If you primarily refrigerate with occasional ice cream storage, a dual-zone’s convenience might justify its premium price and power demands.
Low-Voltage Cutoff Protection Explained
Your battery’s lifespan depends on preventing deep discharge, and your cooler’s low-voltage cutoff (LVC) is the first line of defense. Quality solar-ready coolers offer programmable LVC settings—typically 10.5V, 11.1V, and 11.7V for 12V systems. The critical insight is that these voltages must correspond to your battery chemistry. For lithium batteries, 11.7V represents approximately 20% state of charge, while the same voltage on a lead-acid battery indicates near-total depletion.
Beware of coolers with fixed LVC settings at 10.5V, which protect the cooler but murder your battery. The best units feature hysteresis in their cutoff logic, meaning they won’t restart until voltage recovers to a safe threshold, preventing rapid cycling that damages both cooler and battery. Some advanced models communicate with external battery monitors via Bluetooth, shutting down based on true state-of-charge percentages rather than voltage alone, which eliminates the voltage sag false alarms that occur under heavy loads.
Bluetooth/WiFi Connectivity and Smart Monitoring
Connectivity has evolved from gimmick to essential tool for power management. Modern cooler apps don’t just display temperature; they provide historical power consumption graphs, compressor duty cycle analysis, and predictive battery life calculations based on current drain. This data transforms guesswork into precision energy management, letting you adjust cooler settings proactively rather than discovering a dead battery at midnight.
The real value lies in integration. Coolers that connect to broader van monitoring systems like Victron or Renogy platforms allow centralized control of your entire electrical ecosystem. Imagine your battery monitor automatically signaling the cooler to enter eco-mode when solar harvest drops below a threshold, or receiving alerts on your phone when door seals fail and consumption spikes. In 2026, API-level integration between cooler manufacturers and power system brands has become common, creating cohesive off-grid living solutions rather than isolated appliances.
Installation and Space Optimization
Permanent vs. Portable Mounting Solutions
How you mount your cooler affects both efficiency and convenience. Permanent installations, where the cooler slides into a dedicated cabinet with proper ventilation, maximize thermal performance by protecting the unit from ambient temperature swings and direct sunlight. Built-in mounting also secures the cooler against rough roads, preventing compressor damage from vibration and keeping contents organized during travel.
Portable mounting offers flexibility for outdoor kitchen setups and easy removal for cleaning or vehicle switching. However, portable units face challenges—sitting on the van floor exposes them to radiant heat from the drivetrain, while placement near doors introduces warm air influx. The hybrid approach gaining popularity uses sliding drawer systems that secure the cooler permanently while allowing full extension outside the van for access. Whichever method you choose, ensure the compressor side maintains 4-6 inches of clearance for airflow, and never enclose the unit completely without active ventilation.
Ventilation Requirements for Longevity
Your cooler’s compressor generates heat—heat that must dissipate or it will reflect back into the cooling system, creating a vicious cycle of inefficiency. Side-venting compressors require a minimum of 50 square inches of unrestricted airflow, ideally ducted to draw cool air from near the floor and exhaust hot air upward and outward. Rear-venting units need even more attention, as van walls can reflect heat back into the condenser coils.
Passive ventilation through louvered panels works for moderate climates, but active cooling becomes essential in hot weather. Some van builders install 12V computer fans triggered by temperature sensors near the compressor, creating forced-air cooling that activates only when needed. This adds negligible power draw but can improve compressor efficiency by 15-20% in extreme heat. Pay special attention to the condenser fins—keep them clean and unobstructed, as a layer of dust acts like a thermal blanket, forcing the compressor to work harder and consume more precious solar power.
Wiring Best Practices to Avoid Voltage Drop
Voltage drop is the silent killer of cooler performance, turning a perfectly sized system into a frustrating underperformer. For every 1% voltage drop, compressor efficiency decreases by approximately 2%, and at 5% drop, many coolers will refuse to start. The solution is simple but often ignored: use oversized wire and keep runs short. For a 10-foot wire run carrying 5 amps (typical for a running compressor), 12 AWG wire limits drop to 3%, while 10 AWG achieves under 2%.
Always wire coolers directly to the battery bus bar or distribution panel, never through cigarette lighter sockets that introduce resistance and intermittent connections. Install a dedicated fuse within 12 inches of the power source—coolers can draw 8-10 amps during startup, requiring a 15A fuse minimum. Crimped and heat-shrunk connections are non-negotiable; vibration will loosen screw terminals over time. For redundancy, some veteran van lifers run dual power feeds through separate breakers, ensuring a single point of failure doesn’t leave them with a warm cooler and spoiled food in the backcountry.
Real-World Performance Factors
Ambient Temperature Impact on Efficiency
Laboratory efficiency ratings mean little when your van interior becomes a solar oven. For every 18°F increase in ambient temperature above 70°F, compressor duty cycle increases by approximately 25%. This means a cooler rated at 400 watt-hours daily in temperate conditions might consume 700+ watt-hours when ambient temperatures hit 95°F inside your van. The solution isn’t just more solar—it’s thermal management of the cooler environment.
Strategic placement makes a tremendous difference. Installing your cooler on the shaded side of the van, away from windows and heat sources, can reduce ambient exposure by 15-20°F. Some van lifers build insulated enclosures around their coolers, essentially creating a mini-fridge within their van that stabilizes temperature swings. Others use reflective insulation panels on nearby windows during peak sun hours. Remember, your cooler is fighting a battle against its environment; every degree you remove from that equation is energy saved for other needs.
Altitude Performance Considerations
High-altitude camping presents unique challenges for compressor coolers. As atmospheric pressure drops, refrigerant efficiency decreases, and compressor motors must work harder to achieve the same pressure differentials. Most modern compressors are altitude-compensated up to 10,000 feet, but performance degradation becomes noticeable above 8,000 feet, with power consumption increasing 10-15%. The compressor’s lubrication system also faces challenges—oil return becomes less reliable, potentially shortening lifespan in extreme elevations.
If your adventures regularly take you above 8,000 feet, select coolers specifically rated for high-altitude operation. These units feature modified compressor tuning and enhanced oil return paths. Consider slightly oversizing your solar array for mountain trips, as both cooler efficiency and panel output (due to cooler temperatures) are affected. Some experienced high-altitude nomads run their coolers on a slightly higher temperature setting when camped above 8,000 feet, trading a few degrees of cold for significant power savings and reduced compressor strain.
Noise Levels and Sleep Quality
That gentle hum you barely notice at a trailhead becomes a sleep-disrupting drone when your bed is three feet from the compressor. Quality coolers in 2026 operate at 35-45 decibels—roughly the sound of a library—but this assumes proper installation. Hard mounting directly to van structure can transmit vibrations, amplifying noise through resonance. Isolating the cooler with rubber mounting feet or foam padding can reduce perceived noise by 50%.
Pay attention to compressor startup sounds, which are typically 10-15 decibels louder than running noise. Some units feature soft-start technology that gradually ramps compressor speed, eliminating the jarring “click-hum” that wakes light sleepers. Location matters—mounting the cooler in a rear garage area rather than the main living space creates a natural sound barrier. For the noise-sensitive, consider running the cooler on eco-mode overnight, which sacrifices temperature precision for whisper-quiet operation and reduced power draw when solar charging is unavailable.
Maintenance and Longevity
Defrosting Protocols and Condensation Management
Frost buildup on evaporator coils acts as insulation, forcing the compressor to run longer cycles. Manual defrost models require weekly attention in humid climates, while auto-defrost units consume extra power during defrost cycles but maintain consistent efficiency. The sweet spot for van life is adaptive defrost, which monitors frost accumulation and initiates cycles only when necessary, typically every 3-5 days.
Condensation management is equally critical. Every door opening introduces humid air that condenses on cold surfaces, creating puddles that can rust your van’s floor. Quality coolers channel condensate to external drains, but you must route this water outside the vehicle. Some van lifers install small collection bottles with float sensors that alert when emptying is needed. Others route drain lines through the floor to a small evaporation tray underneath. In freezing conditions, ensure drain lines are insulated or heated to prevent ice blockages that can cause internal water damage.
Battery Health Preservation Strategies
Your cooler’s relationship with your battery bank is symbiotic—abuse one and both suffer. The most critical practice is avoiding short cycling, where the compressor starts and stops rapidly due to voltage fluctuations. This occurs when battery voltage sags under load, hits the LVC, then immediately recovers when the load drops. Program your LVC to the highest tolerable setting (11.7V for lithium) and ensure your battery bank is large enough that voltage remains stable during compressor startup.
Temperature compensation matters too. Cold batteries have higher internal resistance, making voltage sag worse. If you camp in freezing conditions, insulate your battery compartment and consider a heating pad that activates below 40°F. Conversely, hot batteries degrade faster—keep them below 80°F whenever possible. Some advanced setups use the cooler’s waste heat to warm batteries in winter, creating an elegant thermal management loop. Monitor battery health through a shunt-based monitor that tracks amp-hours and state of charge, not just voltage, for accurate cooler shutdown timing.
Budget Considerations and Total Cost of Ownership
Initial Investment vs. Long-Term Savings
Sticker shock is real—a premium solar-ready cooler can cost 5-10 times more than a basic ice chest. But the total cost equation favors quality when you factor in ice purchases ($5-10 daily in summer), food spoilage, and the hidden cost of oversizing your solar system to support an inefficient unit. A $800 efficient cooler might save $1,500 annually in ice and wasted food while requiring 200 fewer watts of solar capacity, representing another $400-600 savings in panels and batteries.
Calculate the payback period based on your usage pattern. Full-time van dwellers typically see ROI within 12-18 months, while weekend warriors might stretch to 3-4 years. However, the intangible benefits—always-cold beverages, safe food storage in remote areas, and elimination of ice runs—carry value beyond dollars. Consider refurbished units from reputable manufacturers, which often include full warranties at 60-70% of retail price. The key is avoiding budget compressors with unknown brands and unrealistic efficiency claims; these false economies fail prematurely and cost more in the long run.
Warranty Coverage and What It Actually Means
A 5-year warranty sounds impressive until you read the fine print excluding “mobile or vehicular use.” Most cooler warranties are written for stationary RV or marine applications, and van life’s constant vibration can void coverage. Seek manufacturers with specific van life or overlanding warranties that explicitly cover vibration-related failures. Understand what “compressor warranty” means—some cover only the compressor, not the associated electronics or refrigerant system, which can be equally expensive to repair.
Consider the practicalities of warranty service. A company requiring you to ship a 50-pound cooler to a service center at your expense can turn a warranty claim into a $200 ordeal. Brands with field-serviceable compressors and modular electronics allow you to swap components yourself, a huge advantage when you’re camped in Baja. Some premium manufacturers now offer “van life support programs” with expedited shipping to general delivery addresses and video-call troubleshooting. The best warranty is one you’ll never need, but the second-best is one you can actually use without derailing your travels.
Legal and Safety Considerations
Electrical Code Compliance for DIY Installations
Even in a van, electrical safety matters. The NEC (National Electrical Code) Article 551 covers RV electrical systems, and while not legally binding on DIY van conversions, its principles prevent fires. Use marine-grade tinned copper wire, not automotive primary wire, as it’s rated for higher temperatures and resists corrosion. Every circuit requires proper overcurrent protection—coolers need dedicated fuses, not shared circuits with other loads.
Grounding philosophy differs in vehicles versus buildings. Your van’s 12V negative bus should bond to the chassis at a single point, preventing ground loops that can cause erratic cooler behavior and galvanic corrosion. If you install AC inverters for cooler operation, GFCI protection is mandatory for any outlet within 6 feet of water sources. Document your wiring with diagrams and keep spare fuses accessible. Some insurance companies now require electrical inspections for converted vans; following code principles ensures coverage validity if the unthinkable happens.
Frequently Asked Questions
How many solar panels do I realistically need to run an electric cooler full-time?
For a typical 45-50 liter compressor cooler consuming 400-600 watt-hours daily, plan for 300-400 watts of solar panels in moderate climates. This accounts for panel inefficiencies, partial shading, and reduced winter sun angles. Desert dwellers facing extreme heat should size up to 500 watts, while temperate forest campers might manage with 250 watts if parking in sunny clearings.
Can I run my cooler directly from solar panels without a battery?
No, this is not recommended. Solar panel output fluctuates with cloud cover and sun angles, causing voltage instability that can damage the cooler’s compressor controller. Batteries act as buffers, providing stable voltage and power during low-light conditions. Some experimental setups use supercapacitor banks for direct solar operation, but these remain unreliable for 24/7 refrigeration.
What’s the difference between a “solar cooler” and a regular 12V cooler with solar panels?
“Solar cooler” is largely marketing terminology. True solar optimization involves efficient power management, low-voltage cutoff protection, and adaptive compressor control. A regular 12V cooler connected to solar may work but lacks these refinements, potentially consuming 30-40% more power and offering no protection against battery damage. Focus on efficiency ratings rather than solar-specific branding.
How long will a 100Ah lithium battery run my cooler?
In moderate conditions, a 100Ah lithium battery (1280 watt-hours usable) will power an efficient 50-liter cooler for 2-3 days without solar input. In extreme heat with frequent door openings, expect 1-2 days. This assumes no other loads and a battery in good health. Always plan for 50% more capacity than calculated needs to account for battery aging and unexpected conditions.
Are thermoelectric coolers ever viable for solar van life?
Only for very specific use cases: short weekend trips, mild climates, and supplemental cooling rather than primary refrigeration. A thermoelectric unit might keep drinks cool while a main compressor cooler handles food. For full-time van life or freezing temperatures, thermoelectric technology wastes too much power and cannot achieve safe food storage temperatures in hot weather.
Do I need a pure sine wave inverter to run my cooler?
If your cooler has a native 12V DC input, never run it through an inverter—this adds 10-15% efficiency loss. For AC-only coolers, a pure sine wave inverter is mandatory. Compressor motors on modified sine wave power run hotter, consume more energy, and suffer premature failure. The cost difference is negligible compared to replacing a burned-out compressor.
How do I prevent my cooler from draining my starter battery?
Use a DC-DC charger with integrated low-voltage disconnect, or wire your cooler through a battery isolator that separates house and starter batteries. Never connect solar coolers directly to your vehicle’s main battery. Some modern vans feature “auxiliary battery” circuits with automatic isolation, but verify amperage ratings—cooler startup surges can exceed these limits.
Can I install my cooler on its side to save space?
Never operate a compressor cooler on its side. The compressor’s oil lubrication system relies on gravity, and sideways operation causes oil starvation and immediate failure. Some units allow 30-degree tilt for short periods, but sustained operation requires level placement within 5 degrees. Consider a slide-out drawer system if space is tight, ensuring the cooler remains horizontal when in use.
What maintenance does a solar-powered cooler require?
Monthly cleaning of condenser coils with compressed air or a soft brush prevents efficiency loss. Check door seal integrity quarterly by closing the lid on a dollar bill—if you can pull it out easily, the seal needs replacement. Annually inspect wiring connections for corrosion and tighten mounting hardware. Auto-defrost models need drain line cleaning to prevent clogs. The compressor itself is sealed and requires no service.
How do I size my solar system if I want to add a second cooler later?
Design your electrical system for expansion from day one. Size your solar array and battery bank for 150% of current needs, allowing headroom for a second cooler or other loads. Use bus bars and fuses rated for double your initial current draw, and run conduit large enough for additional wires. Adding a second cooler later is far cheaper when your infrastructure is pre-sized, avoiding a complete system rebuild.
See Also
- 10 Electric Coolers for Van Life Plugging Into 110V Campsites
- Stop Buying Ice: 10 Solar Electric Coolers for Overland Adventures
- 10 Game-Changing Electric Coolers for Solar-Powered Campsites in 2026
- 10 Electric Coolers for Solar-Powered Campsites That Skip Ice Altogether
- 10 Must-Have Electric Coolers for Off-Grid Camping Without Ice in 2026