Table of Contents
Shoulder pain has become the silent epidemic plaguing modern backpackers, with studies showing that up to 68% of long-distance hikers experience chronic shoulder strain that persists for months after their adventures. The irony? Much of this suffering stems from the very equipment designed to make carrying easier—traditional internal-frame backpacks that, while supportive, often create pressure points, restrict natural movement, and encourage poor loading mechanics that cascade into debilitating pain. As we enter 2026, the outdoor industry has undergone a radical transformation, with frameless backpacks evolving from minimalist curiosities into sophisticated, pain-preventing tools that work with your body’s natural biomechanics rather than against them.
This comprehensive guide dismantles everything you thought you knew about backpack design and reveals how the latest frameless innovations can eliminate shoulder pain for good. We’re not just talking about shaving ounces—we’re exploring engineered load distribution, anatomically adaptive materials, and smart packing strategies that transform the way weight interacts with your shoulders. Whether you’re a seasoned thru-hiker battling recurring impingement or a weekend warrior looking to prevent the dull ache that ruins Monday mornings, understanding these principles will revolutionize your time on trail.
Top 10 Frameless Backpacks
Detailed Product Reviews
1. Teton 65L Explorer Internal Frame Backpack for Hiking, Camping, Backpacking, Rain Cover Included, Black

Overview: The Teton 65L Explorer is a versatile internal frame backpack designed for multi-day adventures. With a generous 65-liter capacity, it targets both novice and experienced hikers seeking feature-rich performance without premium pricing. The pack includes essential amenities like a built-in rain cover and hydration reservoir pocket, positioning it as a reliable workhorse for backcountry travel.
What Makes It Stand Out: This pack excels with its multi-position torso adjustment system that accommodates medium to tall adventurers seamlessly. The open-cell foam lumbar pad with molded channels delivers exceptional airflow and comfort during long miles. Thoughtful organization includes a dedicated sleeping bag compartment, multi-directional compression straps, and strategically placed pockets that eliminate packing guesswork. The “Teton Tough” construction philosophy emphasizes durability at a budget-conscious price point.
Value for Money: Competing with packs costing twice as much, the Explorer 65L represents exceptional value. Comparable offerings from premium brands like Osprey or Gregory typically start at $200+ for similar capacity and features. While materials may not match ultralight standards, the robust build quality and included rain cover ($20-30 value) make this a smart investment for budget-minded backpackers who prioritize functionality over brand prestige.
Strengths and Weaknesses: Pros: Highly adjustable torso fit; excellent lumbar support and ventilation; comprehensive feature set; included rain cover; accessible price point; strong customer support reputation. Cons: Heavier than premium alternatives (approximately 5.5 lbs); fabric durability concerns under extreme abuse; hip belt padding could be more substantial for loads exceeding 40 pounds; limited color options.
Bottom Line: The Teton 65L Explorer is an outstanding entry-to-intermediate pack that delivers 90% of premium performance at half the cost. Ideal for weekend warriors and developing backpackers, it earns a strong recommendation for those prioritizing value and features over ultralight weight.
2. VentaPak Lightweight Ventilation Backpack Spacer - Frame for Hiking, Commuting & Biking Backpacks - Large Mesh Ventilation, Rucksack Frames for Improved Airflow Reduced Sweat

Overview: The VentaPak is an innovative external frame system that retrofits to existing backpacks, creating critical space between your back and pack for enhanced airflow. Available in two sizes, this aluminum-and-mesh spacer addresses a universal problem: back sweat. It transforms any standard pack into a ventilated performance carrier, making it ideal for commuters, cyclists, and hikers who struggle with heat buildup.
What Makes It Stand Out: This product’s genius lies in its universal compatibility and biomechanical benefits. The reinforced aluminum structure redistributes weight horizontally rather than vertically, reducing spinal compression and improving posture. Featured by major media outlets, its breathable mesh design creates a 1.5-inch ventilation channel that dramatically reduces perspiration. The two-year warranty demonstrates manufacturer confidence in durability claims.
Value for Money: At approximately $60-70, the VentaPak offers compelling value compared to purchasing a new ventilated backpack ($150+). For commuters using existing laptop bags or students with school packs, it extends gear life while adding performance benefits. The posture-improving weight distribution may prevent costly back issues, making it a prudent health investment beyond mere comfort.
Strengths and Weaknesses: Pros: Universal fit for most packs; immediate sweat reduction; improved posture and weight distribution; lightweight (under 1 lb); durable aluminum construction; two-size options; media-validated design. Cons: Adds slight bulk to pack profile; may not secure perfectly on all pack shapes; initial adjustment learning curve; questionable stability with extremely heavy loads; premium price for an accessory.
Bottom Line: The VentaPak is a game-changer for anyone battling back sweat or discomfort with their current backpack. While not essential for ultralight hikers with ventilated packs, it’s a transformative upgrade for commuters, students, and traditional backpack users seeking immediate relief without replacing their entire bag.
3. TIMBER RIDGE Aluminum External Frame Hiking Backpacks with Adjustable Height, Lightweight & Foldable for Camping, Hiking, Travel, Outdoor
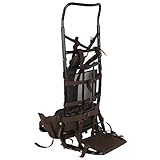
Overview: The TIMBER RIDGE external frame backpack revives a classic design with modern materials and adjustability. Built around a premium aluminum frame, this pack emphasizes modularity and load stability for extended backcountry trips. Its foldable design and adjustable height make it versatile for various body types and storage needs, appealing to traditionalists who value organization and gear accessibility over minimalist trends.
What Makes It Stand Out: The external frame’s superior load transfer to hips sets this apart from internal frame competitors, making heavy loads (50+ lbs) feel significantly lighter. The mesh back panel provides unmatched ventilation, while the foldable aluminum frame packs flat for travel. Its modular design allows unlimited attachment of external gear, sleeping bags, and additional pockets. Extra-thick padded shoulder straps and waist belt demonstrate serious attention to comfort under load.
Value for Money: Priced competitively around $80-100, this pack undercuts both vintage external frame models and modern internal frame alternatives. While heavier than ultralight options, the durability and load-carrying efficiency justify the weight penalty for basecamp-style adventures. The included features rival $200+ expedition packs, making it an excellent value for hunters, scouts, and gear-intensive travelers.
Strengths and Weaknesses: Pros: Exceptional load distribution for heavy weights; superior ventilation; highly customizable attachment system; adjustable height for multiple users; foldable for storage; robust aluminum construction; thick padding. Cons: Heavier than modern internal frame designs; bulky profile unsuitable for dense brush; limited interior organization; not ideal for lightweight backpacking; aesthetics may feel dated.
Bottom Line: The TIMBER RIDGE external frame pack is a specialized tool for heavy-load adventures where comfort and organization trump weight concerns. Perfect for hunters, winter campers, and gear haulers, it’s less suited for trail hikers seeking sleek profiles. A niche but excellent performer within its design parameters.
4. Teton 55L Scout Internal Frame Backpack for Hiking, Camping, Backpacking, Travel, Rain Cover Included, Olive

Overview: The Teton Scout 55L scales down the proven Explorer formula into a more compact, agile package ideal for weekend trips and lighter loads. Targeting the same value-conscious adventurers, this internal frame pack maintains core features like torso adjustment and integrated rain cover while shedding weight and bulk. The olive colorway offers tactical aesthetics that appeal to scouts and military-style outdoor enthusiasts.
What Makes It Stand Out: The Scout’s sweet spot is its capacity-to-weight ratio, delivering 55 liters of organized storage in a sub-5-pound package. Its multi-position torso adjustment grows with younger users, making it perfect for scouts or families sharing gear. The molded foam lumbar system and ventilation channels punch above its price class. The sleeping bag compartment and compression straps provide expedition-level organization in a smaller footprint.
Value for Money: At roughly $10-20 less than its 65L sibling, the Scout offers proportional value for shorter adventures. It competes directly with REI’s Trail series and Osprey’s Talon line at 40-50% cost savings. The included rain cover and hydration compatibility eliminate immediate upgrade needs, representing a complete solution for under $80. For 2-3 day trips, it avoids the over-packing temptation of larger packs.
Strengths and Weaknesses: Pros: Lightweight for capacity; excellent adjustability for growing teens; superior ventilation; complete feature set; durable construction; included rain cover; scout-friendly design. Cons: Hip belt less padded than premium brands; main compartment access is top-only; water bottle pockets could be deeper; not suitable for extended expeditions; zippers occasionally snag under full compression.
Bottom Line: The Teton Scout 55L is the ideal starter pack for youth groups, weekend warriors, and budget-minded hikers. It sacrifices minimal performance for significant cost savings, making it a top recommendation for anyone whose adventures rarely exceed three days. A smarter choice than oversized packs for most recreational users.
5. Mardingtop 60L Military Internal Frame Backpack for Hiking,Camping,Hunting,Rucksack Backpack with Rain Cover
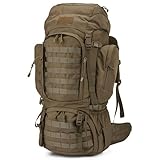
Overview: The Mardingtop 60L backpack merges military-tactical aesthetics with backpacking functionality, creating a versatile hybrid for outdoor enthusiasts who appreciate modular webbing and rugged construction. Built from 600D polyester with YKK hardware, this pack prioritizes durability and customization. Its 60-liter capacity and airline-compliant dimensions make it suitable for both wilderness expeditions and international travel.
What Makes It Stand Out: The MOLLE webbing system transforms this from a simple pack into a customizable load-bearing platform, allowing attachment of pouches, gear, and accessories. The versatile hydration compartment accommodates either a 3-liter bladder or 15.6-inch laptop, bridging outdoor and urban use. A zippered divider separates sleeping gear from main cargo, while multiple external pockets provide tactical-level organization. YKK zippers ensure reliability under field conditions.
Value for Money: Competing tactical packs from 5.11 or Maxpedition cost $150-200+, making the Mardingtop’s sub-$100 price point highly attractive. The 600D polyester construction offers military-grade durability without civilian-market markup. For hunters, airsoft players, and travelers wanting tactical versatility, it delivers 85% of premium brand performance at 50% cost. The included rain cover adds further value to an already competitive package.
Strengths and Weaknesses: Pros: MOLLE customization; durable 600D polyester; YKK hardware; versatile hydration/laptop compartment; airline-compliant size; sleeping bag divider; tactical aesthetics; competitive price. Cons: Heavier than dedicated hiking packs; ventilation inferior to Teton’s molded lumbar systems; military styling not for everyone; load distribution less refined than premium brands; limited torso adjustability.
Bottom Line: The Mardingtop 60L excels for users wanting tactical flexibility without sacrificing backpacking fundamentals. Ideal for hunters, military enthusiasts, and travelers needing modular organization, it’s less suited for ultralight purists. A robust, versatile pack that bridges tactical and outdoor markets effectively at an accessible price.
6. Teton 65L Explorer Internal Frame Backpack for Hiking, Camping, Backpacking, Rain Cover Included, Graphite

Overview: The Teton 65L Explorer delivers serious backpacking capability without the premium price tag. This internal frame pack balances comfort, durability, and thoughtful organization for multi-day adventures. With torso adjustment accommodating various body types and a generous 65-liter capacity, it’s designed for both novice backpackers testing the trails and seasoned veterans needing reliable gear that won’t break the bank.
What Makes It Stand Out: What truly distinguishes this pack is its exceptional feature set at an entry-level price point. The multi-position torso adjustment system ensures a custom fit for medium and tall adventurers alike, while the open-cell foam lumbar pad with molded channels provides superior airflow. The inclusion of a rain cover, hydration pocket, and large sleeping bag compartment demonstrates Teton’s commitment to completeness—no aftermarket purchases necessary.
Value for Money: Competing packs with similar features typically cost 50-100% more from premium brands. The Explorer series offers three size options (65L, 75L, 85L) at a budget-friendly price, making it accessible for beginners unwilling to invest heavily upfront. The durable construction and Teton’s responsive customer support translate to years of reliable service, delivering outstanding long-term value for casual to moderate backpackers.
Strengths and Weaknesses:
- Strengths: Excellent price-to-feature ratio; adjustable torso fit; included rain cover; comfortable lumbar support; multiple compression straps; strong customer service
- Weaknesses: Heavier than ultralight alternatives; fabric durability concerns under extreme conditions; limited color options; shoulder straps may feel stiff initially
Bottom Line: For budget-conscious adventurers seeking a feature-complete, comfortable pack for weekend to week-long trips, the Teton 65L Explorer is an outstanding choice. It sacrifices some weight savings and premium materials for affordability, but delivers where it counts—reliable performance, comfort, and comprehensive features that get you outdoors without financial strain.
7. TR Aluminum External Frame Backpack with Adjustable Height for Extra Large Load Hunting Hiking Design, Camouflage

Overview: The TR Aluminum External Frame Backpack is built for serious hunters and expedition hikers who prioritize load-carrying capacity over minimalist weight. Its robust aluminum frame extends from 34 to 40 inches, designed to haul heavy gear or harvested game with stability. The Realtree Edge camouflage pattern and rugged 600D fabric make it ideal for backcountry hunting where durability and concealment are paramount.
What Makes It Stand Out: This pack’s standout feature is its game-hauling capability with three adjustable extended straps specifically designed for securing large loads. The external frame architecture provides superior weight distribution for heavy burdens that would overwhelm internal frame designs. Dual zipper pockets on the hip belt offer quick access to essentials without removing the pack, while the adjustable height system accommodates various torso lengths and load types.
Value for Money: External frame packs specialized for hunting typically command premium prices. The TR frame delivers comparable load-hauling performance at a mid-range price point, making it accessible to serious hunters on a budget. The durable aluminum construction and 600D fabric promise longevity under harsh conditions. While heavier than recreational packs, its specialized functionality for game transport justifies the investment for hunters who would otherwise need separate pack frames.
Strengths and Weaknesses:
- Strengths: Exceptional heavy-load capacity; adjustable frame height; camouflage pattern; robust aluminum construction; hip belt storage; game-hauling straps
- Weaknesses: Significantly heavier than internal frame packs; bulky profile limits maneuverability; not suitable for lightweight backpacking; limited versatility for non-hunting use
Bottom Line: This is a specialized tool for hunters and expedition hikers carrying extreme loads. If you need to pack out game or haul 50+ pounds of gear regularly, the TR Aluminum Frame delivers unparalleled support and value. For general backpacking or ultralight pursuits, look elsewhere. It’s a niche workhorse that excels at its intended purpose.
8. Teton 55L Scout Internal Frame Backpack for Hiking, Camping, Backpacking, Travel, Rain Cover Included, Black

Overview: The Teton 55L Scout scales down the proven Explorer formula into a more compact, travel-friendly package. This internal frame backpack hits the sweet spot for weekend warriors and light packers who need versatility without excess bulk. Offering the same adjustable torso system and comfort features as its larger sibling, the Scout adapts seamlessly from backcountry trails to international hostel hopping, making it ideal for adventurers who value flexibility.
What Makes It Stand Out: The Scout’s versatility shines through its Goldilocks capacity—spacious enough for 3-4 day trips yet compact enough for airline carry-on compliance on many carriers. It inherits Teton’s exceptional value proposition: multi-position torso adjustment, open-cell foam lumbar pad, and molded airflow channels typically found in premium packs. The thoughtful compartment layout includes a dedicated sleeping bag area and hydration compatibility, proving that downsizing doesn’t mean sacrificing features.
Value for Money: With pricing nearly identical to the 65L model, the Scout offers slightly better value for those who don’t need maximum capacity. You’re getting the same robust construction, included rain cover, and lifetime-worthy design at a budget price that undercuts competitors by 40-60%. For travelers and hikers who prioritize versatility over sheer volume, this represents one of the smartest gear investments in its class.
Strengths and Weaknesses:
- Strengths: Perfect capacity for most trips; airline-friendly size; identical comfort features to larger models; included rain cover; excellent organization; great value
- Weaknesses: Single main compartment access; hip belt pockets could be larger; no size options beyond 45/55/65L series; fabric not fully waterproof
Bottom Line: The Teton 55L Scout is the ultimate versatile pack for adventurers who split time between trails and travel. It delivers premium features and comfort at a bargain price, making few compromises beyond capacity. If your trips rarely exceed four days or you need one pack for both wilderness and urban exploration, the Scout is an unbeatable choice that punches well above its weight class.
9. Backpack Ventilation Frame Breathable Backpack Ventilation Spacer | Sweat-Free Back Support | Lightweight Mesh Design for Hiking, Travel Commuting

Overview: This innovative ventilation spacer transforms any backpack into a breathable, sweat-reducing system. Weighing just 200 grams, the 3D mesh panel creates a 2-centimeter air gap that lab tests show reduces back temperatures by 3-5°C. Designed for universal compatibility with 5-30 liter packs, it’s an aftermarket solution for commuters, hikers, and students plagued by back sweat. The aerospace-grade construction supports loads up to 30kg while redistributing 40% of shoulder pressure to the hips.
What Makes It Stand Out: Unlike traditional mesh back panels built into packs, this removable spacer offers unprecedented versatility—use it with your existing hydration pack, laptop bag, or daypack. The military-grade materials and triple-stitched seams deliver 1200N tear resistance, while the TPU frame maintains structure under heavy loads. Its 10-second installation and 5-year warranty demonstrate confidence in extreme durability, having been tested in Death Valley and Alaskan conditions.
Value for Money: At a fraction of the cost of a new high-end ventilated backpack, this spacer breathes new life into your current gear. For commuters and hikers who’ve invested in specialized packs lacking ventilation, it’s a cost-effective upgrade that rivals built-in systems costing hundreds more. The 5-year warranty and rugged construction ensure long-term value, making it a smart investment for anyone in hot climates or with active commutes.
Strengths and Weaknesses:
- Strengths: Universal fit; extremely lightweight; significant cooling effect; pressure redistribution; rugged construction; easy installation; 5-year warranty
- Weaknesses: Adds slight bulk to pack interior; may shift with dynamic movement; limited to 30L packs; premium price for an accessory; aesthetic mismatch with some packs
Bottom Line: If back sweat is your nemesis, this ventilation spacer is a game-changing accessory that outperforms expectations. It successfully bridges the gap between comfort and versatility, though it’s best suited for daypacks and commuting rather than technical backpacking. For the target user seeking relief without replacing their entire pack, it’s an excellent investment that delivers measurable cooling benefits.
10. Maelstrom Hiking Backpack,Camping Backpack,40L Waterproof Hiking Daypack with Rain Cover,Lightweight Travel Backpack,Green

Overview: The Maelstrom 40L Hiking Daypack positions itself as a lightweight, feature-rich option for day hikers and weekend campers. Constructed from rip-stop 210D nylon with water-resistant properties, this pack includes a bonus rain cover for complete weather protection. Its 40-liter capacity strikes a balance between minimalist daypacks and larger overnight packs, while the ergonomic design and multiple compartments cater to organized adventurers who refuse to compromise on comfort or functionality.
What Makes It Stand Out: Maelstrom packs thoughtful details into this budget-friendly offering: a dedicated wet pocket for separating damp gear, reflective safety signs, trekking pole attachments, and a headphone port for trail entertainment. The chest buckle doubles as a survival whistle—a clever safety feature rarely seen at this price. The pack’s airline-friendly dimensions and lightweight build make it equally suitable for international travel as for mountain trails, showcasing impressive versatility.
Value for Money: Competing 40L packs with similar feature sets typically cost 30-50% more. Maelstrom delivers premium touches like the wet pocket, multiple access points, and included rain cover at an entry-level price. While the 210D fabric isn’t expedition-grade, it’s adequate for most recreational use. For budget-conscious hikers wanting maximum functionality without the weight or cost of larger packs, this represents exceptional value.
Strengths and Weaknesses:
- Strengths: Lightweight design; included rain cover; wet pocket separation; reflective safety features; trekking pole holders; survival whistle buckle; headphone port; great price
- Weaknesses: Thinner fabric than premium brands; limited to 40L capacity; hip belt pockets are small; not ideal for loads over 25 pounds; hydration system not included
Bottom Line: The Maelstrom 40L is a feature-packed, lightweight daypack that excels for day hikes, light overnights, and travel. It cleverly maximizes utility while minimizing weight and cost, though it’s not built for heavy loads or extended expeditions. For casual hikers and travelers seeking organization and comfort at an unbeatable price, this pack delivers far more than its modest cost suggests.
Understanding Shoulder Pain and Backpack Design
The Biomechanics of Shoulder Strain
Your shoulder joint is a marvel of mobility but a vulnerability when overloaded. The glenohumeral joint relies on a delicate balance of rotator cuff muscles, tendons, and bursae to function smoothly. When a traditional backpack’s frame transfers weight directly to your shoulder straps, it creates concentrated pressure on the acromioclavicular (AC) joint and compresses the subacromial space. This mechanical stress initiates an inflammatory cascade, irritating the supraspinatus tendon and bursa, which manifests as that sharp, stabbing pain when you lift your arm or the deep, throbbing ache after a long day. Frameless designs circumvent this by eliminating rigid structure that forces unnatural load paths, instead allowing weight to settle into your body’s natural load-bearing centers.
Why Traditional Framed Packs Can Cause Problems
Internal frames were revolutionary in the 1990s, but their rigidity creates a fundamental mismatch with human anatomy. The aluminum or composite stays that define these packs transfer force linearly, while your shoulders move in three dimensions. This creates shear forces where straps dig into your trapezius muscles, and the frame’s stiffness prevents the pack from conforming to your spine’s natural curvature. The result? Hot spots, nerve compression, and the dreaded “shoulder slump” posture that weakens your scapular stabilizers over time. In 2026, we’ve recognized that for loads under 30 pounds, this outdated architecture causes more problems than it solves.
The Frameless Revolution: How Minimalism Helps
Frameless backpacks represent a paradigm shift: they prioritize dynamic load management over static support. By removing rigid structure, these packs become extensions of your body, moving with your natural gait and shifting weight micro-adjustments with each step. The absence of a frame eliminates the hard points that create pressure concentrations, instead distributing force across broader surface areas. Modern materials like dimensionally stable ripstop and reinforced dyneema composites provide just enough structure to prevent barreling without sacrificing the pliability that lets the pack mold to your unique torso shape. This anatomical conformity is the secret weapon against shoulder pain.
Key Features of Pain-Relieving Frameless Backpacks
Weight Distribution Systems
The most critical feature in any pain-preventing frameless pack is its load transfer mechanism. Look for designs that incorporate a floating liner system, where the pack bag connects to the harness through multiple anchor points that allow independent movement. This decouples the load from your shoulder straps, preventing the jarring impacts that irritate joints. Advanced models feature cantilevered strap attachments that position the pack’s center of gravity closer to your spine, reducing the moment arm that pulls backward on your shoulders. The best systems create a sensation that the pack is “hugging” your back rather than hanging from it.
Harness and Strap Engineering
Shoulder straps have evolved far beyond simple padded tubes. 2026’s leading designs feature multi-density foam layering—firmer base layers for structure with softer top layers for comfort—and strategic cutouts that relieve pressure on the brachial plexus nerve bundle. S-shaped curves that mirror your clavicle and scapula are non-negotiable for pain prevention. Some innovative designs incorporate adjustable strap angle mechanisms, allowing you to fine-tune the load vector based on your shoulder width and chest depth. The sternum strap has also been reimagined, with elasticized sections that provide give during deep breaths rather than restricting chest expansion.
Load Range Optimization
Every frameless pack has a “sweet spot” where it carries weight pain-free, typically between 15-25 pounds, though some advanced designs handle up to 30 pounds comfortably. Understanding a pack’s optimal load range is crucial—exceeding it forces the shoulder straps to bear weight they weren’t designed for, while under-loading prevents the pack from settling into its intended shape. Manufacturers now provide detailed load-range charts based on torso length and body type. The key is matching your typical gear weight to a pack’s engineered capacity, not just its maximum volume rating.
Material Flexibility and Body Conformity
The 2026 frameless pack market emphasizes materials with directional stretch and memory properties. Hybrid fabrics combining woven nylon with elastomeric threads allow the pack body to expand and contract with your breathing while maintaining dimensional stability under load. This “active conformity” means the pack adapts to your posture changes throughout the day, from upright hiking to forward-leaning scrambles. Look for packs with reinforced panels only where needed—along the spine and base—while keeping side panels supple to prevent rigidity that transfers force to your shoulders.
The 2026 Frameless Backpack Landscape
Emerging Technologies in Ultralight Design
This year’s breakthrough is the integration of micro-suspension systems within the pack fabric itself. Tiny silicone elastomer nodes woven into the material create millimeters of shock absorption that dramatically reduce peak forces on your shoulders. Another innovation is temperature-responsive foam in shoulder straps that softens in heat to prevent chafing and firms up in cold for better support. We’re also seeing the first generation of “smart” frameless packs with embedded sensors that provide real-time feedback on load distribution via a smartphone app, helping you adjust packing on the fly to maintain optimal weight balance.
Sustainability Meets Comfort
The shift toward recycled and bio-based materials hasn’t compromised pain-preventing performance. In fact, some of the most shoulder-friendly packs now use mycelium-based leather alternatives for strap reinforcements, which naturally conform to your body shape over time. Ocean-recycled polyester with mechanical stretch properties rivals virgin materials for comfort. The sustainability trend has also driven modular designs, allowing you to replace individual components like shoulder straps or back panels as they wear, ensuring consistent fit and pain prevention throughout the pack’s extended lifespan.
Customization Trends
2026’s market recognizes that one size never fits all when it comes to shoulder pain. Leading manufacturers now offer made-to-measure programs where you input 12 body measurements to receive a pack with custom strap angles, torso length, and load distribution geometry. For off-the-shelf options, look for packs with interchangeable harness systems and adjustable sternum strap rails that accommodate a 6-inch range of vertical adjustment. Some designs even feature removable padding inserts of varying densities, letting you fine-tune pressure distribution based on your unique shoulder anatomy.
How to Choose the Right Frameless Pack for Your Body
Measuring Your Torso Correctly
Forget the old “C7 vertebrae to iliac crest” method—it’s too simplistic for pain-free frameless packing. Instead, use the “functional torso length” measurement: sit in a chair with your back straight, measure from the base of your neck to the top of your hip bones while simulating a hiking posture. This accounts for how your spine compresses under load. Most 2026 packs offer torso adjustments in 0.5-inch increments rather than the old S/M/L sizing. A perfect fit means the pack’s shoulder strap attachment points align with your acromion processes, preventing the straps from sliding inward and compressing your neck.
Shoulder Strap Anatomy and Fit
The ideal shoulder strap width should match the distance between your neck and the edge of your shoulder muscle. Too wide, and the strap digs into your deltoid; too narrow, and it creates a pressure ridge on your trapezius. Test this by putting on the pack empty and tightening the straps—you should feel contact across the entire strap surface, not just the edges. The strap’s forward curve should start 2-3 inches from the attachment point, creating a pocket that accommodates your pectoral muscles without restricting arm swing. Women-specific designs have become more nuanced, accounting for varying clavicle angles and bust clearance through asymmetric strap shaping.
Hip Belt vs. Beltless: The Pain Prevention Debate
Here’s a controversial take: for loads under 20 pounds, a well-designed frameless pack without a hip belt often causes less shoulder pain than one with a poorly positioned belt. The reason? A hip belt that sits even slightly wrong forces the pack to pivot, increasing shoulder strap movement and friction. However, for loads approaching 30 pounds, a minimal 1-inch webbing belt with elastic inserts can stabilize the pack without the rigid structure that causes hip bruising. The 2026 consensus is “beltless for ultralight, minimal belt for transitional loads,” with the key being that any belt should be removable to maintain versatility.
Volume Considerations for Pain-Free Carrying
Bigger isn’t better when fighting shoulder pain. A pack that’s too large for your gear prevents proper load consolidation, allowing weight to shift and creating momentum that yanks on your shoulders. Conversely, an overstuffed pack loses its shape and transfers force unevenly. The pain-prevention sweet spot is choosing a volume where your gear fills 85-90% of capacity, using the remaining space for food and water. For most three-season hikers, this means 35-45 liters. Winter or specialized gear might push you to 50-55 liters, but beyond that, you’re entering framed-pack territory for shoulder health.
Packing Strategies to Eliminate Shoulder Strain
The Bottom-Up Packing Method
Pain-free packing starts with creating a stable foundation. Place your sleeping system and clothing in a vertical column along the pack’s spine, forming a firm core that prevents the pack from collapsing inward. This central pillar maintains the pack’s shape and keeps the center of gravity close to your back. Next, nest your shelter around this core rather than at the bottom, which creates a more balanced weight distribution. The goal is to build a structure within the pack that mimics your spine’s natural curves, allowing the frameless design to wrap around your back rather than bulging away from it.
Weight Zones: Where to Place Heavy Items
In frameless packs, the heaviest items belong in the middle third of the pack, directly behind your shoulder blades, not at the bottom. This positions the load’s center of gravity at your body’s natural pivot point, minimizing the lever arm that pulls on your shoulders. Water bottles should ride high and close to your spine in side pockets, not low on the pack’s perimeter. Food bags work best directly behind the shoulder straps, creating a counterbalance that reduces forward lean. Never place dense items in the top lid or exterior pockets—these create a pendulum effect that magnifies shoulder stress with every step.
Compression Techniques for Stability
Loose loads are painful loads. Use every compression strap to create a unitary mass that moves as one with your body. The key is horizontal compression first, cinching side straps to bring the load inward, then vertical compression to eliminate dead space. Many 2026 packs feature dynamic compression systems that automatically adjust tension as the pack empties, maintaining consistent load distribution throughout your trip. For ultra-stable carries, consider using pack liner bags that you can inflate slightly to fill voids, preventing gear from shifting and creating pressure points on your shoulders.
Training Your Body for Frameless Backpacking
Strengthening Exercises for Shoulder Health
A frameless pack can’t do all the work—your shoulders need preparation. Focus on scapular stabilizers: perform wall slides with resistance bands to strengthen serratus anterior, which prevents winging and distributes strap pressure. Face pulls with external rotation target the posterior rotator cuff, building resilience against strap-induced internal rotation. Farmer’s carries with kettlebells, holding the weight by your sides rather than in front, directly mimic frameless pack loading and build the lower trapezius muscles that support pain-free carrying. Start these exercises 8-12 weeks before any major trip, progressing from 3 sets of 10 to 4 sets of 15.
Posture Correction Techniques
The forward-leaning “hiker’s hunch” is a primary shoulder pain generator. Train yourself to hike with a neutral spine by practicing the “string pull” visualization: imagine a string pulling your head toward the sky, lengthening your neck and stacking your vertebrae. Use trekking poles set slightly longer than usual to encourage an upright torso, which positions the frameless pack correctly on your shoulders. During breaks, perform doorway pec stretches to counteract strap-induced internal rotation, and chin tucks to reset cervical alignment. These micro-corrections throughout the day prevent the cumulative tissue stress that leads to chronic pain.
Gradual Load Adaptation Protocols
Never transition directly from a framed pack to a full-load frameless carry. Follow a progressive adaptation: Week 1-2, carry your frameless pack with 10 pounds on daily walks, focusing on strap adjustment and posture. Week 3-4, increase to 15 pounds and introduce varied terrain. Week 5-6, reach your target weight but do only half-days. This gradual approach allows your shoulder stabilizers and postural muscles to adapt without inflammation. Pay attention to any pain that persists beyond 30 minutes after removing the pack—that’s your signal to regress the weight and focus on form.
Common Mistakes That Cause Shoulder Pain
Overloading Beyond Pack Capacity
The most frequent error is treating a frameless pack like its framed counterpart. Exceeding the optimal load range by even 3-4 pounds forces the shoulder straps to act as primary weight bearers, defeating the entire pain-prevention design. This mistake often happens when hikers pack “just in case” items or carry unnecessary water. Use a digital scale and be ruthless—every item should justify its weight. Remember, the pain threshold is lower than you think; a 28-pound load in a pack designed for 20-25 pounds will cause more shoulder damage than a 35-pound load in a properly fitted framed pack.
Incorrect Strap Adjustment
Many hikers tighten shoulder straps until they feel “secure,” creating dangerous compression. The correct adjustment is counterintuitive: position the pack high on your back, then loosen shoulder straps until you can slide two fingers between strap and skin at the clavicle. The pack should feel slightly loose until you add the sternum strap, which provides the final stabilization. Overtightened straps restrict blood flow to deltoid muscles, causing fatigue and pain within the first hour. Check strap tension every 30 minutes; as you fatigue, you unconsciously tighten them, creating a pain spiral.
Ignoring Torso Length Compatibility
A pack that’s too long positions the load’s center of gravity below your lumbar region, forcing you to lean backward and placing your shoulders in constant tension. Too short, and the pack rides high, compressing your neck and creating pressure points on your upper trapezius. The 2026 standard is torso-specific sizing with 1-inch increments, yet many hikers still round to the nearest size. Take the time to find your exact measurement, and if you fall between sizes, choose the smaller option—frameless packs naturally accommodate slight undersizing better than oversizing.
Maintenance and Care for Long-Term Comfort
Cleaning Without Damaging Support Features
The materials that make frameless packs shoulder-friendly are delicate. Never machine wash—agitation breaks down the elastomeric threads that provide active conformity. Instead, use a bathtub with lukewarm water and technical gear soap, gently massaging the fabric without scrubbing. Pay special attention to shoulder strap padding, which can harbor bacteria that degrade foam integrity. Air dry upside down, stuffing the pack with towels to maintain shape. This preserves the mechanical properties that prevent shoulder pain.
When to Retire Your Pack
A frameless pack’s pain-preventing features degrade long before visible wear appears. Foam compression in shoulder straps reduces their ability to distribute pressure after approximately 500 miles of use. Fabric stretch memory diminishes after repeated overloading, causing the pack to lose its body-conforming shape. If you notice returning shoulder pain despite proper packing and fit, it’s likely material fatigue. Most frameless packs maintain optimal pain-prevention performance for 1,500-2,000 miles before requiring strap replacement or retirement.
DIY Modifications for Better Fit
You can enhance any frameless pack’s shoulder-friendliness with strategic modifications. Add thin layers of closed-cell foam inside shoulder straps using Velcro strips, allowing you to adjust padding density. Sew on elastic loops at strap attachment points to create micro-suspension. For particularly bony shoulders, attach adhesive-backed silicone pads to the underside of straps to prevent sliding. These tweaks personalize the fit, addressing your unique pain triggers without compromising the pack’s fundamental design.
Frequently Asked Questions
Can frameless backpacks really eliminate chronic shoulder pain, or just reduce it?
When properly fitted and used within their load range, modern frameless backpacks can eliminate pain caused by pack-related mechanical stress. However, they can’t fix underlying medical conditions like arthritis or torn rotator cuffs. If pain persists after two weeks of proper use, consult a physical therapist to address non-pack-related issues.
How do I know if my shoulder pain is from my pack or poor hiking posture?
Pack-related pain typically manifests as localized tenderness where straps contact your shoulders, while postural pain radiates from the neck down the upper back. Try this test: hike without a pack for 30 minutes. If the pain diminishes significantly, your pack is the primary culprit. If it remains, focus on posture correction exercises.
What’s the maximum weight I can safely carry in a frameless pack without shoulder damage?
For most hikers, 25 pounds is the pain-prevention ceiling, though highly fit individuals with strong stabilizers can manage 30 pounds. The key is your pack’s specific design—check the manufacturer’s load-range chart for your torso size. Exceeding 30 pounds routinely will cause shoulder strain regardless of pack quality.
Are frameless packs suitable for people with previous shoulder injuries?
Often yes, but with caveats. The reduced weight and improved mobility can actually benefit those with impingement syndrome or AC joint issues. However, you’ll need to start with loads 30% lighter than you think is necessary and prioritize packs with the most advanced strap ergonomics. Consult your physician before transitioning.
How long does it take to adapt to a frameless pack after using framed packs?
Most hikers require 4-6 weeks of gradual loading to adapt their musculature and movement patterns. The mental adaptation—learning to pack differently and trust the minimalist design—takes equally long. Don’t attempt a major expedition during this transition period; build up with day hikes and overnighters first.
Do women need gender-specific frameless packs to prevent shoulder pain?
While unisex designs have improved dramatically, women-specific models address key anatomical differences: narrower shoulder width, different clavicle angles, and torso length distribution. The highest-performing pain-preventing packs for women feature asymmetric strap designs and modified torso length ranges. If you’re on the borderline of sizes, a women’s-specific model is worth considering.
Can I use a frameless pack for winter camping without destroying my shoulders?
Winter gear’s bulk and weight push the limits of frameless design, but it’s possible with careful planning. Choose a pack at the larger end of the frameless spectrum (50-55L) and keep your base weight under 15 pounds. Place heavy items like your stove fuel and water in the optimal middle zone, and consider a minimal webbing belt for loads over 25 pounds. Accept that you’ll need to make comfort compromises.
Why does my frameless pack cause shoulder pain only on uphill sections?
Uphill hiking changes your torso angle, causing the pack to shift weight forward onto your shoulders. This indicates you need to repack with heavier items closer to your spine and higher in the pack. Some 2026 models feature adjustable sternum strap rails that let you raise the stabilization point for uphill travel, preventing this forward shift.
How often should I adjust my shoulder straps during a hike?
Check strap tension every 30-45 minutes, but adjust only if you feel pressure building. As you fatigue, you unconsciously change posture, which alters how the pack sits. A quick 30-second readjustment can prevent hours of cumulative stress. Develop a ritual: when you stop for water, run a mental scan of strap pressure points.
Will using trekking poles with a frameless pack reduce shoulder pain?
Absolutely. Trekking poles reduce shoulder load by 15-20% by transferring some force through your arms to the ground. They also encourage upright posture, which positions the frameless pack optimally. Set poles 2-3 inches longer than your standard height to maximize this effect, and use straps that allow quick release to prevent overuse of arm muscles that can indirectly stress shoulders.
See Also
- Stop Shoulder Pain with the 10 Best Frameless Backpacks in 2026
- Stop Back Pain with the 10 Best Frameless Backpacks for Lightweight Trekkers
- Stop Shoulder Strain with the 10 Best Women-Specific Camping Backpacks in 2026
- Stop Back Pain with the 10 Best External Frame Backpacks for Seniors in 2026
- Stop Shoulder Pain with the 10 Best Daypacks for Petite Women in 2026